Splash well removal 1985 4 winns

Blazinmonkey

Petty Officer 2nd Class
Joined
Jul 21, 2011
Messages
101
Hello dry dock...


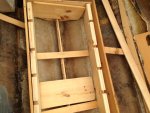
I am going to remove my splash well to access the transom wood. In the first picture I made a light pencil/cut line to cut the cap.

That line is my best guess of where to cut the cap. Considering this site is where I get/will get the bulk of my information, I thought it best to make a thread and get those with more experience their thoughts. Thank you for any input.

CUT LINE.jpgCUT LINE 2.jpgsummer 2013 212.jpgCUT LINE under.jpgblue cam 7-13 620.jpg
 

further

Lieutenant Junior Grade
Joined
Jun 18, 2009
Messages
1,031
Re: Splash well removal 1985 4 winns

I think you'd prolly wanna move that line a bit more so as to give you more room for grinding/patching etc on each side of the cut line. The line you have drawn looks like you'll be dealing with the corner there and that may pose a problem. Just my 2 cents and I'm a newbie and did the same for the first time recently. I'm sure the pros will chime in shortly. Gluck!
 

saginawbayboater

Senior Chief Petty Officer
Joined
Mar 8, 2012
Messages
677
Re: Splash well removal 1985 4 winns

I am no pro, but I would also agree with further to move your cut out away from the corner!! A straight run would be easier and stronger to patch then a corner. Looking forward to your resto..:joyous:

SBB
 

jbcurt00

Moderator
Staff member
Joined
Oct 25, 2011
Messages
24,869
Re: Splash well removal 1985 4 winns

W/ an upside down U shape, the gunwale should be plenty strong enough after the repair, so locating it close to the corner only complicates how much work it'll be to fill & fair smooth.

Moving the cut 18" to 2ft forward will make it easier to work on the tabbing that will need to be wrapped out onto the hull sides too.
 

Woodonglass

Supreme Mariner
Joined
Dec 29, 2009
Messages
25,924
Re: Splash well removal 1985 4 winns

I'd recommend cutting it at the mid-point of the Teak Step plates. 2 Reasons. More room and when you make the repair the Steps will hide the joint and render it almost invisible.
 

Blazinmonkey

Petty Officer 2nd Class
Joined
Jul 21, 2011
Messages
101
Re: Splash well removal 1985 4 winns

splash 003.jpgsplash 002.jpgsplash 001.jpgcut line 003.jpg
I can not thank every one enough for their replies...
so glad I posted on iboats before cutting...
the end of the tape is a transition...
so my best bet is to cut around 15-16 inches? middle of teak aft screws?
thank you for your input...
 

Woodonglass

Supreme Mariner
Joined
Dec 29, 2009
Messages
25,924
Re: Splash well removal 1985 4 winns

If it were me, the 16" line would be the "Mark"!!!;)
 

eboat85

Petty Officer 2nd Class
Joined
Sep 1, 2013
Messages
121
Re: Splash well removal 1985 4 winns

Is this a "New to you" boat? I am not as familiar with fiberglass on boats as I am with cars but the picture that you posted in the first set looks like you have quite a bit of sub floor damage. Most of the restos that I have seen split the hull at the rub rail to get to the bottom of the hull to repair the wood and foam.

I might be off base but just a thought.
 

Blazinmonkey

Petty Officer 2nd Class
Joined
Jul 21, 2011
Messages
101
Re: Splash well removal 1985 4 winns

wog - 16" it will be... could not think of a better person to get advice form... maybe par? lol...
truly, I am lucky & happy for anyones in put... i need it...
eboat- I got this boat in june of 1991...
I think it had sunk before I bought it... It has sunk twice since I have had it... in the slip 1994 & 1996... salt no less.... not proud about it...
so it has had some damage... the foam... original 1985 140 looper too...
 

eboat85

Petty Officer 2nd Class
Joined
Sep 1, 2013
Messages
121
Re: Splash well removal 1985 4 winns

Blazin, if these old boats could talk I am sure we would all learn a lot. I was just thinking that with all the time you are going to spend on the transom would it be much more to do it all? Then you now it's done.

There are others on the dry dock that can tell you how involved that would be.
 

Blazinmonkey

Petty Officer 2nd Class
Joined
Jul 21, 2011
Messages
101
Re: Splash well removal 1985 4 winns

transom cap 015.jpgtransom cap 017.jpgtransom cap 024.jpg

I want to thank every one for their input. I see what every one was telling me about the cut location...
 

Blazinmonkey

Petty Officer 2nd Class
Joined
Jul 21, 2011
Messages
101
Re: Splash well removal 1985 4 winns

transom cap 023.jpgtransom cap 022.jpgtransom cap 028.jpg
you think I could pour some glue or thin some epoxy to pour in?
 

Woodonglass

Supreme Mariner
Joined
Dec 29, 2009
Messages
25,924
Re: Splash well removal 1985 4 winns

Nice work!! Make a template out of cardboard or heavy paper and look for some Arauco Brand 3/4" ext. Grade Plywood to make the new transom. Have you ordered your Resin and Glass yet?
 

Blazinmonkey

Petty Officer 2nd Class
Joined
Jul 21, 2011
Messages
101
Re: Splash well removal 1985 4 winns

photo 1.jpgtransom removed 005.jpgtransom removed 023.jpgtransom removed 034.jpgtransom removed 040.jpg
I went to my local lumber yard bought 2 sheets of 3/4 AC plywood or G1 ext. as they called it
The pic of the wood with out the clamps is the first ply alone... with the clamps both pieces together... how close should the would be to the skin on the perimeter? the pic of the wood together upside down is what it looks like when pulled out... is it ok to glue this way?
thank you for your input...
 
Last edited:

Woodonglass

Supreme Mariner
Joined
Dec 29, 2009
Messages
25,924
Re: Splash well removal 1985 4 winns

The upper edge of the transom should match the fiberglass skin edge as closely as possible. Having said that, it is possible to trim it after it has been installed, but I'd recommend, laminating the two pieces together first and keeping the bottom edges together until cured and then do a dry fit and mark the upper edge and make the final cuts for it after the two pieces have been glued together. You'll then be ready to install. The fitment for the lower edge looks good. The PB will squeeze out and fill the void around the edges and you can make a nice coved fillet.
 

Blazinmonkey

Petty Officer 2nd Class
Joined
Jul 21, 2011
Messages
101
Re: Splash well removal 1985 4 winns

transom wood 009.JPGtransom wood 008.jpgtransom wood 007.jpgtransom wood 002.jpgtransom wood 001.jpg

so I took 15 min to layout the screw locations 2" from the edge every 4" then 6" on the inside... the one picture shows why you should pre-drill... I hope to glue in the morning... mark & trim the top after the glue tries...
thank you again for the direction...
 

Blazinmonkey

Petty Officer 2nd Class
Joined
Jul 21, 2011
Messages
101
how to assemble?

so I have all the would cut and fit. I am putting all the wood back as I found it in when I did the demo.
I still have to grind out the shell of the spine as you can see in the pics. I left it in as a template to fit every thing.
then wash the inside down with acetone.
how should I assemble this?
1) transom first?
2) do I cover all sides of the transom wood with resin and cloth let dry then install or coat the back side and edges with just resin and peanut butter the boat skin and clamp all at one time? then go back over with the cloth.
3) install the 2 main stringers next or spine? then the 2 smaller stringers.
4) again do I cover all sides of the wood with resin and cloth let dry then install or coat the bottom edges with just resin and peanut butter them boat skin?
5) bulk heads- same question do I cover all sides of the wood with resin and cloth let dry then install or coat the bottom edges with just resin and peanut butter them boat skin and then wet out & tab to stringers?
6) the sides for the gas tank supports same question. wrap in cloth and resin or resin one side and clamp to stringer with PB -the cross supports are removable so I should just resin and cloth them?
7) the bilge area has two small supports I would do them the same as the stringers? then add the horizontal pieces, should they
be covered in resin then wrapped in cloth and then installed while still wet?
8) after all that is in then add the foam.
9) deck should just resin and cloth them let dry then install and tab to the boat skin?

the wood has been drying for a year now.


I will go by WOG tabbing/layup diagram & I will use WOG material list. should I get 15 or 20 Gallons 435 Polyester Resin to start?

Thank you for any help.
 

Blazinmonkey

Petty Officer 2nd Class
Joined
Jul 21, 2011
Messages
101
No Title
 

Attachments

  • photo204390.JPG
    photo204390.JPG
    138 KB · Views: 1
  • photo204391.JPG
    photo204391.JPG
    137.7 KB · Views: 1

Blazinmonkey

Petty Officer 2nd Class
Joined
Jul 21, 2011
Messages
101
No Title

pics
 

Attachments

  • photo 3.JPG
    photo 3.JPG
    138 KB · Views: 0
  • photo 4.JPG
    photo 4.JPG
    137.7 KB · Views: 0
Top