72 Thunderbird Formula w/twin 165hp Mercs

Mark72233

Ensign
Joined
Jul 11, 2014
Messages
926
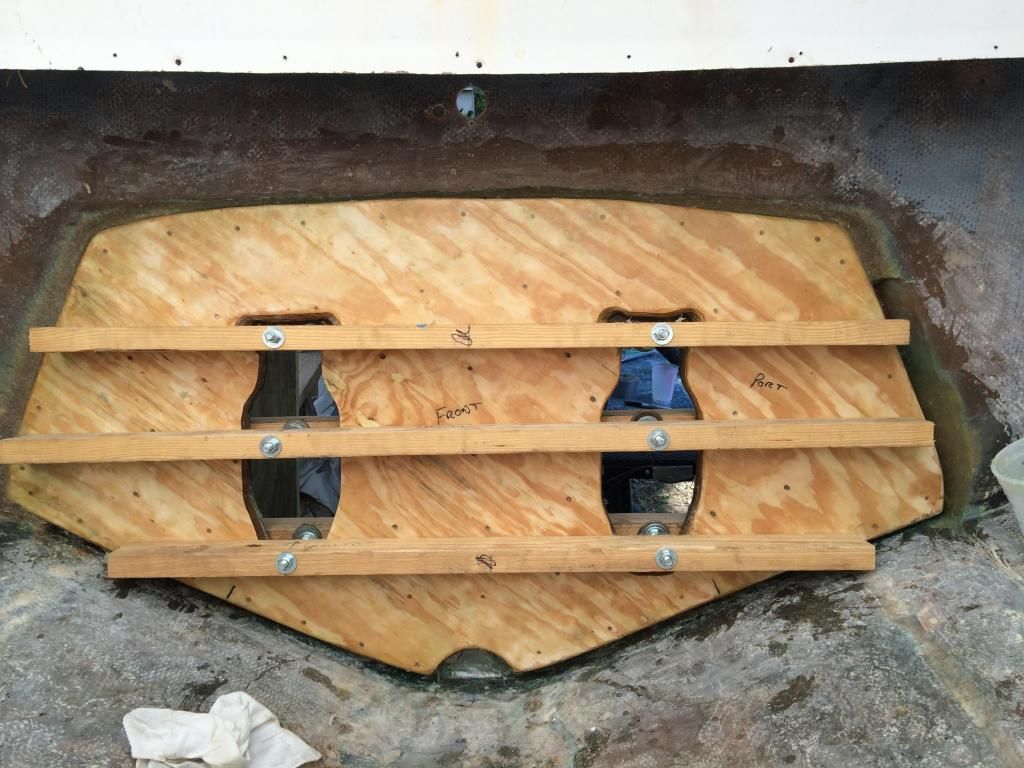
Sunday I was finally able to start putting things back into the boat. :clap2: Cut and dry fitted my clamps and transom. Mixed a thick batch of hairy peanut butter first and filled in the holes I made while grinding, yes holes I did it 3 times:facepalm::laugh:. The hairy PB I made with 500ml of resin, a small cup of hand torn CSM, 30ml of the 1/4" chop strand, 750ml of Cabisol for thickener and 1% on the hardener. The 1% was a little slow to kick but this was at night and about 75*. Then I mixed 2 batches of PB ahead of time leaving out the hardener and about 25% of the Cabisol. This let me add the hardener to the first batch and still be able to mix it before I added the rest of the thickener (Cabisol). With the second bucket already mostly mixed it made transitioning to the second batch easy and quick. The batches were 1500ml of resin, 120ml of 1/4" chop strand, 1750ml of Cabisol and 1.5% on the hardener. It was about 88* Sunday and it gave me plenty of time to work with it.


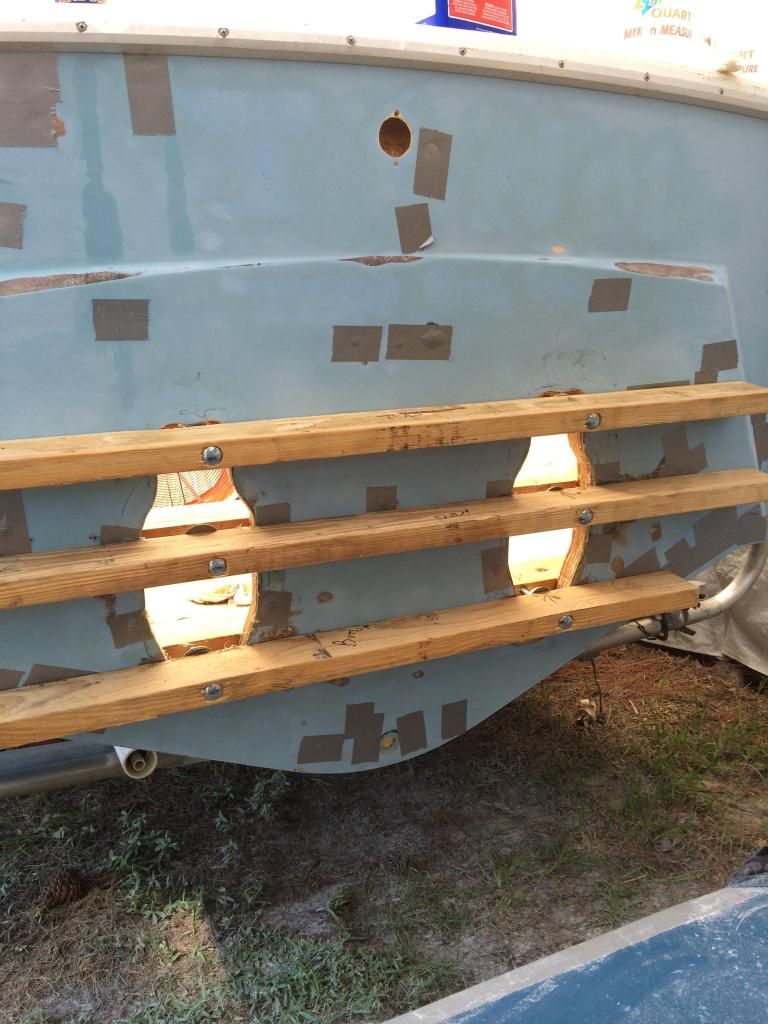
The duct tape is covering all the holes made over the past 42 years from 2 sets of trim tabs, 3 different bottom machines and speedos, 2 swim ladders and a swim platform.
 

Mark72233

Ensign
Joined
Jul 11, 2014
Messages
926
After the transom was solidly in place I mixed up more PB and started filling in the gap around the plywood part of the transom and the fiberglass part. Some of these spots are over an 1 1/2" deep and I learned real quick what exothermic reaction means (chemical reaction that releases energy in the form of light or heat) with fiberglass it is heat and a lot of it. I started making smaller batches and putting it on with thinner layers.
 

nurseman

Lieutenant Junior Grade
Joined
Jun 2, 2013
Messages
1,045
Awesome progress!!! Very nice work on your transom and stringers. :yo: She looks like she is going to be nice and beefy when you're done.
 

WOEISMEIGOTTA470

Petty Officer 1st Class
Joined
Aug 31, 2012
Messages
375
killer job on that transom! Good work, very methodical seems you're following everyone's advice to the "T" and it's paying off nicely! Looking forward to the next episode!
couch2.gif
:pop2:
 

Mark72233

Ensign
Joined
Jul 11, 2014
Messages
926
NM, WOG and Woe, thanks for the encouragement on my project. Like I said I wouldn't and couldn't have done what I have done so far without the knowledge and confidence I have gotten from everyone doing projects on iboats. I am subscribed to about 70 different restorations on here. I am addicted to the iboats forum which should be called weBoats. I will be looking for advise as I get the first stringers in. I want to make sure what I have planned will be strong enough.
 

Jared9220

Seaman
Joined
Dec 29, 2010
Messages
59
Hey mark very nice work so far. I just read through your whole thread and I'm going to be following along from now on if you don't mind. I'm almost done with grinding so I'll be almost at the same stage you are and asking the same questions very soon. Keep up the good work.
 

Mark72233

Ensign
Joined
Jul 11, 2014
Messages
926
Thanks Jared, and slow down on yours because your making some of us look like slugs:sleeping: Just kidding you are flying :plane: on your boat keep it up.
 

Mark72233

Ensign
Joined
Jul 11, 2014
Messages
926
This weekend I covered my transom wood in fiberglass. First I PB the entire perimeter some it was either a flat transition or a nice angled transition to the hull. I then vacuumed and cleaned everything with Acetone refolding my rag and changing out to a fresh rag to make sure I had as little contamination as possible. I then wetted out the wood and laid a sheet of CSM with about 3" over lap. It turned out nice and was so easy I decided to slap on the second layer which was the 1708 over lapped another 3". I should have stopped there but of course now that I am a fiberglass expert (two layers successfully applied made me think that). So I grabbed the third and final layer which was the second layer of 1708 which was another 3" or so over lap. It was a pretty big piece about 50" high by 72" wide. That 1708 is heavy stuff. After a lot of fighting it and one big mess I finally won the battle and got it all wetted out with no bubbles or dry spots. In a few spots I got a little carried away with the resin.


Now onto putting a couple of stringer in.
 

Woodonglass

Supreme Mariner
Joined
Dec 29, 2009
Messages
25,924
Sooo, how far out onto the sides and bottom of the hull did you extend the 1708? Hopefully 6-8"!! The rest of it looks good and by doing it one layer right after the other you'll get a lot better bonding action.
 

Mark72233

Ensign
Joined
Jul 11, 2014
Messages
926
1st layer about 3-4" past the wood and onto the top,sides and bottom. Next 2 layers of 1708 went about 6" and 9". So it's attached very well to the hull all the way around. Just like I was instructed by that Woodglass guy. :)
 

Mark72233

Ensign
Joined
Jul 11, 2014
Messages
926
Thanks NM. It sure wasn't a 1st class job as I was doing it. No one ever shows or talks about that. Ripped gloves, resin spilt every where, my shoes sticking to the hull because it was starting to kick, bubbles, ripples, air pockets and me sweating like a pig trying to fix it all before it hardens. What a mess. Only after a lot of luck did it come out like it did. Then I cleaned up my mess and took some pics. Like the magic of Hollywood, no one gets to see behind the scenes or whats behind the curtain :)
 

nurseman

Lieutenant Junior Grade
Joined
Jun 2, 2013
Messages
1,045
I can totally relate! The end result is the only thing that matters!
 

Woodonglass

Supreme Mariner
Joined
Dec 29, 2009
Messages
25,924
Shhhh, you're not supposed to tell all that. The NEWB's are listening!!! You'll scare em all off and they'll go looking to buy one of them Tin Can Boats!!!!:D:bounce::nono::lalala:

Who is that No It All guy??? Oh well sure glad to hear you got those big ole' tabbings in there. She'll be a TANK for sure now!!!!:rockon:
 
Last edited:

hadaveha

Petty Officer 1st Class
Joined
Mar 17, 2009
Messages
389
I cant wait to check your progress daily what a cool boat
 

Mark72233

Ensign
Joined
Jul 11, 2014
Messages
926
Ok so I finally put the first two stringers in with PB and tabbed them with CSM about 4-5" up the stringer and down onto the hull. I PB the rear of the stringer to the transom and laid a layer of CSM so far to attach it to the transom. On the front side where the new stringer joins the old I had about a 6" over lap of 1/2 ply and I PB them together and put about 10 SS screws before covering it with a layer of CSM.


After that dried and jumped in and tried putting down the 2 layers of 1708 with each over lapping the next by about 2-3" but that was tough going and I ended up with what I guess are dry spots in the cloth.


Do I need to grind all these spots out and fix them or are they plenty strong and will be just fine hidden by the deck.
 

Woodonglass

Supreme Mariner
Joined
Dec 29, 2009
Messages
25,924
Hmmm, That's interesting. Any chance that the 1708 fabric could have been contaminated somehow. It's kinda unusual for it to be that hard to lay it down on the flat like that and get air or dry spots like that. It almost looks like contamination is causing the fabric to "repel" the resin. You for sure need to grind it out and try again. Roll out some resin first and then apply the fabric and then roll on some more. Do you have a bubble buster roller? If so, use it to ensure the resin on the bottom comes up from below to penetrate the fabric. If this happens again I'm suspecting the cloth might have become contaminated with something.
 
Top