1988 Imperial V220 low budget

jc55

Senior Chief Petty Officer
Joined
Nov 3, 2006
Messages
665
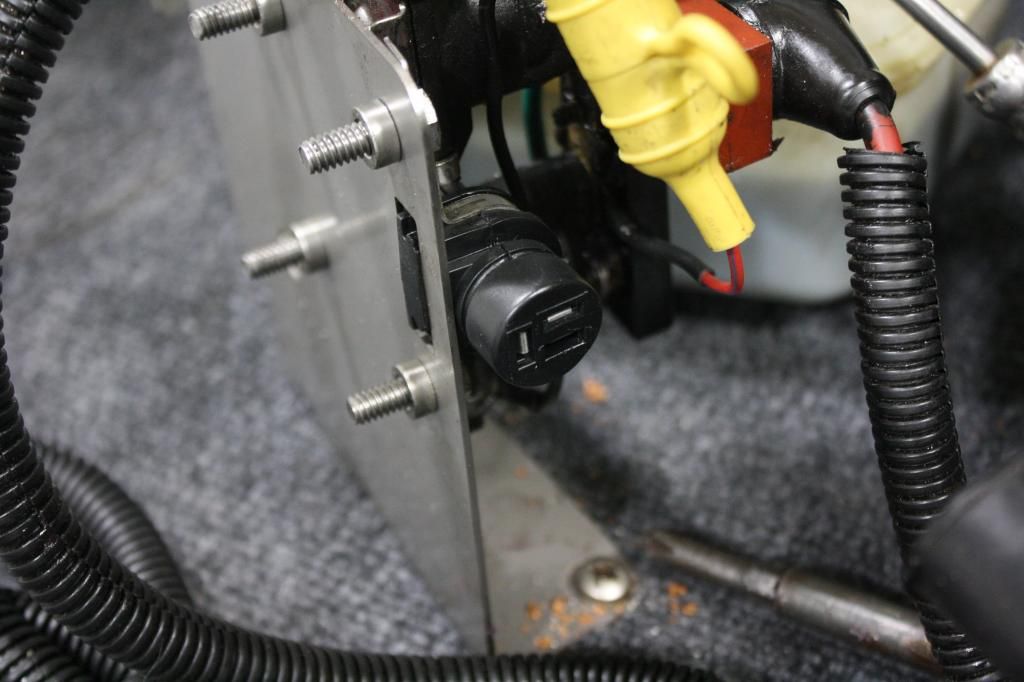
That makes sense All Dodge because Ja's purple/red wire is the 12v feed which would control all the other functions. The "trailer" switch should move the drive all the way up, (blue/white wire out of binnacle to blue/white wire[bypassing trim limit switch on drive]).

The "trim" switch on the binnacle will move the drive up until the trim limit switch (purple/white wire through limit switch to blue/white) drops out.

Could these wires have been swapped in the past (trailer function put on the trim switch) because the limit switch quit working or was out of adjustment and they wanted to keep drive movement on the binnacle's "trim" switch?
 

JaCrispy

Petty Officer 1st Class
Joined
Jul 8, 2014
Messages
391
Thanks for the harness info but "Yikes!" ...lol. I bought one of those new-to-old adapters to cut up and a new fuse holder to make my own.
 

JaCrispy

Petty Officer 1st Class
Joined
Jul 8, 2014
Messages
391
My trim pump fuse holder was shot and the female plug (pump mounted) had corrosion. So here's what I came up with using the adapter. You can buy the adapter and fuse holder for under $20.

IMG_6881.jpg


Original harness on right (temp fuse holder), adapter on left.
IMG_6883.jpg


Same plug
IMG_6884.jpg


Match the wires
IMG_6886.jpg


Finished
IMG_6888.jpg
 

JaCrispy

Petty Officer 1st Class
Joined
Jul 8, 2014
Messages
391
Finally back working on the boat. Had an employee of 18 years have a heart attack and pass on the job. Needless to say I was in a funk for a while. Trying to turn the corner with everything at this point.

Anyway, got the back portion of the top cap back on. Put a thick layer of sealer where the cap meets the hull since I was getting some water in there. The wedges in the top of the gunwale are to keep the width of the blade I used to cut it off. I made up some PB and pushed it into the gap, then applied a few layers of csm. Just going to keep building it up.

I also have all my material for new cushions. Will have some pics of that later.

IMG_6904.jpg


IMG_6906.jpg


IMG_6905.jpg
 

jc55

Senior Chief Petty Officer
Joined
Nov 3, 2006
Messages
665
Nice lines on that boat. Reminds me of my last Baja. See, you were worried about this part...you've got this! Sorry to hear about your co worker.
 

JaCrispy

Petty Officer 1st Class
Joined
Jul 8, 2014
Messages
391
Thanks alot.

Quick question, do I need to grind between CSM layers? IIRC you do with epoxy but I'm using polyester resin.
 

Woodonglass

Supreme Mariner
Joined
Dec 29, 2009
Messages
25,924
No grinding required as long as contaminates don't get on the previous layers, and it's still tacky.
 

JaCrispy

Petty Officer 1st Class
Joined
Jul 8, 2014
Messages
391
Thanks, the glassing has been going great so far!

Here's my new sun deck! After some frustrations with my Moms old 1970's Singer she let me borrow her new machine, worked awesome! The corners are a bit of a pain in the butt, you just have to let it know who's the boss. haha

IMG_6907.jpg


IMG_6908.jpg


My ghetto setup. I'm going to try to build a temporary sewing table, it really helps on those last few passes holding all that vinyl.

IMG_6909.jpg
 

JaCrispy

Petty Officer 1st Class
Joined
Jul 8, 2014
Messages
391
Thanks!

So I'm re configuring the rear bench seat. It will basically be two cushions similar to the pic below but I need to design some arm rests that hopefully tie in with the side cushions on the gunwales. I'm going to try to incorporate some cup holders in them as well. One of the things I'm fighting now is after sewing up the stripes there's a 1/2" excess flap underneath. I wish I had some sort of glue to keep them flat when I staple the covers on. For the sundeck I had the cushion upside down and slid in a yard stick to fold them where I want them placed. I tried ironing on some scrap pieces but it just wasn't working out.

Progress on the seat bottom. I have to build this one first then I can measure for the seat back and have it meet the sun deck height......hopefully. lol

IMG_6911.jpg
 

Corjen1

Lieutenant Junior Grade
Joined
Aug 24, 2013
Messages
1,237
You can trim the selvage off...Ive started using only 3/8, sometimes even 1/4 seam allowance. If you are nervous about trimming it off, you could use some double side tape or basting tape to hold it in place
 

JaCrispy

Petty Officer 1st Class
Joined
Jul 8, 2014
Messages
391
Thanks! Alldodge, if you need vinyl on that Chrysler boat I'll do it for free just to drive it once. haha I'm a Mopar nut too.

Corjen1, thanks for the info. I was just duplicating the original covers. Pretty much everything I saw had 1/2 or so of 'selvage' (learned something new :)) so I left it like that. You actually see the line from the selvage on the surface which IMO actually looks kinda cool. One thing I can't do is top stitch the side panels like the originals. The machine I'm using will go through 3 layers of the material like butter, but the big, bulbous end of the machine to the left of the needle makes it real difficult to do turns for corners. I've seen some other machines where the needle is positioned as far left as possible, that's what I need.
 

Woodonglass

Supreme Mariner
Joined
Dec 29, 2009
Messages
25,924
Uhmm, You can use plain ole' 2" masking tape to tape the selvage flat on the back of your panel. Once installed it will not be seen and won't "Bleed" thru. As Corjen stated Trimming it off leaving a 1/8" border works too, and is what most people do or again as corjen states use a smaller seam allowance. You are using the maximum 6 spi stitch length correct??
 
Last edited:

JaCrispy

Petty Officer 1st Class
Joined
Jul 8, 2014
Messages
391
You are using the maximum 6 spi stitch length correct??

I set it to 4mm, which going by a chart converts to roughly 6spi. I initially ran a few samples and matched them up with the original stitching.
 

Woodonglass

Supreme Mariner
Joined
Dec 29, 2009
Messages
25,924
If that's the longest stitch the machine will stitch then that's what I'd recommend to use.
 

JaCrispy

Petty Officer 1st Class
Joined
Jul 8, 2014
Messages
391
Was able to get some more work done. Made up the back of the back seat and after looking through some photos of back seats decided to scrap the armrest idea and just lengthen the side cushions. Should have my vinyl on Monday.

IMG_6915.jpg


IMG_6916.jpg


IMG_6917.jpg
 
Top