hit pier and got a nice big crack in hull

halltrail

Seaman Apprentice
Joined
May 8, 2014
Messages
35
Hello all, I posted this up on another forum and the group there was great at helping me diagnose the situation and try and calm me down lol.. I may need some further help in doing a fiberglass repair on a major hull crack. Ive been trying to search and find a how to thread...but I think im still so upset that I cant think straight...having a hard time finding what I need. I do have insurance and could go that route. But I know around here it would be in the shop for weeks. So im looking for some help on how to fix the boat. Last night, I did a flashlight test to see if the crack was all the way through and it was not. I didnt see any light from the inside. I can post more pics if needed. This am, I am going to stop by my grady dealer/marina and get their opinion too.

Below is the story about what happened and pics of the crack:

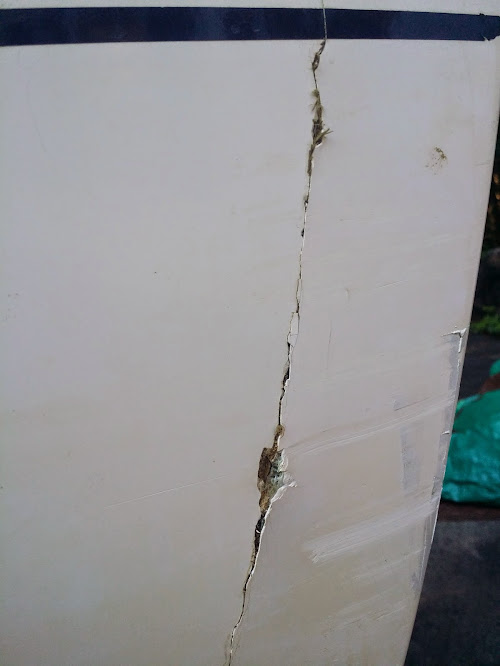
Ok, long story short, rescued two paddle boarders on river today....who got caught in heavy current and wind. They hailed me down and had no life preservers. I picked them up and returned them to the fishing pier they launched from (this is not a boat launch pier) i got them as close as I could and while the were trying to get out of the boat the wind and current pushed me towards the pier much faster than I anticipated. the girls safety was my first concern and really didnt have time to do anything but try and lessen the impact by reaching out to the pier pylon to slow the boat down....still hit pretty hard. The port side hull 4 inches from the stern hit. I have an 10 inch vertical crack in the fiberglass. Not all the way through; however, I do see a small hair line crack on the inside corner above the external crack. No water was coming in.


Ok im so upset, i can barely think. It is an 1985 seafarer...but Ive spent a lot of time getting her on the water. Been great for 4 weeks. Caught my first rockfish last week. Ill post a few pictures. I guess im looking for thoughts on this.....is the boat done...is it repairable, is it worth repairing...have it checked? Anyone dealt with this before?

and fellas, I know i made some mistakes like not staying away far enough away from the freaking pier...and maybe I should have just taken them to a ramp....New boater here...and i just learned a few hard lessons.

20140704_180951+%25281%2529.jpg

20140704_181118.jpg
 

Rickmerrill

Senior Chief Petty Officer
Joined
Mar 13, 2014
Messages
686
Halltrail welcome to the dry dock! You were being a Good Samaritan so no need to beat yourself up - stuff happens to us all. Like Woodonglass here is fond of saying "the good thing about fiberglass is it can always be fixed" so don't worry about that.

Just to give you a quick idea of what it will take (or how I'd do it anyway), so you can decide if you want to go the insurance route or fix it yourself... Assume you'll need an angle grinder, tyvek suit, gloves and a respirator and a few hundred $ worth of resin, hardener, CSM, 1708, and all the misc stuff for mixing/measuring/applying. This is a structural repair (as opposed to cosmetic) so your going to grind a tapered repair area inside and outside around it at 12 times the thickness of the hull or at least 3 inches. So you'll need access from the inside. In the cracked area there is going to be fractured glass so it's gotta go. Then you'd put a backer (like styrofoam with waxed paper so it doesn't stick) and tape it to the hull. Apply a layer if CSM, once it tacks up remove backer and work both sides so you end up with 2 layers of CSM and two layers of 1708 on each side. Then do a little filling/faring of the patch area and color match and apply gelcoat and sand and polish until your satisfied with the finish.

It would help to see a view from the inside. I see some cracks at the stern that might end being a second area that needs the same. Read some of the restoration threads to get a better feel for what you'd be getting yourself into. I've attached a link to a guy that did some good videos on fiberglass and gelcoat repairs. Others I'm sure will chime in with more help and info. Good luck.

Note: I'm no expert - you've been warned.
 
Last edited:

sphelps

Supreme Mariner
Joined
Nov 16, 2011
Messages
11,435
So sorry this happened halltrail . And while just doing a good deed .. This should be very repairable .. Can you get good access to the inside of the hull at that point . You will probably never match the original gell color but with buffing you could get it close . Gunna need to grind the gell back around the hole all the way back to good glass . I would guess, and hopefully some of the other guys will chime in, grind back at least 8 or 10 inches around the crack to taper the glass to allow for a good layup of new glass .. Probably would need a few layers on the inside of the hull also ..
You could always let the insurance take care of it but you know how that goes . They may jack your rates up eventually ..
Good luck !
 

halltrail

Seaman Apprentice
Joined
May 8, 2014
Messages
35
Ok, thanks to both of you...You have given me a great starting point. Ill check out the videos and and keep you all updated on what is happening.
 

Woodonglass

Supreme Mariner
Joined
Dec 29, 2009
Messages
25,924
I'm gunna hold off on advice and ask for pics of the inside if you can provide those. Access to the damage from the inside will be critical to making this repair correctly and effectively.
 

jigngrub

Fleet Admiral
Joined
Mar 19, 2011
Messages
8,155
That's a bad place for such a wound, that close to the transom will make it a harder fix. It would've actually been an easier fix if the damage had occurred mid-ship.

I agree with the above stated prep work of grinding out the damage... but if that was my boat I'd go bigger and heavier on the patch because of the location of the damage.

I'd start with a 12" wide piece of 1708 centered over the crack and lapping 6" above and below the top and bottom of the crack. Any excess on the short side (transom) would be wrapped around to the back of the transom.

The next piece would be an 18" wide piece lapping 3" over the first piece all the way around and wrapping around the transom too.

The last piece would be a 24" wide piece again lapping 3" over the second piece and wrapping around the back of the transom.

I'd do these layups on the inside and outside.


It'll take quite a bit of fairing compound to smooth everything out on the outside of the boat, but there's not much else you can do.

As far as paint/gel coat, anything you do will be noticeable with the current chalky/oxidized exterior finish on your boat. If you want a good match you'll have to rub your boat out first and then try to match what you have.
 

sphelps

Supreme Mariner
Joined
Nov 16, 2011
Messages
11,435
^^^^ That sounds like a good strong layup .. ^^^^ I guess with where the damage is located the more new glass over lapping on the old is always a good call ..
 

Woodonglass

Supreme Mariner
Joined
Dec 29, 2009
Messages
25,924
This damage is in an awkward and critical location. In order for you to DIY the repair you need to prepare the area properly and use the proper material. It's a lot more complicated than just throwing some 1708 over it. If done properly you can make it look nice and it will be almost invisible when finished if you take your time and work carefully.
 

GT1000000

Rear Admiral
Joined
Jul 13, 2011
Messages
4,916
Before I chime in, I have a question of how the damage occurred...?

Thanks.
 

jigngrub

Fleet Admiral
Joined
Mar 19, 2011
Messages
8,155
This damage is in an awkward and critical location. In order for you to DIY the repair you need to prepare the area properly and use the proper material. It's a lot more complicated than just throwing some 1708 over it. If done properly you can make it look nice and it will be almost invisible when finished if you take your time and work carefully.

I thought you were going to hold off on any advice until you saw pics of the inside?
 

halltrail

Seaman Apprentice
Joined
May 8, 2014
Messages
35
Before I chime in, I have a question of how the damage occurred...?

Thanks.

GT, like B...but not at an angle we hit almost parallel to the pier. All the impact was on the back there. I still need to get pics of the inside...but there isnt any noticable damage on the inside except a small hair line crack in the corner up higher than the exterior crack. I do have a pic of that. The back wall in the photo is the transom and the bright white is the camera flash.

20140704_195125.jpg
 
Last edited:

sheboyganjohn

Senior Chief Petty Officer
Joined
Aug 2, 2005
Messages
753
I will let some of the pro's explain the exact way to do the repair, but I will try and explain the concept. The edge of the break needs to be tapered outwards after you get it ground back to good glass. You want a long sloping surface from the gelcoat going in to the inner hull. When you build back up you will be placing a small piece in first to fill the first layer of missing glass (inner hull layer) You then keep adding the additional layers slightly wider each time to build up each subsequent layer until you get the hull flush with the gelcoat again. Think of a rubber stopper. If it is the same size as the hole it will just fall in, if it is larger it just lays on the top. The tapered edge of the stopper wedges into the hole, and if the hole is tapered it holds in even better. There are many more structural elements to this, but you should have the basic idea.
 

GT1000000

Rear Admiral
Joined
Jul 13, 2011
Messages
4,916
GT, like B...but not at an angle we hit almost parallel to the pier. All the impact was on the back there. I still need to get pics of the inside...but there isnt any noticable damage on the inside except a small hair line crack in the corner up higher than the exterior crack. I do have a pic of that. The back wall in the photo is the transom and the bright white is the camera flash.

20140704_195125.jpg

OK, that's good, if you can call any damage to a hull, good?
The reason being that this type of damage is concurrent with NON-structural damage...meaning it is similar to denting the fender on a car as opposed to bending the frame...
The repair will require good access to the interior, but can be effectively taken care of with minimal effect to the boat...
As has been mentioned, the cosmetic appearance may be difficult to get 100%, but the structural aspect should be easy peasy...
Here is a sketch of the type of repair you need to make, both to the inside and the outside...


Best of luck,
GT1M
 

sphelps

Supreme Mariner
Joined
Nov 16, 2011
Messages
11,435
:confused:I thought the pieces of glass were supposed to go from smallest first to largest ...
 

Woodonglass

Supreme Mariner
Joined
Dec 29, 2009
Messages
25,924
If you look at Gus's drawing that's exactly what they do. What's the distance from the Transom to the Crack? Whats the total height of the crack?
 
Last edited:

friderday

Chief Petty Officer
Joined
Apr 1, 2012
Messages
463
I've seen this video before about 2 yrs ago. The first red flag I noticed too, Sam, was they went from bigger piece of csm to smaller. I always thought we were supposed to go from smaller to bigger as we lay. These guys definitely know their stuff, but I'm confused too.
 

Woodonglass

Supreme Mariner
Joined
Dec 29, 2009
Messages
25,924
Ok, I see what everyone's talking about now. Yup, I agree...The video show's the layup backwards, IMHO. It should be exactly the way Gus's drawing depicts it.
 

sphelps

Supreme Mariner
Joined
Nov 16, 2011
Messages
11,435
Yep I was referring to the video .. But for as small a patch that was on the vid I would think it would be ok for such a non-structural hole .
 
Top