DECK, AND STRINGERS, AND TRANSOM? OH MY!

Daniel1947

Petty Officer 1st Class
Joined
Sep 22, 2010
Messages
267
DUH!!! :embarassed: I guess it is true what they say about "short term" memory and not sure what is said about long term. Sorry about the last 2 posts to my thread, it seems that Woodonglass and I had already answered the question earlier when discussing the transom. :facepalm: Maybe I should have re-read my thread before I posted an additional question. Sorry to have wasted anyone's time, but will update more as I go.
 

Daniel1947

Petty Officer 1st Class
Joined
Sep 22, 2010
Messages
267
Stringer height....I have measured the tentative height for my stringers. I laid a straight edge from port to starboard and measured along the line fore and aft where the main stringers will be. For the most part the height is consistent at 4" and it does taper down slightly towards the bow. If I cut the stringers at a height of 4", bed them in approximately 1/4" of PB, then tab and lay a couple of layers of cloth over the top, I am sure the final height would be higher. I am thinking that if I remove an additional 3/8" of an inch from the height this will be enough, or should I remove an additional 1/2"? I would like to keep the deck from sagging too much in the center, but I definitely don't think I want it higher. Any thoughts? As always...thanks for everyone's input.
 

GT1000000

Rear Admiral
Joined
Jul 13, 2011
Messages
4,916
First off, you can never ask enough questions when it comes to this crazy bizness of boat restoration...I totally agree and back up woody's suggestions 99.9% of the time, but sometimes there are other ways to accomplish the same things...it just takes a bit of time to get around to posting the answers...
As for the reconstruction of the transom, I would basically stick with the way it was originally done, except I would take it to the iboats level and PB it in solid to the outer skin of the hull in the center and all along the "floating" edges, then fill the empty spaces with foam...tab everything in nice and solid, then lay on a layer or two of 1708 to lock it all in...
With the cross brace and knee stringers properly done up, it will be battleship strong!
As for the deck height, I have come to learn that most old boats are built to the "Good Enough" scale...nothing is ever precisely the same measurement from one side to the other, front to back, or top to bottom...I have seen discrepancies as much as 1 inch from one to another...
Obviously we are blessed with ADD, OCD and a host of other disorders that force us to restore our boats to better than factory new condition and therefore tend to over stress and over think each and every step we take...
My humble opinion is that if you are going back to what was originally there, you can fudge things a little here and there and still end up with a much better product than original...
If you want your deck to be close to the original height, or if you want your deck to be sloped front to back, or dipped towards the middle or the edges, this is the time to decide...
The factory built them to make a profit and stuck with what was efficient and got the finished product out the door as quickly as possible...not necessarily what was absolutely best for the particular design of the boat...
Now that you have a "blank canvas" to work with, you are free to make some alterations and changes as you see fit, as long as you stay within the basic parameters of the original design...
I am a creature of thinking that sometimes I know more than the guys that originally designed certain things and I always feel like I can improve on the original, so for what its worth, do what you feel will work for you...without going too crazee!;)
Happy Camel Day!:D
 

Daniel1947

Petty Officer 1st Class
Joined
Sep 22, 2010
Messages
267
Thanks for the input GT, however I have already cut the 2 pieces for the transom. One is the full size as the original and the other is smaller as was discussed earlier. I used 3/4 marine ply and while I guess I could get another piece, I am really at a point open for further discussion. Considering the fact that the original transom was not attached to the port and starboard sides of the hull, and because of the misalignment against the aft portion of the hull, do you really think there will be a problem going forward with what I have now. The smaller section of the transom will be completely attached to the rear section. After PB'ing it to the real hull, I plan to tab and lay a full layer of 1708 top to bottom, and side to side, prior to attaching the full width piece. As you have suggested, I am going to attach the full section to the sides and bottom, PB and tabbing, and then a layer of 1708 across that section. I believe I can get additional tabbing inside the full piece and of course I will be filling the void with foam. I have also cut the stringers out of 3/4 marine ply and plan to double the mains for a full 1-1/2 width and leave the centers at just 3/4" which from what I could determine was the original size of the centers. I really put the pencil to the paper in laying out my cuts on the marine ply and while I am not afraid to spend the additional dollars for another sheet of 3/4" marine, I would rather use it to buy a fifth of Crown. LOL. But, I guess I can settle for Seagrams 7, LOL. What do you think my friend?
 

GT1000000

Rear Admiral
Joined
Jul 13, 2011
Messages
4,916
I believe your current plan sounds ROCK solid, sir!
Save your green for the Crown!:watermelon:
The only additional thing I just thought of...
On the kick backs on either side of the transom, you could, if you want, add a slab of plywood to the back walls as a solid mount for any future accessories, such as stern eyes, sounders, pitot tube, boarding ladder, etc...
 

Daniel1947

Petty Officer 1st Class
Joined
Sep 22, 2010
Messages
267
Thank you sir....I already have the pieces of ply cut for the additional supports on the kick backs and back walls. There were some there from the original manufacturer and of course as was already discussed the piece on the port side (kick back I guess it is called) was not flush with the hull and that was what caused the old transom to not be adhered to the hull completely on the port side. If I ever make it down that way, first drink of Crown is on me. I will post some photos as I move further....right now I can't mind my measurements of the original stringers length. :facepalm:
 

Daniel1947

Petty Officer 1st Class
Joined
Sep 22, 2010
Messages
267
I have most of the wood cut and am about to start joining (sandwiching) pieces for the stringers etc., I plan to use TiteBond III as has been recommended. I may have missed it in the forum...but...should I seal the plywood with a coat of poly resin, let it dry, and then join the pieces using TiteBond? Or, should I use the TiteBond first on raw wood, then seal with resin and then cloth?
 

Woodonglass

Supreme Mariner
Joined
Dec 29, 2009
Messages
25,924
Raw Wood, and use deck screws to screw em together spaced about 4" apart. Let cure over night. Remove the screw then fill all voids including the edges with PB and then coat all sides and edges with generous coat of resin. Really soak it in. When it tacks up it's ready for a layer of CSM.
 

Daniel1947

Petty Officer 1st Class
Joined
Sep 22, 2010
Messages
267
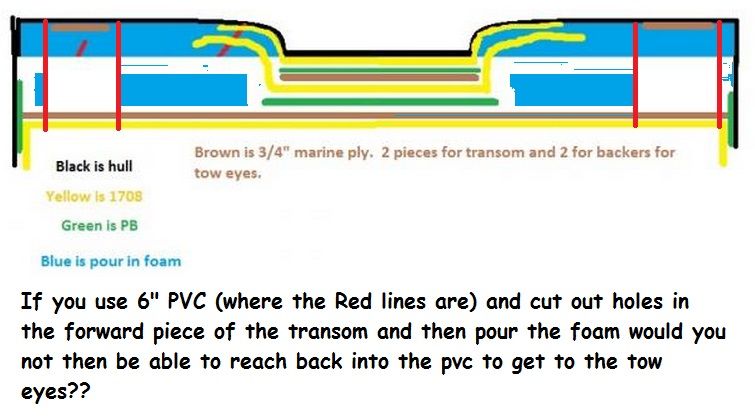
Final plan for transom. I am not an artist, but this is what I came up with using ideas Woodonglass and I discussed earlier in this thread; page 2..post 20 to 25.

As the image shows, the stern is not straight across. I plan on wrapping a layer of 1708 (YELLOW) from port to starboard along the full width of the stern. I will follow this by attaching the first piece of 3/4" marine ply (BROWN) sandwich with PB (GREEN), (I plan on drilling "weep" holes in this first piece of ply.) I then plan on wrapping a second layer of 1708 (YELLOW) over this, followed by the full width piece of 3/4" marine ply (BROWN) also attached with PB (GREEN), (also with weep holes drilled.) I will use PB (GREEN) all along the edge of the final piece of ply along the hull. I will tab it and also wrap a full layer of 1708 (YELLOW) over this. At least that is the plan right now, unless there are some good negative ideas. Any input is always appreciated. Thanks to all.
 

nurseman

Lieutenant Junior Grade
Joined
Jun 2, 2013
Messages
1,045
Looks like a good plan to me. That is one interesting transom for sure! Good luck with the install.
 

Rickmerrill

Senior Chief Petty Officer
Joined
Mar 13, 2014
Messages
686
Agree with that ^^^! The only thing that got my OCD going was are you going to have inside access to the tow hooks but that's just a nit.
 

Woodonglass

Supreme Mariner
Joined
Dec 29, 2009
Messages
25,924
Yup, and to Ricks Point about access to the Tow Eyes, you could easily cut some 6" PVC to place over the Tow Eyes and then encapsulate them in Foam. This would allow easy access to the nuts on the back of the eyes. The rest looks like we talked about and should yield a strong structure. The void between the outer skin and the forward Full Transom piece would be filled entirely with foam...Correct???
 

Daniel1947

Petty Officer 1st Class
Joined
Sep 22, 2010
Messages
267
Yes Wood, that is the plan to fill the void with foam. As to getting to the tow eyes, the truth is there is actually plenty of room to get my hands in there to tighten the nuts. BTW, I purchased some stainless steel, nylock nuts to replace the ones that came with the new eyes. They should keep from loosening over time. Thanks for the PM Nurseman on you not using CSM...I agree that coating the ply with resin, then using PB, should do the trick on sealing the ply. I was more concerned about the added thickness the CSM might add, but I think I will go with this plan since you 3 "experts" agree. LOL, thanks again men, I appreciate it.
 

Woodonglass

Supreme Mariner
Joined
Dec 29, 2009
Messages
25,924
Yeah I know you can now, but...once the foam goes in that's another story. I'm thinking the pipe will allow access, After the fact just in case you need to replace in the future for some unforseen reason. Just something to think about like Rickmerrill was saying
 

Daniel1947

Petty Officer 1st Class
Joined
Sep 22, 2010
Messages
267
I am obviously missing something here Mike and Rick. :confused: When the cap is back on the hull, there isn't any access to the area that the nuts are at. Maybe these photos will help. I actually dug out the area around the tow eyes after I removed the cap.


The cap completely covers the area, and since I am planning to replace the large foam blocks on both sides like the original, I just don't see how using the PVC will offer any access. Even the hoses connecting the bilge drains have to be attached prior to the cap being secured.


Always open for information fellows and correct me if I am missing something. :help:
 

Daniel1947

Petty Officer 1st Class
Joined
Sep 22, 2010
Messages
267
Mike, if I go back with the large block of foam like was original, and considering that the top of the cap is completely flat over the top of the area where the foam block will be, I just don't think the PVC will work. Besides, the old tow eyes, which I feel were the originals lasted longer than the wood did. The boat is a 1989 model.


I understand your drawing, and think it would be a good idea, but right now I don't see how to make it work. That part of the foam which runs along the port and starboard hulls is right in front of the eyes, which is where the PVC would need to be.
 

nurseman

Lieutenant Junior Grade
Joined
Jun 2, 2013
Messages
1,045
Although it is always nice to be able to access everything, sometimes it is more hassle than it is worth. IMO, make sure they are sealed up good with 5200, use locktite or nylon nuts, and perhaps even a pinch nut and forget about it. Unless you want to extend a PVC tube all the way through the flotation blocks, but that would be a real pita to reach through to get to the bolts. Just my two cents worth.
 

Rickmerrill

Senior Chief Petty Officer
Joined
Mar 13, 2014
Messages
686
Yeah I was mostly thinking if you had to rebed the sealant around the tow hooks but usually the stuff lasts a long time. Andy at boatworkstoday today said most of the sealants are guaranteed for 20 years but he thinks 10 years is more realistic so he recommended changing it at 7 years to be on the safe side. Like you my 20 year old tow hooks were perfectly dry and the sealant around the garboard drain was fine too but the swim ladder is bolted thru below the waterline and it let water in the core and rotted it out so now I'm just plain anal about anything that penetrates the hull or deck. Now I don't know if it was improperly sealed from the get go or if the sealant failed because one of my 280 pound friends got a bolt to move or if it had something to do with the age of the sealant but I'm going keep an eye on it and replace it if I still have the boat in 7 years.

Anyway, a lot of this stuff ain't exactly science and you have to pick and choose your battles against Mother Nature but in the end she always wins. I'm not liking that they designed that boat so the drain hoses and tow hooks are not accessible but it worked for 20 plus years, probably will again and I don't think anybody here is going to tell you it would be wrong to put it back together the way it was.
 

GT1000000

Rear Admiral
Joined
Jul 13, 2011
Messages
4,916
Picking and choosing...always something that we have to deal with...
I totally agree that going back to factory in most cases is just fine...like has been said many times before...it worked for so many years, why not copy it...
Plus, going back to original saves a ton of time over the craziness I have gotten myself into by completely redesigning my interior...
In the end, this is a labor of love we impart upon these expensive floating platforms and besides the massive amounts of fun and frivolity we enjoy while doing our restorations, it really is more fun to actually use them...:D...now if I had only followed my own advice...:facepalm:
I have come to the conclusion from looking back at some of the pics taken of my tub, shortly after separation, that unless the foam up the sides is immersed in water for extended periods of time, like the non-encapsulated foam at the bottom of most our boats...it should remain dry and viable for centuries...
And if the penetrations through the hull are well sealed and properly maintained, they too, should keep water on the outside and prevent it from entering into our wood or foam...
Part of that comes from improving, as much as possible, the mounting points for our intended hull penetrations...by making them big, thick and solid enough, properly encapsulating them and using heavy enough hardware to support their intended use and proper sealants.
As in the case of swim ladders or tie down eyes, you should strive for as solid and as large as possible a mounting point, to prevent the usual weakness that will show up when the unexpected happens, from compromising its integrity...
BTW, glad to see some forward progress and looking good, D!;)
 
Top