1979 26' Commander gas & H2O tank replacement & ?

Mikeopsycho

Senior Chief Petty Officer
Joined
Feb 6, 2014
Messages
738
I'm in the process of replacing the leaking water tank in my old 26' Commander (BC built fly bridge sedan)


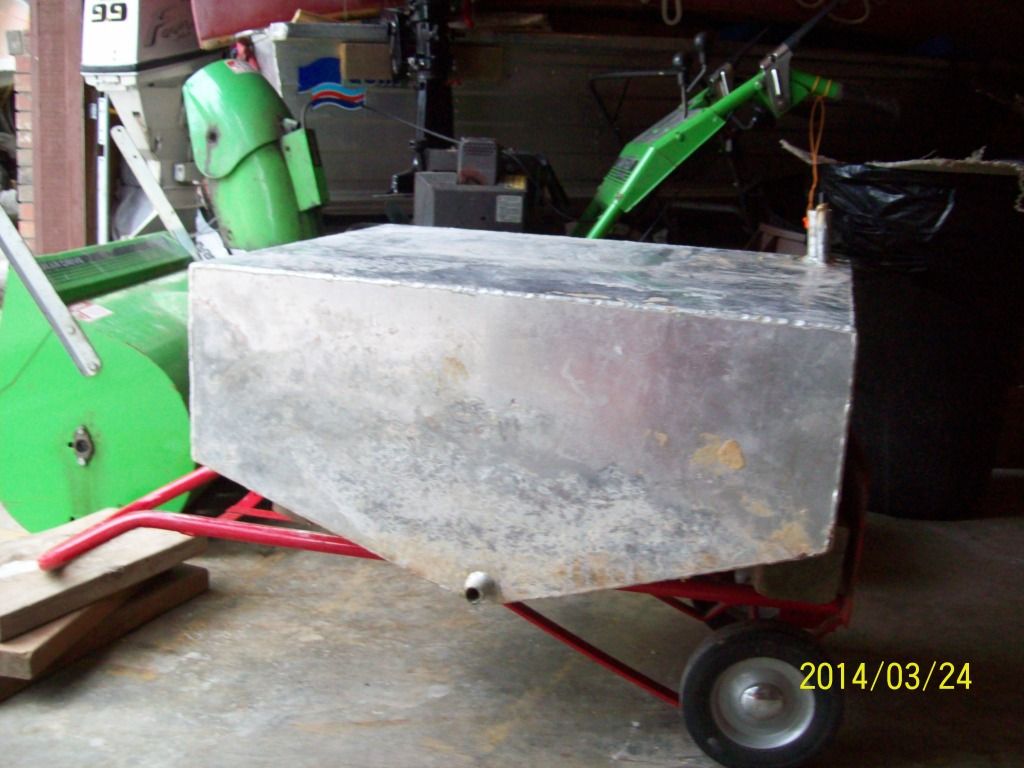
So far I've peeled up the cork flooring and removed the dinette and the dinette base.Betsay water tank 002.jpg
I located the tank, cut through the floor, removed the foam and finally managed to pull the old tank out.
http://i994.photobucket.com/albums/af61/Mikopsycho/OWNER-MSI/2014-03-18%20Betsay%

[URL=http://s994.photobucket.com/user/Mikopsycho/media/OWNER-MSI/2014-05-08%20Betsay%20repairs%20May%202014/2014-03-18%20Betsay%20water%20tank/005_zpsfab825b8.jpg.html][IMG]http://i994.photobucket.com/albums/af61/Mikopsycho/OWNER-MSI/2014-05-08%20Betsay%20repairs%20May%202014/2014-03-18%20Betsay%20water%20tank/005_zpsfab825b8.jpg


20water%20tank/Betsaywatertank001_zps0c95c29a.jpg[/IMG][/URL]Betsay water tank 005.jpg005.jpg

Now it's time to decide what kind of tank to install, and how to do the installation.

Behind the 35 gallon water tank is the 120 gallon gas tank, foamed in the same as the water tank was. The fuel tank gives no indication of any leaking at this point, so I want to leave well enough alone.

I have spoken to a few people with some knowledge of boat building, and with their suggestions have come up with a tentative plan, as follows;

1- glass in a bulkhead between the gas tank and the water tank and "bathtub" the water tank area.
2- have a new aluminum tank built the same as the old one
3- 5200 a few plastic strips to the bottom of the tank and 5200 the strips to the hull
4- strap down the tank with neoprene rubber between the straps and the tank
5- reinstall and fiberglass in plywood floor
6- finish up al the other little incidentals, like reinstalling the booth base, dinette, bins, prep the floor and install new floor covering, etc., etc., and go boating.

Let me know if you can see any obvious flaws in my plan, I'd appreciate any and all comments and advice.

I have no fiberglass experience, so it's a learn as I go project.

Mike
 

Attachments

  • 401.jpg
    401.jpg
    139.1 KB · Views: 2
  • 001.jpg
    001.jpg
    138.7 KB · Views: 2
Last edited:

Mikeopsycho

Senior Chief Petty Officer
Joined
Feb 6, 2014
Messages
738
Re: 1979 26' Commander water tank replacement

Re: 1979 26' Commander water tank replacement

So, I ordered the new tank. When I cut open the old tank for a look inside, I was surprised at how thin the aluminum was! The new tank will be 1/4". I was also surprised at how clean the inside was, wow, this is a 35 year old tank!

My new tank will be ready in 2 or 3 weeks. No real rush, it's way too cold around here for fiberglass work anyway. In the meantime I'll get the bulkhead cut out and resin it a couple coats, ready to install.

I plan to reroute the pickup line, the existing line is copper and it's foamed in under the floor and I'd have to open up more floor to get at it. I don't want to trust the old line, so rerouting is the way to go. Rather than having my pickup fitting installed at the front of the tank like original, I'm having it put at the aft of the tank. This will allow me to run the new line through the floor into the dinette base with the existing fill and vent lines, and it will allow me to fully drain the tank during winter layup.

I was thinking of using 3/8" copper to above floor level, then transitioning to clear reinforced PVC, but I haven't found any that small locally yet.
 

Mikeopsycho

Senior Chief Petty Officer
Joined
Feb 6, 2014
Messages
738
Re: 1979 26' Commander water tank replacement

Re: 1979 26' Commander water tank replacement

I noticed a little moisture weeping from the water line hole drilled through the stringer beside the water tank space, so I decided to take out a little more floor and have a look. Foam looked good and dry till I dug out a bit and I found dark, wet foam around the copper water line. http://forums.iboats.com/images/smilies/grumpy.png. I removed all the bad foam and I'm trying to decide my next move.


Betsay water tank replacement 008.jpg I don't think there's any foam under the floor between the stringer and the hull, so I'll probably leave that bit of floor in place. In order to have a look under the floor on the other side I'd have to remove the galley, big pita! Not sure if it's worth the effort, I'll have to ponder this for a day or two.

Betsay water tank replacement 012.jpg


I also removed the batteries and battery box so I can clean and organize in the engine compartment a bit, and to get at the water pressure pump easier.
Betsay water tank replacement 003.jpgBetsay water tank replacement 006.jpg

Usually my boat would be launched for the season by now. I'm missing the spring fishing, but I've got to get the old boat patched up again so I'll be able to enjoy it in the summer.
 
Last edited:

DeepBlue2010

Lieutenant
Joined
Aug 19, 2010
Messages
1,304
Re: 1979 26' Commander water tank replacement

Re: 1979 26' Commander water tank replacement

Decent size project. Thanks for sharing. I would've got one of these Molly plastic ones for the water tank myself but Alum will also do. Did you treat the alum by any means to protect from corrosion before installing?


Also, The black spots in this bulkhead makes me a little curious; did you check the boat (bulkheads, transom and stringers) for rot?

 
Last edited:

Mikeopsycho

Senior Chief Petty Officer
Joined
Feb 6, 2014
Messages
738
Re: 1979 26' Commander water tank replacement

Re: 1979 26' Commander water tank replacement

Hi DeepBlue. I decided to go for aluminum for a couple reasons. It's cheaper than plastic, and has more capacity than any off the shelf plastic tanks I could find. Also. I'm going to mount it on plastic strips with air flow around it, and not foam it in like the original was. The tank you see in the pics is the front of the gas tank, which I'm going to leave in place.

I am going to cut out the front bulkhead and replace it, you're right, the black spots are a little concerning. I'm a little leery about using the recip saw along the inside of the hull, so I've been putting it off. Is there a better tool for this job?

I visually inspected the stringers I have exposed, and did some tapping with a hammer. They seem sound to me, but maybe I need to do a little more invasive testing? This is all new to me, so suggestions are more than welcome. I had to get another survey last year for insurance and the inspector hammer tapped the entire hull and transom and said all is fine. I believe that any water that made it into the structure is fresh water from my failed tank, no outside intrusion.
 

DeepBlue2010

Lieutenant
Joined
Aug 19, 2010
Messages
1,304
Re: 1979 26' Commander water tank replacement

Re: 1979 26' Commander water tank replacement

OK. Good plan but if you are not planning on using any epoxy primer or paint in the tank, I would recommend laying the strips on beads of 3M 4200 or 5200 marine sealant and adhesive. Use painters tape to mask off both sides beside the strips - like 1/8 away - and press down on the strips with enough force to seat it but not enough to almost ooze out all the adhesive you applied.

Put a latex glove on your hand and use your fingers to smooth out the extra around the edges then remove the tape. Now, you can have a peace of mind that water and moisture will never find its way under these strips and - over time - corrode your new tank.

If the tank doesn't set high enough from the floor of the boat for good drainage and ventilation, I would still be inclined to treat at least the bottom and the sides of the tank since this is where pitting always starts but I am an "over kill" kind of guy :)
 
Last edited:

Mikeopsycho

Senior Chief Petty Officer
Joined
Feb 6, 2014
Messages
738
Re: 1979 26' Commander water tank replacement

Re: 1979 26' Commander water tank replacement

Thanks DB, I like the idea of sealing the strips to the tank with 3M. The plastic I got is 3/8" thick, which should work out OK.

I bought an oscillating tool, after seeing pictures of them in other poster's threads, and used it to help cut out the forward bulkhead. Worked great! Good thing I decided to cut it out, there was moisture in the space behind it and the bulkhead feels a little heavier than it should, like it's holding water.


003.jpg002.jpg

I'll keep a fan running on the area for a couple days to make sure it's nice and dry before I install a new bulkhead.
 

Attachments

  • 001.jpg
    001.jpg
    131 KB · Views: 2
Last edited:

Mikeopsycho

Senior Chief Petty Officer
Joined
Feb 6, 2014
Messages
738
Re: 1979 26' Commander water tank replacement

Re: 1979 26' Commander water tank replacement

I'm beginning to think I'm going to have to replace the fuel tank while I'm at it. Now that the floor is opened up a bit I can detect a gasoline odor when I enter the salon. The boat is 35 years old with original tanks, which are about 1/8" aluminum, foamed in. I called the fab shop and postponed the build of the water tank until I get the gas tank out and figure out how I want to proceed.

I'd like to build a flat floor in this space and install flat bottom tanks, but I only have 9 1/2" of height from the hull to the top of the stringers, and if I attach a ledge for support and 3/4" plywood base I'd have very little space left for the tanks. If I stay with the V tank design I'll have to figure out how to foam them in, or use plastic strips and set them directly on the hull. Any suggestions?
 

Mikeopsycho

Senior Chief Petty Officer
Joined
Feb 6, 2014
Messages
738
Re: 1979 26' Commander water tank replacement

Re: 1979 26' Commander water tank replacement

So, the project is getting bigger. I noticed a dark stain on the fiberglass in front of the gas tank. over the last couple weeks the stain has grown slightly, and I definitely smell gas. Yup, the darn thing is leaking for sure and will have to be replaced. It's about 7 1/2 feet long and runs under the floor, extending past the cabin/cockpit bulkhead about 2 feet into the engine compartment.


Betsay repairs May 2014 010.jpg


I opened up the floor some more and found wet foam under the fresh water line, which I removed.


Betsay repairs May 2014 014.jpg

At this point I decided that I'd remove the galley so I can check the foam underneath. I removed the propane stove, and the fridge. I took off all the doors and drawers, then unscrewed the cabinet from the boat. I also had to disconnect the AC breaker box, which was mounted inside the cabinet.


Betsay repairs May 2014 001.jpgBetsay repairs May 2014 003.jpg
I removed the cabinet and cut out some floor to have a look at the foam. It looks dry from the top, but I will cut out and remove a section to check the bottom.


I can see where there used to be screws securing the floor to the stringers, but they are completely corroded away. There is no rot in the plywood sole (so far).

I syphoned the gas out of the tank into a 45 gallon drum, a 60 gallon truck saddle tank, and a bunch of plastic gas containers. 120 gallons of gas takes up a lot of room!
 
Last edited:

Mikeopsycho

Senior Chief Petty Officer
Joined
Feb 6, 2014
Messages
738
Re: 1979 26' Commander water tank replacement

Re: 1979 26' Commander water tank replacement

The bathroom also has to come out for access to the gas tank.
View attachment 231380
I removed the door, disconnected all plumbing and removed the toilet and vanity cabinet, and unscrewed the walls.
View attachment 231381
I'm having trouble getting the shower pan/bathroom floor out. It seems to be fiberglassed firmly to the plywood sole. I don't want to wreck it. I was able to cut it loose about 6 or 7 inches in from the two sides with a slim scraper and a hammer, but I don't know how I'm going to get the rest of it loose. Any ideas?
View attachment 231382
I removed the buss heater and the trash can cabinet.
View attachment 231383View attachment 231384
 

jbcurt00

Moderator
Staff member
Joined
Oct 25, 2011
Messages
24,863
Re: 1979 26' Commander water tank replacement

Re: 1979 26' Commander water tank replacement

The bathroom also has to come out for access to the gas tank.
View attachment 231380
I removed the door, disconnected all plumbing and removed the toilet and vanity cabinet, and unscrewed the walls.
View attachment 231381
I'm having trouble getting the shower pan/bathroom floor out. It seems to be fiberglassed firmly to the plywood sole. I don't want to wreck it. I was able to cut it loose about 6 or 7 inches in from the two sides with a slim scraper and a hammer, but I don't know how I'm going to get the rest of it loose. Any ideas?
View attachment 231382
I removed the buss heater and the trash can cabinet.
View attachment 231383View attachment 231384
no pix attached
 

Mikeopsycho

Senior Chief Petty Officer
Joined
Feb 6, 2014
Messages
738
Re: 1979 26' Commander water tank replacement

Re: 1979 26' Commander water tank replacement

no pix attached
Hmmmmm...... Not sure what happened there. Did you try clicking on the links? When I click on them the pics open up, but I don't know why the little thumbnail pictures didn't post. I'll try again.


Betsay repairs May 2014 028.jpgBetsay repairs May 2014 026.jpgBetsay repairs May 2014 007.jpgBetsay repairs May 2014 006.jpgBetsay repairs May 2014 005.jpg
Did it work this time?
 
Last edited:

jbcurt00

Moderator
Staff member
Joined
Oct 25, 2011
Messages
24,863
Re: 1979 26' Commander water tank replacement

Re: 1979 26' Commander water tank replacement

Must have been an iboats processing error, now the pix are visible & clickable.

Before they were gibberish attachment links only, that when clicked opened an invalid link window.........

EDIT: The most recent pix attached, but the post I quoted, still has dead end attachment links.
 
Last edited:

Mikeopsycho

Senior Chief Petty Officer
Joined
Feb 6, 2014
Messages
738
Re: 1979 26' Commander water tank replacement

Re: 1979 26' Commander water tank replacement

I really wish I could figure out how to post from photobucket. I opened a photobucket account and loaded some pictures in it, but I haven't got a clue how to load them onto an iboats post.

YEAH!! I got it figured out! I'm updating my pics.
 
Last edited:

Mikeopsycho

Senior Chief Petty Officer
Joined
Feb 6, 2014
Messages
738
Re: 1979 26' Commander gas & H2O tank replacement & ?

I disconnected and/or moved varies hoses, lines, and cables out of the way. I also removed the gas tank access plate and the gas line petcocks, and disconnected the fuel level sender.


Betsay repairs May 2014 035.jpgBetsay repairs May 2014 033.jpgBetsay repairs May 2014 030.jpgBetsay repairs May 2014 032.jpg

Now to make a plan of where and what to cut. For now I think I'll just cut out enough of the aft cabin bulkhead to allow me to lift the tank a bit for removal. I'll cut out the plywood sole back to the bulkhead on each side of the tank to check for wet foam. The sole will have to be cut out above the tank in the engine space, as well as the upright piece that runs from side to side.

I'm not sure if the engine space is painted or gelcoated. I think I read something about how to determine this in another thread, but I can't recall what it was. Anyone know?
 
Last edited:

jbcurt00

Moderator
Staff member
Joined
Oct 25, 2011
Messages
24,863
Re: 1979 26' Commander water tank replacement

Re: 1979 26' Commander water tank replacement

Drop an acetone soaked rag on the suspected paint. If it lifts, it's paint. If it doesn't it's probably gelcoat.
 

Mikeopsycho

Senior Chief Petty Officer
Joined
Feb 6, 2014
Messages
738
Re: 1979 26' Commander gas & H2O tank replacement & ?

Attempting to figure out photo uploads from photobucket.

Nope, that didn't work, ended up with a clickable link to the entire contents of my photobucket, which I deleted.


Success! I think...now all I have to do is remember how I did it.........
 
Last edited:

Mikeopsycho

Senior Chief Petty Officer
Joined
Feb 6, 2014
Messages
738
Re: 1979 26' Commander water tank replacement

Re: 1979 26' Commander water tank replacement

Drop an acetone soaked rag on the suspected paint. If it lifts, it's paint. If it doesn't it's probably gelcoat.
Thanks jbcurt00, it looks like the blue area under the dinette base and under the galley cabinetry is gelcoat. I still need to check in the engine compartment.

I was finally able to get the shower pan/bathroom floor out, but not in one piece. Yup, I broke the darn thing, now I've got something else to try and figure out how to fix. :facepalm:


I cut out more of the sole to within a few inches of the sides and the rear cabin bulkhead. I still need to cut out some of the bulkhead and the rest of the plywood on top of the gas tank.


Question; what are the advantages one way or another re cutting out the sole right up to the hull side and tabbing in the new floor versus leaving a few inches and joining the new floor with a butt joint?

I dug out a section of foam from under the galley down to the hull and it was bone dry. :joyous:


Here I'm pointing at one of the two remaining screws that held the plywood floor to the stringers.

 
Last edited:

Mikeopsycho

Senior Chief Petty Officer
Joined
Feb 6, 2014
Messages
738
Re: 1979 26' Commander gas & H2O tank replacement & ?

Another shot.


The dark spots on the plywood are where the screws corroded to nothing.


And here's a shot of how separation between the aluminum gas tank and the underside of the sole was achieved. Yup, it's cardboard. Don't worry, "FRAGILE, HANDLE WITH CARE" was printed on the cardboard, which I did. You can also see how the tank wasn't FULLY foamed in, note the void along the side of the tank. (I'm not sure if this is good, bad, or indifferent)


The cardboard smells like gasoline although it is dry. The plywood also has odor-de-gas. I don't know if the gas vapours from the leaking tank leached into the plywood or if gasoline somehow actually came into direct contact with the plywood to cause it to smell so much. There's no indication of any leakage around the fill, vent, sender, or inspection plate, so I can't see how gasoline could have wetted the plywood. Maybe I'll find out more when I get the rest of the tank opened up.
 
Last edited:

Mikeopsycho

Senior Chief Petty Officer
Joined
Feb 6, 2014
Messages
738
Re: 1979 26' Commander gas & H2O tank replacement & ?

After removing all the plywood over the gas tank I changed my mind, there is evidence of a leak at the inspection plate.


See the black staining on the bottom of the plywood


Here's the tank coming out


Note all the voids in the foam, and the discoloration caused by leaking gas. There was a bit of liquid sitting in the bottom, a mix of gas and of water from the fresh water tank. Stinky stuff!

 
Top