Century Coronado restore

89 resorter

Petty Officer 1st Class
Joined
Oct 3, 2013
Messages
287
Here are the pictures of the oops that I put through the hull before I learned how to grind more better along with the dock rash that I will need to fix from the PO before he learned to dock more better :D.

Both cuts through the hull are located at one of the chines where a stringer will bed down


Here are pics of the dock rash on the bow and the same location from inside the boat. I originally thought that the inside was badly damaged until I got a closer look to realize that the big gap is only the area where the inner hull with the balsa core sandwiched ends on each side. Still, I will be interested to get opinions on how to fix it since it is only about one inch wide (at its widest) and about 3/8" deep so I am sure getting glass into it will be a challenge.


My plan is to go with epoxy for the transom then use poly for the rest of the build. Seeing how I will run out of warm weather before I can possibly get it all done, I plan on getting the transom done this fall, focus on building stringers and interior over the winter, then pick back up in the spring to finish bedding and glassing the stringers and floor. This way I can order and use all of my epoxy stuff now then wait for spring to order all of my poly supplies. Now for my challenge ...... all of the threads that I have followed have used poly so I have no idea of what to use for the transom (what is the PB mixture, type of glass mating, etc.). WOG, I would also like to know more of the vacuum bagging process you pointed out.

As always, thanks for all the help.

Dave.
 

Woodonglass

Supreme Mariner
Joined
Dec 29, 2009
Messages
25,924
Vacuum Bagging can be a convoluted and involved process as the pic below shows. You need specialized equipment to accomplish it with. Vacuum Pump, manifolds, tubing, valves, regulators, etc... Wood boat guys and molding guys use em a lot. For the DIY'r they're not very practical unless you want to attempt it. There are plans and videos on YouTube for making your own vacuum pumps from old refrigerator compressors etc.. if you really want to got nuts on it!!!:eek:

images
 

89 resorter

Petty Officer 1st Class
Joined
Oct 3, 2013
Messages
287
WOG, I looked into the vacuum bagging process and it looks like it requires a Rocket Surgeon to pull off so that pretty much leaves me out. Think I will stick to the normal layup process. I also revisited your Fabricating Decks, Stringers, and Transoms and see where it does cover epoxy. You note to use 17 oz. cloth instead of 1708/csm. I did not see any 17 oz cloth in the US Composites website. The closest thing I saw was 18 oz. E glass....... would this be the correct stuff? I was also wondering if I could use whatever epoxy supplies I use for the transom to also strengthen the inside of the hull behind the dock rash on the bow? I know that I can't use it to fix the areas where I ground through the hull since I am using poly for the rest of the build, but the blue area of the hull is currently paint and I plan to keep it that way.
 

Rickmerrill

Senior Chief Petty Officer
Joined
Mar 13, 2014
Messages
686
From their home page click products, biaxial and scroll down to DB170 - 17oz Biaxial - NO MAT
 

89 resorter

Petty Officer 1st Class
Joined
Oct 3, 2013
Messages
287
Thanks Rickmerrill! I was assuming that all of the biaxial had the csm so I did not look real hard at that section. I plan on taking measurements of my transom this weekend so that I can get my epoxy supplies ordered early next week.

Thanks again.
 

Woodonglass

Supreme Mariner
Joined
Dec 29, 2009
Messages
25,924
You note to use 17 oz. cloth instead of 1708/csm. I did not see any 17 oz cloth in the US Composites website. The closest thing I saw was 18 oz. E glass....... would this be the correct stuff? I was also wondering if I could use whatever epoxy supplies I use for the transom to also strengthen the inside of the hull behind the dock rash on the bow? I know that I can't use it to fix the areas where I ground through the hull since I am using poly for the rest of the build, but the blue area of the hull is currently paint and I plan to keep it that way.

Yup, the Vacuum Bagging is NOT for the DIY'r unless they're extremely ANAL!!!! I KNOW some of those types but I'M NOT one of them in MOST cases!!!:facepalm:

The 17oz Biaxial cloth you need is listed in the USComposites site under the Specialty Fabrics Sections. $7.95 per yd. You can use the epoxy any where Poly will not be coming in contact with it.;)
 

89 resorter

Petty Officer 1st Class
Joined
Oct 3, 2013
Messages
287
After looking at the bagging process I would think that if you look up the word "anal" in the dictionary you might see the same pic you attached in post #22:lol:. It is good to know that I can use epoxy to sure up the bow so I can at least get one of the repairs done prior to the cold weather. After staring at the picture a little more I am not sure how best to go about it since the damage is on the inside of the outer hull while the area that I had planned to sure it up to is on the inside of what I will call the inner hull (not sure what it would actually be called). I am now thinking that I may need to cut back the balsa wood and inner hull to expose a large enough area of the outer hull to build it up (hopefully this is just my ANAL side showing :D).
 

89 resorter

Petty Officer 1st Class
Joined
Oct 3, 2013
Messages
287
I did not get a lot of time this weekend to work on the boat but it was due to a really good reason ...... our daughter had our first grand baby last week! :baby: Since she is at the stage where all she does is pretty much sleep, eat and poop I was able to sneak to the cabin just long enough to pattern the transom so that I can begin getting my materials list together.


I have got some questions that will affect the amount of materials.....

1) How do I determine the amount of PB that I will need. The transom will be about 20 sq. ft. ...... is there a rule of thumb for calculating PB coverage?

2) I reviewed friso's PB video along with many other threads where most add the 1/4 inch chop strand fibers. Will chop strand be needed for the epoxy PB I use to glue the wood onto the transom?

3) Since I will be sticking the individual wood pieces onto the transom, I plan on applying a coat of resin on each side of the transom before I cut it into the smaller puzzle pieces, but I will not have the opportunity to first coat one side with the 17oz cloth first like in a normal transom rebuild. I am assuming that once the pieces are glued in place that I will either apply the cloth to the entire transom at that point then follow up with tabbing or apply tabbing at that point then follow up with cloth over the entire transom. Also, aside from the two layers of tabbing, how many layers of 17oz cloth will I need to apply over the entire transom?

4) This does not really relate to materials but I am trying to get my mind around if I will have to figure a way to clamp the pieces in place once they are glued in place?

I got a little time to figure this out since I just found out that the marine plywood I ordered will not be in until sometime next week.

Thanks again ...... Dave
 

Woodonglass

Supreme Mariner
Joined
Dec 29, 2009
Messages
25,924
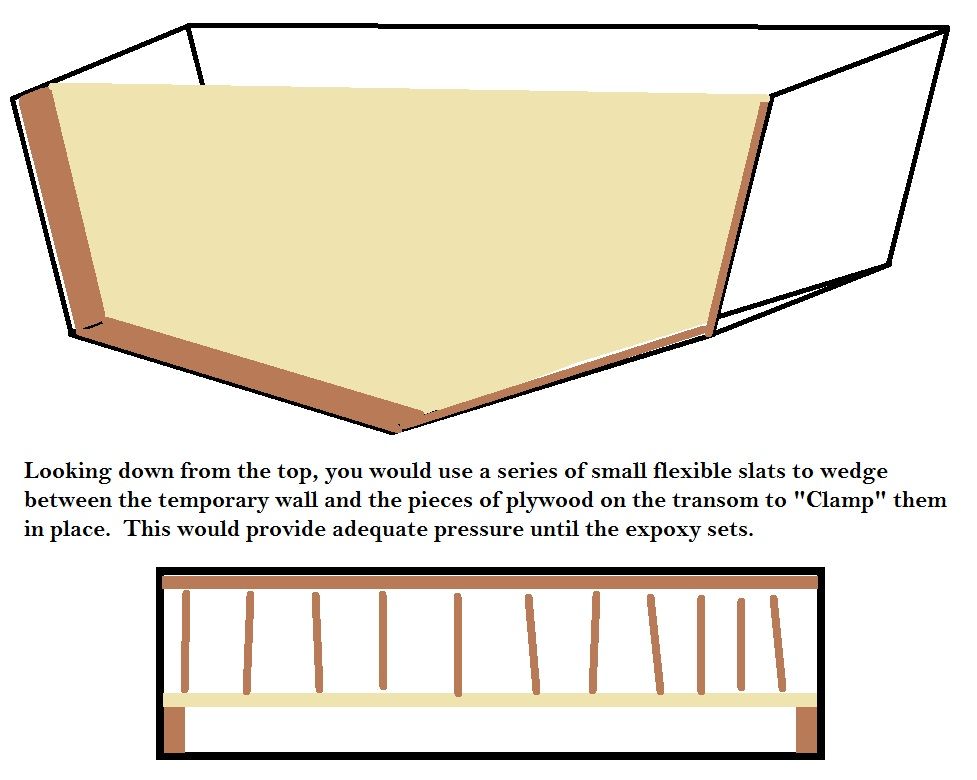
I've created a drawing to illustrate how I'd recommend you go about it. You're free to do it as you see fit. I'd build a temporary clamping wall from 2x4's and plywood. Kinda like a false transom and then C-clamp it inside the hull facing the transom. The clamps and friction should provide enuf force to hold it in place. I'd then fabricate up a LOT of small 1/8" x 24" long or whatever length it turns out to be flexible wedge pieces to use as "Clamps" for each piece of Plywood "Tile" for the transom. I hope the drawing shows you what I mean. I've seen it done I just can't illustrate it very well. Hopefully you get the idea.

 
Last edited:

89 resorter

Petty Officer 1st Class
Joined
Oct 3, 2013
Messages
287
Thanks WOG! I think your illustration is great and I can clearly see what you are talking about. Having never worked with epoxy before (or poly for that matter), will the tiles stick and stay in place long enough for me to "tile" the entire transom then install the false transom wall and insert the clamp pieces or will I have to begin installing the clamp pieces as I tile up from the bottom?
 

Woodonglass

Supreme Mariner
Joined
Dec 29, 2009
Messages
25,924
From the very beginning. You should have the clamp wall in place but...Thicken the epoxy to the consistency of mayonaise and then spread it with a notched trowel just like laying tile Then stick em on. Starting at the bottom and work up. They WILL stay in place and the epoxy won't begin to "Kick" for at least 45 mins or longer depending on temps. Leave the plywood wall OFF so you'll have room to work and once the "Tiles" are in place drop the wall in, and start placing the Clamp sticks. You can even use piece of plywood to bridge over multiple tiles for clamping as long as you can get good even pressure. I'd place wax paper between the bridge and the transom to avoid adhesion.;)
 

89 resorter

Petty Officer 1st Class
Joined
Oct 3, 2013
Messages
287
I built a temporary clamping wall last weekend and I plan on making a *&%# load of wedges this weekend and if temperature permits, I hope to begin laying in the tiles on the transom. My plan is as follows (please feel free to question and/or set me straight on any/all items.....it is greatly appreciated)

1) Coat each tile with epoxy resin and let cure. I plan to coat the side that will go against the transom and the edges then wait until all tiles are installed to coat the other side.

2) Use a notched trial to butter (mayo consistency) the individual tiles and the transom wall then stick the tiles working from the bottom up. Not sure if there is a particular size trial but I bought both an 1/8" and 1/4" V notch and will see which appears to work the best once I get started or if anyone has any recommendations. I also would be interested to know if I should also coat the edges of each tile?

My only other question at this point is should I add any chopped fiber into the PB mixture used to glue the tiles? I know that the chopped fiber is needed to add strength to the mix when embedding stringers and filleting but I am not sure if is should be used in this situation.

Thanks
Dave
 

89 resorter

Petty Officer 1st Class
Joined
Oct 3, 2013
Messages
287
Got my clamping wall fitted and a bunch of wedges all ready to go over the weekend but I did not get to the point of actually gluing the transom tiles in place. Our high temperatures only went into the low 50's and dropped into the upper 30's at night so I decided not to risk it...... one of the joys of living in the western PA mountains......I guess. Maybe the temps will be more conducive for epoxy gluing next week.


Woodonglass

Supreme Mariner
Joined
Dec 29, 2009
Messages
25,924
Looking good. I'd use the 1/4" trowel. For this application and since you're using epoxy, you won't need milled fibers. Mix the PB fairly thick. Don't want it to run to much. If you have a heater you can use it. Epoxy is not to flammable. Heat Lamps or Halogens and a tarp will heat things up nicely. Only need to get it to 60 degrees. I'd recommend making your wedges out of 1/4" x 3/4" thick Pine Ripped from a 1x4. Make em about 1" to long and then you can bend em and the "Spring" action will be the Clamp pressure. If you need more pressure make em 3/8" thick. experiment with the thickness till it seems right. When you do the next layer you just trim the wedges off by the appropriate amount. Hope this makes sense. ;):D
 
Last edited:

89 resorter

Petty Officer 1st Class
Joined
Oct 3, 2013
Messages
287
Makes perfect sense. I have a large wood burner in the building that can keep it heated up reasonably well until it gets real cold (building not insolated) but I think that I will get a heat lamp of some sort that I will can put inside the boat to boost the epoxy cure. I coated the transom wood this weekend and learned first hand how slow this stuff cures. Anyway, hope to have some pics to share of the completed transom in the next week or two.
 

jc55

Senior Chief Petty Officer
Joined
Nov 3, 2006
Messages
665
Those small electric heaters that kick off when you knock them over, aimed at your work with a tarp over the boat work extremely well this time of year. I like your boat. Nice grinding work too. Tagging along...
 

89 resorter

Petty Officer 1st Class
Joined
Oct 3, 2013
Messages
287
Welcome aboard jc55. I actually found an old ceramic cube heater that I forgot I even had and If the temperatures require it, I will cover the work area with plastic and heat her up while the epoxy cures.
 

89 resorter

Petty Officer 1st Class
Joined
Oct 3, 2013
Messages
287
I was hoping to begin gluing the transom tiles in place this weekend but the wife had other plans for me so very little boat progress to report:ballchain:. I brought the fuel tank and swim platform home with me hoping that I might be able to make some head way after work during the week. The fuel tank is welded aluminum and I plan on getting it pressure tested to make sure it is fit for use. Before I do that, however, I want to get the inside of the tank clean so I was wondering if anyone has a good formula for doing this?


Woodonglass

Supreme Mariner
Joined
Dec 29, 2009
Messages
25,924
You'll prolly think I'm crazy but. remove the sending unit, get a 6ft length of chain and snake it into the tank and tape one end of it into an opening. Fill the tank with 5 gallons of Boilng Hot water and a cup of DAWN dishwashing Soap. Leave the tank in the back of your truck and then go for ride on some good ole' bumpy roads. All the bumps and sloshing around will make that hot soapy water and chain beat the tar residue off the tank side. Dump it all out turn it over and then do it again on the other side. It'll clean up really well. That's the C.O.B. method. There are chemicals and other methods, I.E. Steam Cleaning and Radiator Shop cleanng but they can be pricey. This is Cheap and it really does work pretty good!!!;)
 

89 resorter

Petty Officer 1st Class
Joined
Oct 3, 2013
Messages
287
I don't think that is crazy at all, but then again, I thought that the clamping wall and bunch of little sticks to do my transom was brilliant! :D I already grabbed some chain from work and I think that me and my tank will go for a ride tonight.....Living in western PA I will have no problem finding bumpy, hilly and twisty roads.
 
Top