Replacing my 16ft SS Starcrafts Transom

Tnstratofam

Commander
Joined
Aug 18, 2013
Messages
2,679
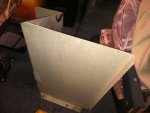
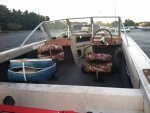
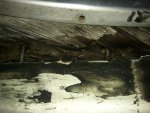
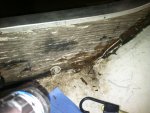
Bought our little SS last fall. When I met the seller he told me he put in a new floor, and the only thing wrong was a bad lower unit on the outboard. While examining the boat he pointed out that he reinforced the transom where the motor clamped at the top. He also said he sealed the splash well to the transom with caulk to help prevent water intrusion. I new the transom needed to be replaced but I didn't argue much over the price because the rest of the boat looked real good.

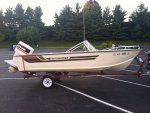
Here she is when we picked her up.:joyous:

Click image for larger version  Name:	IMG_0185.JPG Views:	1 Size:	905.0 KB ID:	10545730


Now I finally have some time this spring to get her replaced. So here we go I'm sure it's going to be interesting, and I'll have some questions. Hopefully I can get this project done in the next couple of weekends so She'll be ready to hit the lake this spring.
 

Attachments

  • IMG_0301.JPG
    IMG_0301.JPG
    844.7 KB · Views: 8
  • IMG_0185.JPG
    IMG_0185.JPG
    905 KB · Views: 5
  • IMG_0186.JPG
    IMG_0186.JPG
    835.3 KB · Views: 6
  • IMG_0184.JPG
    IMG_0184.JPG
    888.2 KB · Views: 7
  • IMG_0307.JPG
    IMG_0307.JPG
    1.2 MB · Views: 7
  • IMG_0292.JPG
    IMG_0292.JPG
    1.1 MB · Views: 10
Last edited:

Tnstratofam

Commander
Joined
Aug 18, 2013
Messages
2,679
Re: Replacing my 16ft SS Starcrafts Transom

Here are some pictures of me unbolting the motor and disconnecting the steering cable. Thanks to Frank Acampora and MickLovin in the Chrysler forum for helping me figure out how to disconnect the cable.

IMG_0293.JPG


IMG_0313.JPG

Steering Cable out:joyous:

IMG_0315.JPG

Shifter and Throttle cables disconnected and marked.

IMG_0316.JPG

IMG_0317.JPG

Motor wiring for future reference

IMG_0321.JPG

IMG_0319.JPG

IMG_0320.JPG
 
Last edited:

Tnstratofam

Commander
Joined
Aug 18, 2013
Messages
2,679
Re: Replacing my 16ft SS Starcrafts Transom

Lower motor bolts.

IMG_0322.JPG

Motor off the transom and on my homemade engine/outboard stand.

IMG_0323.JPG

Additional support for the motor on the stand.

IMG_0324.JPG


IMG_0330.JPG
 
Last edited:

Tnstratofam

Commander
Joined
Aug 18, 2013
Messages
2,679
Re: Replacing my 16ft SS Starcrafts Transom

Here is the po's transom reinforcement

Click image for larger version  Name:	IMG_0326.JPG Views:	1 Size:	1.00 MB ID:	10545759

Click image for larger version  Name:	IMG_0327.JPG Views:	1 Size:	1.05 MB ID:	10545760

.

Removed this piece on both sides.

Click image for larger version  Name:	IMG_0290.JPG Views:	1 Size:	1.07 MB ID:	10545761

Click image for larger version  Name:	IMG_0291.JPG Views:	1 Size:	1.03 MB ID:	10545762


Click image for larger version  Name:	IMG_0294.JPG Views:	1 Size:	853.9 KB ID:	10545764

IMG_0553.JPG
 

Attachments

  • IMG_0294.JPG
    IMG_0294.JPG
    853.9 KB · Views: 6
Last edited:

Tnstratofam

Commander
Joined
Aug 18, 2013
Messages
2,679
Re: Replacing my 16ft SS Starcrafts Transom

Foam removed.

IMG_0296.JPG

I sprayed all the bolts I could see with penetrating oil when I got started.

IMG_0295.JPG

IMG_0299.JPG


Where I'm putting all my nuts bolts and screws.

IMG_0304.JPG

The inside of the boat is my storage area so I don't get things mixed up with the Stratos we're replacing the deck in.

IMG_0305.JPG
 
Last edited:

Tnstratofam

Commander
Joined
Aug 18, 2013
Messages
2,679
Re: Replacing my 16ft SS Starcrafts Transom

Here is a shot of the transom at the splash well after I got the caulk the po put on it off.:faint2:

IMG_0306.JPG


This is how much I could pull the tie down through before I even loosened the bolts.:eek:

IMG_0312.JPG

I used the chisel Hammer and pry bar to remove the nails in the transom cap.

IMG_0325.JPG
 
Last edited:

Tnstratofam

Commander
Joined
Aug 18, 2013
Messages
2,679
Re: Replacing my 16ft SS Starcrafts Transom

First I would use the chisel to get under the nail. Then I would use the pry bar to pull it the rest of the way out. Always being careful not to damage the transom cap.

IMG_0329.JPG

Some of the nails I could pull out by hand.

IMG_0328.JPG

I drilled out the rivets on the transom end caps and pulled them off.

IMG_0332.JPG

IMG_0333.JPG


Then I popped the transom cap off.

IMG_0334.JPG
 

Attachments

  • IMG_0331.JPG
    IMG_0331.JPG
    1.2 MB · Views: 4
Last edited:

Tnstratofam

Commander
Joined
Aug 18, 2013
Messages
2,679
Re: Replacing my 16ft SS Starcrafts Transom

Here is where I stopped for the day. Ive got the transom exposed and the remaining bolts soaking in penetrating oil. I'll try to get the rest of the bolts and splash well screws out tomorrow. Here are a few shots of the top of the transom wood after I got the transom cap off.


IMG_0335.JPG


Watch how far I can push this screwdriver through.

IMG_0336.JPG

IMG_0337.JPG


Well I'll get back at it tomorrow. Thanks for stopping by.:)

Dave.
 
Last edited:

classiccat

"Captain" + Starmada Splash Of The Year 2020
Joined
Dec 20, 2010
Messages
3,405
Re: Replacing my 16ft SS Starcrafts Transom

Great progress Dave! :thumb:

That's one nasty transom! :eek: I'm surprised that there was no collateral damage (knee-brace, splashwell, etc.)
 

Tnstratofam

Commander
Joined
Aug 18, 2013
Messages
2,679
Re: Replacing my 16ft SS Starcrafts Transom

Oh I'm sure there is allot more damage than meets the eye. I didn't have a full pic of the knee brace, but it's got some rivets at the bottom that have been popped out. One of the previous owners caulked those places with clear silicone. There are also a couple of rivets missing along the bottom of the transom.

The splash well looks okay, but I've got to check all the seams before I say it's good.

One question for the experts. If the splash well is OK should I remove it to get the transom out, or leave it in and bend up the ends to slide the transom by?
 
Last edited:

jbcurt00

Moderator
Staff member
Joined
Oct 25, 2011
Messages
24,871
Re: Replacing my 16ft SS Starcrafts Transom

Until you try to remove the transom w/out removing the splashwell, it'll be hard to tell which will be more work/more difficult:

Removing & replacing splashwell after transom is R&R'd

or

R&R the transom w/ the splashwell in place.

Many struggle mightly getting the transom plywood out, even w/ the splashwell removed. I wouldn't leave the splashwell in place, it'd aggravate me trying to work around it...........
 

toms26t

Cadet
Joined
May 29, 2012
Messages
20
Re: Replacing my 16ft SS Starcrafts Transom

Did that repair on my 18' Super Sport. Mine came out in 3 pcs, 2 short pcs on the sides with 1 pc that crossed on the bottom. So made a paper template after getting it cleaned up. A 1-1/2" sheet of marine plywood was hard to find so went with 2 3/4" marine sheets. I glued and SS Screwed them together and placed some bricks on for weight. The good part of putting mine back together was the one piece transom seamed to provide more strength than the 3 piece that came out.

Good luck on the rest of your repair.
 

Tnstratofam

Commander
Joined
Aug 18, 2013
Messages
2,679
Re: Replacing my 16ft SS Starcrafts Transom

Well I didn't get much done today. Sunday is always busy here at our house and it's hard for me to get much work in the garage done. Anyway it looks like my transom is made up of 3 pieces. the upper pieces are pretty rough. I don't think they will come out whole. The lower piece is pretty solid in the center so I think I can lift it or pry it out in one piece. Once I do some more cleaning on the splash well, and can check it for cracks I will decide on whether I remove it or not. My real question is if the transom disintegrates when I take it out can I use cardboard or something like that to trace out for the new transom?

I went to my local Lowes yesterday looking for a sheet of 3/4 inch Arucco brand exterior grade ply wood, and the people there looked at me like I was from another planet. The guys looked at me and said "Whatever is on the shelf is what we've got".:facepalm: I hate shopping at the big box stores.:mad: Anyway I know marine grade is the best, but I've seen lots of transoms done with exterior grade so that's what my plan is.

I also need to coat it but I'm not sure what to use. I looked at some valspar wood primer for exterior applications. If I use that and then paint the transom with exterior paint is that good enough?

I'll be getting back on pulling out the transom later in the week. I'll post pictures then of my success or failure. Till then Thanks for stopping by.

Dave.
 

hawk200282

Seaman
Joined
Jul 26, 2013
Messages
53
Re: Replacing my 16ft SS Starcrafts Transom

I don't own an aluminum boat, but from the threads I've read on iBoats, coating the new transom in epoxy resin seems to be the way to go for longevity.
 

jbcurt00

Moderator
Staff member
Joined
Oct 25, 2011
Messages
24,871
Re: Replacing my 16ft SS Starcrafts Transom

Yep ^^^ but remember, epoxy isn't UV stable, so it too must be covered.

Exterior plywood will be an OK choice. PM SigSaur and find out where he's getting his transom ply. If I remember correctly, it's good quality lumber & reasonably priced.

If the existing transom ply doesn't come out in 1 piece, then any means possible to make the template: cardboard, construction/reson paper, masonite, 1/4" rigid foam, etc
 

GA_Boater

Honorary Moderator Emeritus
Joined
May 24, 2011
Messages
49,038
Re: Replacing my 16ft SS Starcrafts Transom

Tn - I got my Arauco at Home Depot. It's been a couple of years though. A piece of floatation....I mean foam board is great for making a template.

BTW - What transom. All I see is flowerpot dirt. :)
 

jasoutside

Supreme Mariner
Joined
Dec 20, 2009
Messages
13,269
Re: Replacing my 16ft SS Starcrafts Transom

PO's reinforcement + calk = trashed transom every time:facepalm:

Hey, you are well on your way here!:encouragement:
 

lakelover

Rear Admiral
Joined
Mar 26, 2003
Messages
4,386
Re: Replacing my 16ft SS Starcrafts Transom

You're making quick progress!

Hope you can get the transom out in good enough shape to make a template, that'll save all sorts of headaches. The more you can get out without destroying it, the better. I started trying to remove mine in the Fall....beat on it, pulled, lifted and everything I could think of and it wouldn't budge. After sitting dry under cover for the winter, the next spring it popped right out in 10 minutes.

I used 2 pieces of 3/4" ext. plywood, fastened together with SS screws and Gorilla glue. Then several coats of epoxy resin, followed by Rustoleum primer and paint. It's holding up very well so far.
 

Bob_VT

Moderator & Unofficial iBoats Historian
Staff member
Joined
May 19, 2001
Messages
26,022
Re: Replacing my 16ft SS Starcrafts Transom

Looking good! Many (MANY) of us have been down the same road. Keep going. You might try some eye bolts designed for wood and grab the transom wood from the inside and use a hoist for pressure and it should pop right out.

I would go with this epoxy http://www.iboats.com/Low-Viscosity-Epoxy-Resin/dm/view_id.342274?cm_sp=Forum-_-Ref-_-BF and do not fear the UV exposure since it is only showing 6-8" of wood on the transom and you will probably paint it anyway OR just coat it with a marine varnish top coat.

I used oak on my dashboards and used epoxy coated with varnish...... very hard, waterproof and UV safe ;)
 
Last edited:

lakelover

Rear Admiral
Joined
Mar 26, 2003
Messages
4,386
Re: Replacing my 16ft SS Starcrafts Transom

..... You might try some eye bolts designed for wood and grab the transom wood from the inside and use a hoist for pressure and it should pop right out.

I tried this method, and it lifted the boat off the trailer! :D Might work though if it's not really stuck.

I used oak on my dashboards and used epoxy coated with varnish...... very hard, waterproof and UV safe ;)
Ditto on that, exactly how I did it, spar varnish topcoats.
 
Top