1990 galaxie california deck repair help

garrett113

Seaman
Joined
Jun 19, 2013
Messages
53
Re: 1990 galaxie california deck repair help

ok I must have miss understood but any way im glad I got it figured out.
yesterday I cut off rear section of cap to get access to transom also made a cardboard template. today im cutting out the transom possibly start making the new transom.
 

garrett113

Seaman
Joined
Jun 19, 2013
Messages
53
Re: 1990 galaxie california deck repair help

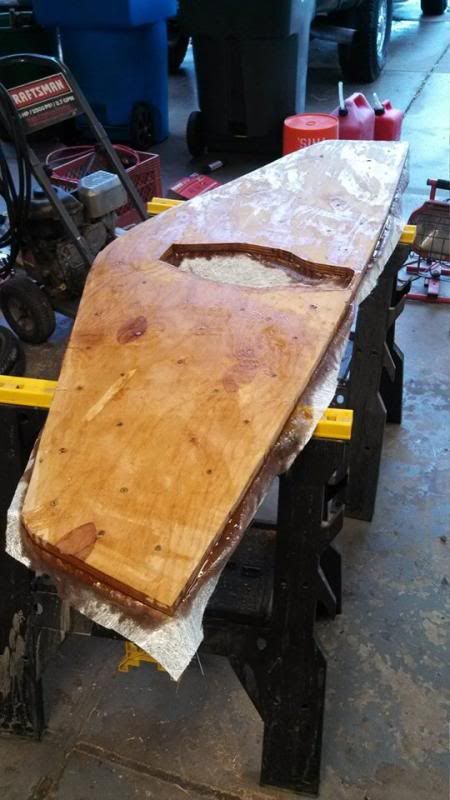
New transom piece is complete. here is what I did, I sandwiched two pieces of 3/4'' marine grade ply with 1 oz csm, I used (resign (polyester non waxed) on both pieces then wet out csm then used wood screws to clamp together (pilot holes drilled larger then scew in top piece). After everthing hardened I cut off all the excecess with my skill saw then belt sander to smooth everthing then lastely I grinded down the screws on the back side. I plan to just leave the screws in.

I will next coat the entire thing in resign.

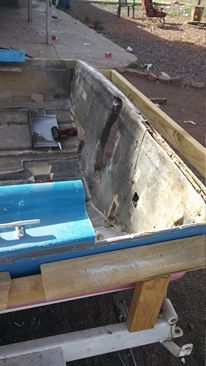
so now im ready to put the transom in the boat. Should I use a layer of csm between the transom and the hull?

I saw that woodonglass did a layer of csm on both sides then tore the extra off and then pushed the hairs down I got a little confused as to weather he did that then clamped it in the boat or what.

Im going to keep looking around but if someone has a quick answer for me that would be great.

I almost forgot, so my boat has a single stringer then forks into two doubling as the "motor mount stringers", these stringers where originally glassed with the transom. I feel like it would be better to glass the transom then glass the engine mount stringers to that so that way every thing is separated from each other. what do you all think?

New transom before being trimmed.
 

GT1000000

Rear Admiral
Joined
Jul 13, 2011
Messages
4,916
Re: 1990 galaxie california reuild

Re: 1990 galaxie california reuild

Hi Garrett,
Great job cutting and gluing the transom plates...
I personally, would completely encapsulate it with one layer, on all faces, of CSM before actually installing it...
Then refer to woody's way...
http://forums.iboats.com/boat-resto...go-splashed-w-pics-384982-25.html#post3586813
Make a note that he points out in the sketches that for I/O applications, the transom should be doubled up on 1708...

If the screws you used to clamp the pieces together are deck/galvanized screws, you'll be OK to leave them in, otherwise you might want to remove them...if they are plain steel, they will eventually begin to rust from the wet environment, leach out through the resin/cloth and start causing problems...

Keep up the great progress!
Gus:)
 

Woodonglass

Supreme Mariner
Joined
Dec 29, 2009
Messages
25,924
Re: 1990 galaxie california deck repair help

Uhmmm, not sure but is that a bad reflection in the pic, or are there air bubbles in your glass lamination. If it is bubbles they need to be ground out and patches put back in. It's much better to tie the Mounts and stringer into each other and then tie them into the transom making them a uniform structure. Makes for a much stronger unit. Once the transom wood is coated with CSM on both sides it's ready to be installed. No more CSM required. Do a dry run of clamping it in place to ensure you know how it's gunna fit and then mix up your PB and get her installed.:joyous:
 

garrett113

Seaman
Joined
Jun 19, 2013
Messages
53
Re: 1990 galaxie california deck repair help

Thanks for the info guys. Woodonglass, what your seeing is the excess resign that oozed out of the screw holes. the resign started to kick just as I finished putting in the last screws so I scraped the excess off. That is why it doesn't look even. I am planning on getting the transom installed this weekend also I will build the engine mounts and start cutting out stringer. I plan to cut it out the same way I cut my transom out which is with an air chisel it was really nice easy work. and no dust! not sure if anyone else has done it this way but it worked great for me. I removed my entire transom and had most of it grinded in 4 hours!

I had one more question before I install the transom and that is, if you look above about three posts you will see the pic of the old transom. you can see that it goes all the way up to the top of the hull and the transom was glassed to the cap. what im thinking is I will capsulate the transom in csm install transom in boat then when ready replace that section of the cap I cut out and then glass the transom to the cap.

My other option is to replace the section of cap first then do transom that way there is a barrier keeping water out(between cap and hull) but this way would be much more difficult.

you get what I mean?
 

garrett113

Seaman
Joined
Jun 19, 2013
Messages
53
Re: 1990 galaxie california deck repair help

made some progress over the weekend!


I got one side of transom covered with 1.5 oz mat but ran out of catalyst so I decided to do a test fit. Made some clamps, im going to make acouple verticle clamps to go near the ends. I wasn't getting enough clamping power at the ends. Anyways while I had the transom in I figured id make the engine mounts. got those all cut out then I removed the stringer. its a 2x4 its 3.5 all the way down except for the last 3 feet it tapers off should be pretty easy.

It wouldn't be an update without a question now would it...

When I go to put the transom in (after incasing the rest in matt.) my plan is to whip up a big batch of pb and lay it on thick maybe idk 1/4'' then clamp it in and then use the rest to fill in the gaps and round of the edge so the cloth will lay down nicely. Sound good?

one other question, when I over lap or anytime I have to go over a section that already has glass/resign that I applyed do I need to sand first to give it some bite? ive been told if I put a little acetone and it becomes a tacky I can simply glass over it no prep is required other then making sure there is no dust. What do you guys do?
 

GT1000000

Rear Admiral
Joined
Jul 13, 2011
Messages
4,916
Re: 1990 galaxie california deck repair help

Transom install plan sounds solid...
One tip, if you are going to eventually install stern eyes, you could drill the mounting holes for them now and use the holes as a place to bolt through the clamps...

As far as doing a lam,having to stop, then adding more later...I have had much success using the method you describe, IF you do it within a day or two...after that most of the cure will have been completed and you should definitely "ruff and scuff" the surface...

I generally go over the previously laid glass with a quick pass of the D/A with 40 grit, just to get rid of any "nubs" or Hairs, that might impede the next layer from going down smoothly...

You'll also get an indication of whether the resin is too "Cured", if the sandpaper does NOT get all gummy from a quick pass...

Great looking progress and keep up the great work!
 

Woodonglass

Supreme Mariner
Joined
Dec 29, 2009
Messages
25,924
Re: 1990 galaxie california deck repair help

Here's a tip on how to make KeyHole clamps so you'll get more clamping pressure on the outer portion of the transom. Cut a taper on the 2x4 as shown in the drawing. I exaggerated the taper in the drawing for illustration purposes you only want it to be about 3/8" from the end towards the middle. When you tighten the center bolt, pressure will be applied first to the outer regions of the transom and then as you tighten the bolt pressure will be brought to bear more and more towards the center as the board flexes.

TransomKeyholeclamps.jpg
 

garrett113

Seaman
Joined
Jun 19, 2013
Messages
53
Re: 1990 galaxie california deck repair help

Made some progress over the weekend.


any recommendations or technique tips for when I go to cover the engine mounts/stringers?

also I decided to put some pvc pipe in the drain plug whole ruffed it up then used pb. I it it kinda hard with a hammer a few times after it dried and it didn't budge. should be ok, yea?
 
Top