Re-securing mat to inner hull wall, 1987 Bayliner Trophy

pastorbud

Chief Petty Officer
Joined
Jun 1, 2005
Messages
555
I have a separate post up with questions about a floor restoration. While I have the floor off, I'm inspecting the interior structures.

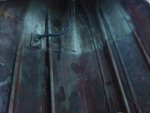
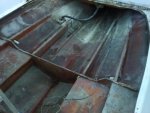
Not sure what to do with this part: There are rectangular boxes full of foam (I know that 'cause a little extruded from the factory) on each side, running from the transom forward about 5 feet, right next to each gunwale, positioned in beween the fuel tank and the gunwale. The fiberglass is largely intact, and the tops are flat.

It looks like they were once secured to the gunwales with mat running about 3 inches up the inner wall of the hull. (See photo.)

There is now about 1/4 inch gap (see white arrows) between the mat and the hull. Looks like it used to be attached.

starboardhullmat.jpg

I don't think that mat has any structural effect (it's attached, or was attached, to a very flexible part of the hull, near the top to the gunwale). I think it's only purpose is to trap any water coming down the inside of the hull and redirect it into the bilge or the forward compartment (where it will then drain back to the bilge).

I'm just wondering how and whether to re-attach it.

Just lay another piece of mat on top (pretty sure that will pull right off like the old one)? Insert some treated plywood or "peanut butter" resin and chopped glass to fill the gap, then mat over? Leave it alone, it's been that way a long time and waddaya want it's an old boat?
 

pastorbud

Chief Petty Officer
Joined
Jun 1, 2005
Messages
555
Forward compartment

Forward compartment

The drains plugged on the forward compartment and I had at least 10 inches of water in there last season. I vacuumed it out and installed an additional bilge last season. I cleared the drains when I got the floor out.

All in all, it's in better shape than I expected. All the fiberglass seems intact and chines (?? fore and aft running channels) are solid.

The darker sections are dripped hydraulic fluid from when I removed the Baystar hydraulic steering lines to remove the console.

I don't see much here that need attention.

View attachment 198208
View attachment 198209
 

Attachments

  • forwardcompartmentcloser.jpg
    forwardcompartmentcloser.jpg
    22 KB · Views: 0
  • forwardcompartment.jpg
    forwardcompartment.jpg
    28.6 KB · Views: 0

pastorbud

Chief Petty Officer
Joined
Jun 1, 2005
Messages
555
Potholes

Potholes

I've got two "potholes" where there was a knot in the plywood on top of the flotation chambers. They look worse in the picture than they are. Just about the size of a golf ball and less that 1/2" deep.

I've already chipped out the bad stuff and will re-fill with resin and chopped strand.

portpothole.jpg

portpotholeandstringer.jpg
 
Last edited:

pastorbud

Chief Petty Officer
Joined
Jun 1, 2005
Messages
555
Coupla worn places

Coupla worn places

The soft deck allowed the underside of the floor to rub against some of the flat surfaces underneath the floor and remove the fiberglass. And it was "crazed" (mutiple cracks in may directions) in one place.

I plan to just lay a layer of mat over these sections (after filling that one pothole).

starboardfloatation.jpg

portpotholeandstringer.jpg
 

jbcurt00

Moderator
Staff member
Joined
Oct 25, 2011
Messages
24,871
Re: Re-securing mat to inner hull wall, 1987 Bayliner Trophy

Got the PM

Not sure I understand what I'm looking at & what you're really asking above & from the PM:

Reattaching the mat to inner hull wall?


Do you mean the mat that has pulled free in this pix (as marked by the arrows?):
attachment.php


If this is the square foam filled box you mentioned earlier, and there is evidence of water intrusion & a rotted deck, you probably should carefully remove these 'boxes' after taking LOTS of pix & measurements for put back. If water was getting below deck, isn't it possible that this foam filled box has also experienced water intrusion?

At a minimum, I'd probably grind off the loose mat from the corner your Bic is laying in up & grind the surrounding glass back to fresh glass in prep of new fiberglass work. Then fill the joint w/ resin PB, fillet the box to the hull and run a layer of CSM & 1708 across the top of the box, over the fillet & up the hull sides.

But that is just a less then expert opinion, based on somewhat limited info & pix.

That ^^^ all said, I suspect the boxes have 2 primary functions:

Additional flotation foam (to meet USCG standards of sufficient foam for level flotation)

And 1 or several of the following:

Structure to support the interior finish & layout
Torsional hull rigidity
General hull support structure
Dampen harmonics/vibration 'felt' thru the hull while underway (from the motor, the hull in contact w/ the water, etc)
Additional strength in that area of hull side~bottom chine

Doing nothing or leaving it as is & glassing over, are probably not your best course of action. SOMETHING caused the delamination from the hull. Getting the boat w/ this condition, I'd also look very carefully at the other one on the other side of the boat for similar problems. It may not be easy to determine. But if you proceed to fix this damaged 1, I'd definitely do similar work to the other side, damaged currently or not.

What ever caused the delam, although not exactly relevant to it's repair, it is important to rectify the current condition & prevent it's re-occurrence or replication on either side.

Could have been a factory defect that took years to full develop into what you see now.
 

Woodonglass

Supreme Mariner
Joined
Dec 29, 2009
Messages
25,924
Re: Re-securing mat to inner hull wall, 1987 Bayliner Trophy

JBC is 100% "Spot On" in his analysis and advice. Put it back just like you found it and attach the foam filled boxes to the hull so they will serve their intended purposes as stated above.
 

jigngrub

Fleet Admiral
Joined
Mar 19, 2011
Messages
8,155
Re: Re-securing mat to inner hull wall, 1987 Bayliner Trophy

At a minimum, I'd probably grind off the loose mat from the corner your Bic is laying in up & grind the surrounding glass back to fresh glass in prep of new fiberglass work. Then fill the joint w/ resin PB, fillet the box to the hull and run a layer of CSM & 1708 across the top of the box, over the fillet & up the hull sides.

^^^^^ This ^^^^^

Factory below deck glass work isn't the greatest, you can do a much better job.
 

pastorbud

Chief Petty Officer
Joined
Jun 1, 2005
Messages
555
Re: Re-securing mat to inner hull wall, 1987 Bayliner Trophy

Yes, that mat that is pulled loose and marked with the arrows is what I was referring to. I opened one box up today-- cut the "cap" off.

More pix later. Thanks guys. I hope to take some more pix and put a a "how-to" for others. It helps to know where to cut on these things, so I may as well share what I find under there!
 

pastorbud

Chief Petty Officer
Joined
Jun 1, 2005
Messages
555
Re: Re-securing mat to inner hull wall, 1987 Bayliner Trophy

^^^^^ This ^^^^^

Factory below deck glass work isn't the greatest, you can do a much better job.

You can say that again! Iss oogly under thare!
 

Scott Danforth

Grumpy Vintage Moderator still playing with boats
Staff member
Joined
Jul 23, 2011
Messages
47,541
Re: Re-securing mat to inner hull wall, 1987 Bayliner Trophy

The factory work was done with minimum prep in the shortest time possible.
 
Top