1974 18' Starcraft Holiday Aluminum Boat Restoration and Custom Build

StickyHooks

Cadet
Joined
May 20, 2013
Messages
11
Hello iBoats,

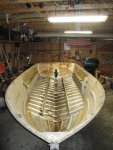
Thought I'd document my first boat build after lurking on the site for years gathering information from the community. I am the proud owner of a POS 18' Starcraft Holiday that has left me stranded on multiple occasions. I think I've tied a rope to my waist and swam this boat back to share 3 times now, once with my fat cousin sitting on the bow refusing to paddle. Many other breakdowns include bouncing off $50,000 boats in the river trying to get back to the launch on busy holiday weekends, embarrassing.

Time for a gut and build project. Snot Green Anymore.jpg
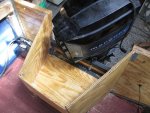
I will be converting to an outboard so a new transom design is in order. I've read every forum post possible on material selection but after looking at the rotted junk that came out I'm not going to be too picky. Starcraft only painted the transom wood from the factory and relied on epoxy to seal it on the 'backside'.

My choice was (2) 3/4" and (1) 1/2" chunks of plywood for a total of 2" thickness, coupled with a piece of 1/8" angle iron to cap it with. I wanted ACX but it wasn't in stock so BCX got thrown in the truck.

I measured my motor to confirm it was a 20" shaft and then decided to mount it a 21" to live on the edge a bit. Found a piece of cardboard to use as a template and cut it to size, then transferred the cardboard pattern to the plywood

After cutting into the BCX I noticed the interior voids were not filled/sanded like I had thought. Oh well, thats why I ordered extra epoxy from US Composites. No complaints so far.

After a bit of sticky work I had a drop in transom assembly. I used exterior grade scres to clamp the sheets together. I also paid very close attention to the edges of the transom as it soaked up more epoxy, this took 3 coats before I was confident in it's water resistance.

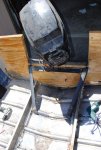
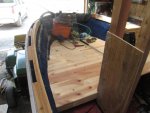
I then referenced Glen L Marine's manuals for the final outboard well dimensions and cut the entire transom to size using a circular saw (set at proper depth to not hit the aluminum sheet) and a sawzall for the aluminum portion. It is not beautiful but it is tough as nails. After letting it cure for 24hrs I mixed another batch of epoxy and really laid it on thick over the exposed top. Then I laid the channel iron and set the motor. DSC_0007.jpg
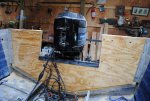

Tonight I will align and bolt the motor (150hp Black Max), looking at the install height I'm really happy I went with 21"

Future plans include:
-Outboard Well made from left over angle iron and plywood
-100% wooden gunwales made from Cedar and Red Oak (I know Red Oak is not ideal....)
-Aluminum Gas tank install, 8cu*ft of closed cell foam in the floor
-100% Wood Floor, T&G Pine slathered with epoxy and some beach sand
-90% wooden Center Console made from Cedar with a canvas t-top using conduit and marine canvas
-This was going to be made from bent exhaust piping but the steel would interfere with my autopilot compass
-100% Electric Steering with compass autopilot, using a controller and a ballscrew linear actuator

Stay tuned, this should be fun. Please comment and post as you'd like. Heres the budget so far:View attachment https___docs.google.com_spreadsheet_fm_id=tz4Co-kWPh3XY1nXrTqPHZw.03253096254560060448.pdf
 

GA_Boater

Honorary Moderator Emeritus
Joined
May 24, 2011
Messages
49,038
Re: 1974 18' Starcraft Holiday Aluminum Boat Restoration and Custom Build

Welcome to the Tin Drydock, Sticky. You give Starcraft too much credit, they didn't do any thing to floors or transoms except cut to fit and stick 'em in.

You are planning on some knee braces, aren't you? And how about aluminum tubing for the T-top, then no interference with the compass.

Keep up the good work and Git 'er dun! :D
 

classiccat

"Captain" + Starmada Splash Of The Year 2020
Joined
Dec 20, 2010
Messages
3,405
Re: 1974 18' Starcraft Holiday Aluminum Boat Restoration and Custom Build

Welcome StickyHooks! That's one heck of an introduction!! You're off to a great start!
 

jasoutside

Supreme Mariner
Joined
Dec 20, 2009
Messages
13,269
Re: 1974 18' Starcraft Holiday Aluminum Boat Restoration and Custom Build

Hey welcome to iboats!

Interesting set of plans ya have there!

Yah, I'm with GA, knee braces should be on the short list for ya:thumb:
 

Woodonglass

Supreme Mariner
Joined
Dec 29, 2009
Messages
25,924
Re: 1974 18' Starcraft Holiday Aluminum Boat Restoration and Custom Build

I'm not a "Tinner" but...I'd think some kind of a "Splashwell" should be in the plan too!! I'd also recommend replacing that STEEL Angle with and Aluminum one. Steel is Really not needed IMHO.;) But again, I AM just a Glasser!!!!!:D:eek:
 

Woodonglass

Supreme Mariner
Joined
Dec 29, 2009
Messages
25,924
Re: 1974 18' Starcraft Holiday Aluminum Boat Restoration and Custom Build

If I could Only find a Nice JetStar in Okie Land!!!!!:joyous:
 

Woodonglass

Supreme Mariner
Joined
Dec 29, 2009
Messages
25,924
Re: 1974 18' Starcraft Holiday Aluminum Boat Restoration and Custom Build

I dint C no Stinkin JetStar in Dem Dere pikchures U cent me
 

StickyHooks

Cadet
Joined
May 20, 2013
Messages
11
Re: 1974 18' Starcraft Holiday Aluminum Boat Restoration and Custom Build

Thanks for the input fellas. I really wanted to use aluminum angle for the splashwell and bracing, as well as the center console structure. I just dont have any good way to work with it, my stick welder and I get along real well and I've got a cedar mill right down the street.

These types of projects really get influenced by what tools you already own and what resources are readily available.

I do plan on sealing the steel with epoxy and then some Rustoleum. Its going to be a fresh water boat that spends its time on Lake Michigan and Lake Superior. Unless gasoline gets really cheap I dont think the boat will ever see a salt bath.

My goals for the weekend are the splashwell, gunwales, and maybe the floor if my gas tank arrives in time. I should have some good pics up Monday night.

One of my concerns is that I will be using steel for the splashwell/bracing structure and this will need to be fixed to the aluminium hull using many 3/16" rivets. I dont like the dissimilar metal contact for abrasion and galvanic corrosion reasons. My plan is to epoxy the interface and see what happens.

Anyone else dealt with this dissimilar metal contact with success?
 

jasoutside

Supreme Mariner
Joined
Dec 20, 2009
Messages
13,269
Re: 1974 18' Starcraft Holiday Aluminum Boat Restoration and Custom Build

I will be using steel for the splashwell/bracing structure and this will need to be fixed to the aluminium hull using many 3/16" rivets. I dont like the dissimilar metal contact for abrasion and galvanic corrosion reasons. My plan is to epoxy the interface and see what happens.

Why don't ya just use alum stock for this sort of stuff?:noidea:
 

GA_Boater

Honorary Moderator Emeritus
Joined
May 24, 2011
Messages
49,038
Re: 1974 18' Starcraft Holiday Aluminum Boat Restoration and Custom Build

Sticky - I have to go with Jason. The horror stories about dissimilar metals are true. Steel and copper are both almost equally bad. I have fish hook scars under my deck, someone else had a penny laying on the hull with a circular scar. All in freshwater boats. Mixing mis-matched metals and water is not good, salt or not. Plan on the boat getting wet, no matter how good you seal her up.

Throw up some pics so we can see what you are planning on doing. Also, scrap yards are a source of AL and the big box stores have a fair selection of stuff, too. If it needs welding, it's best to bite the bullet.
 

StickyHooks

Cadet
Joined
May 20, 2013
Messages
11
Re: 1974 18' Starcraft Holiday Aluminum Boat Restoration and Custom Build

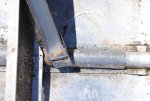
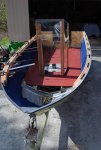
Well, a lot of progress was made this weekend. I finished the transom bracing with steel and have added two magnesium anodes (not shown in pic) to the dissimilar metal interface. Magnesium is much more reactive than zinc and should be the answer to the dissimilar metal question:DSC_0003_2.jpgDSC_0004_2.jpg

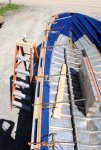
I then moved on to the gunnel work, so far this has been my favorite part of the project. I used a cedar 2x4 and cut it diagonally with a table saw. Then added two cedar 1x4's for the railing. Every interface was expoxied and then thru bolted with 1/4" bolts. The original plan was to add a third, red oak, 1x4 to the outside but the gunwales were stiff enough without it and I didn't want the hassle of keeping the red oak in good shape:
DSC_0002_2.jpg

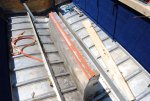
Following the gunwales came the tank and foam install. I wrapped the tank with silicon strips to keep the hull and tank from rubbing on each other:
DSC_0001_2.jpg

The used a two part foam (2lb) density and poured the side cavities full. I saved just enough foam to go around the edges of the tank as well (no pic). This foam is a little messy but great stuff to work with. I used 8cu ft from US Composites for the whole boat. That equals about 480lbs of flotation.
 

StickyHooks

Cadet
Joined
May 20, 2013
Messages
11
Re: 1974 18' Starcraft Holiday Aluminum Boat Restoration and Custom Build

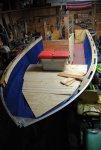
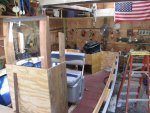
Next up was the floor and center console. I am not impressed with how my white wood carsiding floor turned out. I dont think it will be a permanent flooring solution. What I am impressed with is the RockSolid Desk Restoration product that I coated the underside and topside with. That stuff penetrates well and provides a no-slip, hard as nails surface finish:
DSC_0007_2.jpg

The center console turned out "ok", all in all this boat will end up being a functional fugly machine, nothing that will exactly turn heads at the launch. But thats alright, its going to be used extensively. Also, I am surprised at how light the boat has remained. There must have been a lot of water packed in the old wood I ripped out, couple that with all the extra seat weight and uneccesary add on's installed by the Manufacture.
DSC_0008_2.jpg


Goals for this week:

Router/Sand the gunwales
Rear splashwell
Rigging
 

GA_Boater

Honorary Moderator Emeritus
Joined
May 24, 2011
Messages
49,038
Re: 1974 18' Starcraft Holiday Aluminum Boat Restoration and Custom Build

Sticky - Did you put the magnesium between the steel bracing and the aluminum rib? You say they aren't shown, but I see something at that junction.
 

StickyHooks

Cadet
Joined
May 20, 2013
Messages
11
Re: 1974 18' Starcraft Holiday Aluminum Boat Restoration and Custom Build

I riveted the magnesium chunk to the aluminum support spar in the valley of the boat. In this location is will always be covered by bilge water (if present). The magnesium is much more reactive than zinc and should be a proper anode and provide protection for the aluminum.

What is shown in the pic is my 2" chunk of exhaust pipe cut in half. This piece served as a weld point for the channel as well as providing a nice surface to rivet through into the aluminum channel/support.
 

StickyHooks

Cadet
Joined
May 20, 2013
Messages
11
Re: 1974 18' Starcraft Holiday Aluminum Boat Restoration and Custom Build

Well I finally had a chance to make some real progress again.

I've got the wires and cables run inside 1" plastic loom, this keeps them organized and the loom will serve as trim between the floor and the sides.
IMG_0023.jpg
Also complete is the gas tank, filler tube, vent, and sending unit. I used 1.5" black pipe to serve as my filler neck and grounded it accordingly. The 3/8" gas line and vent run to the back via the 1" conduit above deck. I didn't want any wiring or fuel below deck where I couldn't see it or easily get at it in the event of a breakdown.
IMG_0026.jpg
The front floor is complete although I have not painted or installed and access hatches yet. At the moment I'm concentrating on the jobs required to get it sea worthy.
IMG_0025.jpg
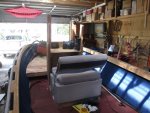
There was a brand new Deckmate Flip Back Cooler seat on eBay for 250$ that I picked up last week and I'm VERY happy with it. The material is top notch although I doubt it will hold ice as well as an Igloo cooler.

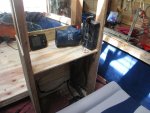
I also finished the center console off and installed the fish finder and controls. I had to rotate the controls to make them fit and provide easy wire/cable routing. Still need to cut the acrylic glass for the side wind screen(s).
IMG_0024.jpg
 

StickyHooks

Cadet
Joined
May 20, 2013
Messages
11
Re: 1974 18' Starcraft Holiday Aluminum Boat Restoration and Custom Build

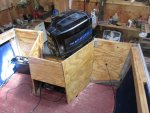
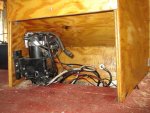
The roughest part of this whole project has been the splashwell. After some effort it came out exactly as I wanted and according to plan. I built it around the motor and because of this I have alot of extra room inside the boat to run downriggers at the back corners. There is also just enough room to hide the trim pump and one very large marine battery underneath. This also leaves mroe room inside the boat as well.
IMG_0019.jpgIMG_0020.jpgIMG_0022.jpg
Today I fired the old girl up on the garden hose and she ran "ok". I noticed some bleed hoses cracked in half so I replaced those and also ran some SeaFoam thru her. After that she idled right down and purred. I still have not put the engine under load yet. There still may be some demons lurking.

The next job will be steering. As stated before I'm going to be a beta tester for SMRTindustries.com and their joystick steering autopilot system. I already bought the ballscrew actuator and am just waiting for the control unit. As a part of this gig they want to use this boat to tune the autopilot as well. Just so long as they dont mind me fishing while they're tuning it'll be ok.
 

Celtichawk

Chief Petty Officer
Joined
May 6, 2012
Messages
564
Re: 1974 18' Starcraft Holiday Aluminum Boat Restoration and Custom Build

That is some interesting build....I like it though and waiting to see the finished product once all that wood is sealed and ready for splash day.
 

StickyHooks

Cadet
Joined
May 20, 2013
Messages
11
Re: 1974 18' Starcraft Holiday Aluminum Boat Restoration and Custom Build

Well, the results are in. I have put about 100 miles on her and everything is performing great. The joystick steering is a god send, responsive enough but not too touchy. I can walk away from the helm (in appropriate conditions) for a bit and take care of set up and other tasks in route to my destination. Its also nice to have the power of that linear actuator during rough seas as it filters out all disturbances. The compass autopilot is hands down my favorite fishing gadget of the summer. Now no one is complaining about driving the boat when the poles pop and a fish is on.

But...I do have a small problem. The boat rides to flat on the water above 35mph. Anything past 1/2 throttle and I cant get the nose up using the trim. This creates a twitchy and dangerous situation. The boat really wants to bite and turn abruptly. If anyone could chime in on possible causes I would appreciate it. I dont know if I mounted the motor too high or what?!?

Setup and Details:
-18' Aluminum Hull Rigged => apprx 1100lbs
-1978 Merc 150hp Black Max 20" shaft length mounted at 21" (one inch higher than bottom of boat)
-14"x19P Aluminum Prop
-Evinrude 6hp kicker, two batteries, trim pump all in the back of the boat
-30gal tank and center console in dead center of boat.
-I have run the boat with a full and empty gas tank (30gal) with no change in high speed planing angle.

Is it possible that this hull was designed for 30-35mph? At WOT I'm pushing 50 on gps.
 
Top