Restoration of my unknown 13.5ft fiberglass

CK07R6

Cadet
Joined
May 23, 2011
Messages
28
Not sure what the heck this boat is, but its mine.

I picked it up about 10 months ago off a farmer. I got it with the floor and stringers previously ripped out. So no templates for anything. But I did what I could for my first time and got a floor put in it. Dont ask me what I used for the floor repair because I honestly dont remember. I did what I felt was sufficient at the time. Im pretty sure it was 3/4" plywood over 2x6 stringers that were obviously cut down to match the curve of the hull. Everything was fiberglassed front and back and all around to be water tight. I learned what I could from the forum prior to starting my project.

Originally the boat came with a 1960's 50hp Mercury outboard but it wouldnt go into reverse and the leg was leaking pretty good. Rather than risk more damage I pulled it and bought a parts boat with a 40hp newery Merc (1983?).

Its an odd little boat. From what I can tell its a Fleetcraft built by Scotts Fiberglass here in Calgary locally. Seems 13.5 feet from transom to bow in a straight line. Had back to back seats up front and a rear bench which was totally rotted out. Literally nothing left but some vinyl.

Im kinda playing catch-up on this thread because when I first bought the boat it was spray painted a nasty silver colour. Some light sanding revealed the original gelcoat in an orange color which I actually kind of like. I may just paint it the same color again.

Enough yacking. On to the pics.

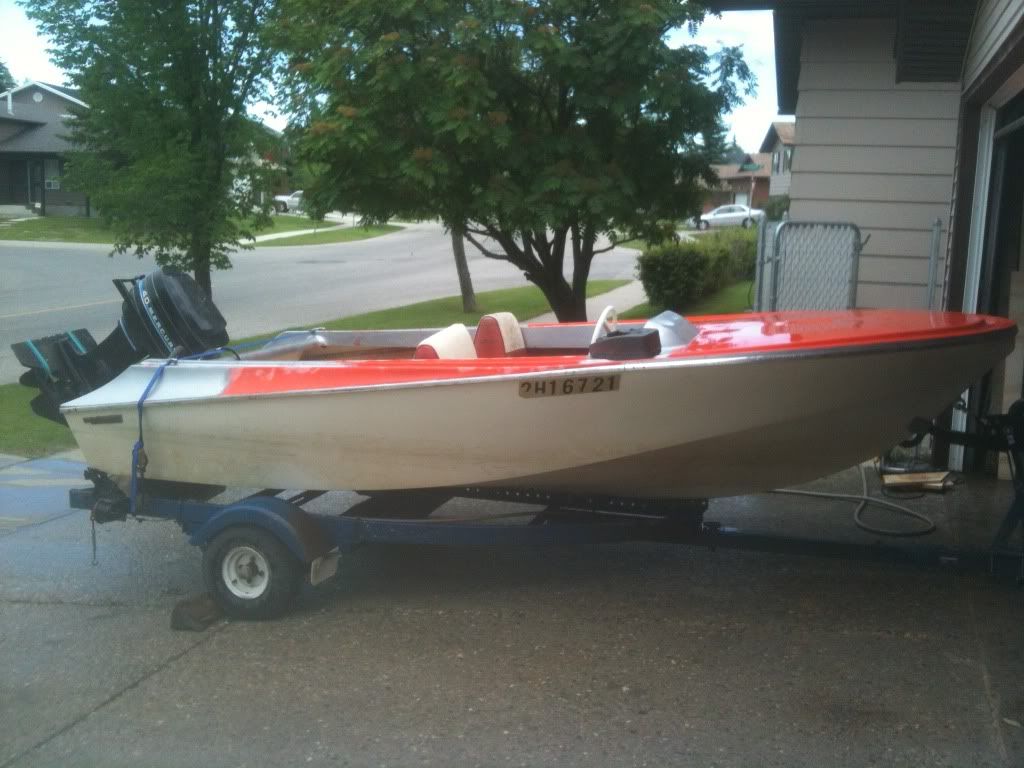
Here's the boat when I first picked it up about 8-9 months ago:
photo11.jpg


Here's the previously ripped out floor and stringers:
photo1.jpg


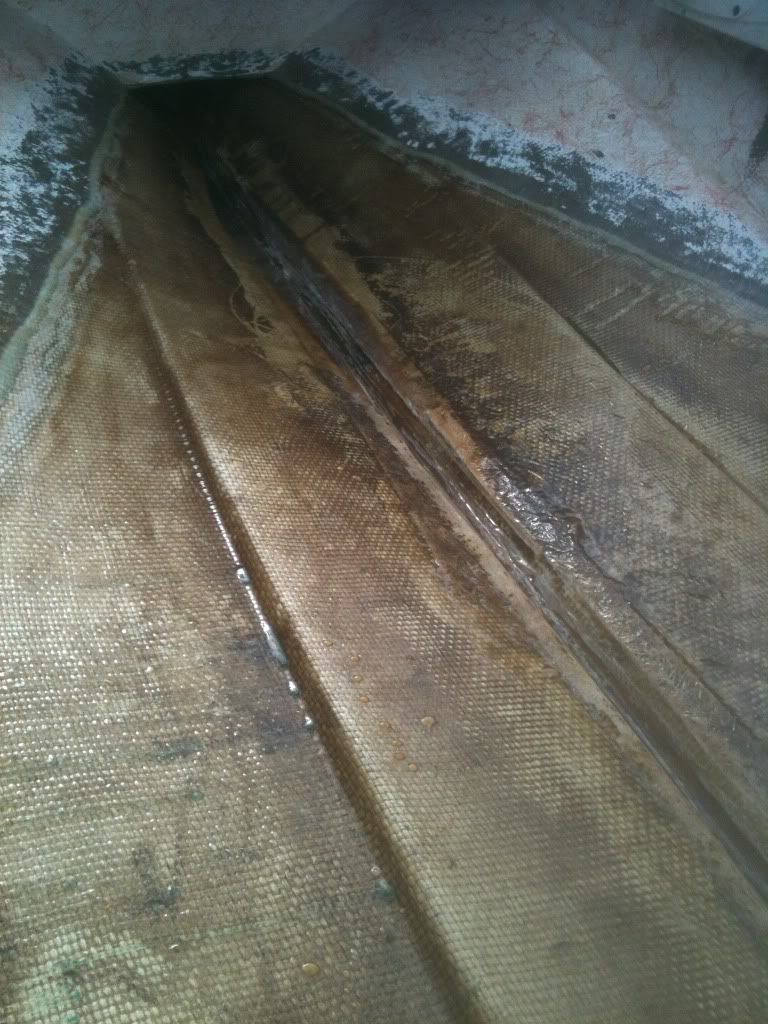
I dont have any pics of the progress of my stringer and floor replacement really. The stringers I bedded in PB based on other peoples recommendations and that worked pretty well. Again, it was my first try so of course it could have been better, but I dont think I had any air bubbles or anything.

Here's a picture of the floor laying process. There's a bit more of a gap there than I would have liked but I closed it in fairly well. Tabbed everything over 4-6".

photo31.jpg


It looks like theres more of a gap than there actually was. I continued by PBing the gap and tabbing anywhere that the panels met. Feels pretty strong. Unfortunately there's only like 3-4" below the floor so I didnt do any foam. Im second guessing myself now with the foam. Should I try to squeeze some pool noodle pieces under there or cut a small access door into the front of the floor to fit something in there for floatation?

Here's a picture of the grey crappy spray bomb partially sanded off. The gelcoat is we obviously but I like the color.
photo23.jpg


The boat came with a windshield but it was in about 5 different pieces so I tossed it. Wasnt even worth making a mold of.

So, everything was going fairly well. I repaired a bunch of fiberglass spots where it had cracked from stress and there were various holes (windshield etc). I was going to leave well enough alone with the floor replacement and small repairs........but my I recently underwent hernia surgery on my abdomen. What's a guy to do when he has a month off work (PAID) ???!?

Rip into the boat of course!

So I decided it was all or nothing. This boat is shaped as a bit of a speed boat, which I love, but fishing is more my style. I like to boot around the lake but I really enjoy my fishing. So I went out and bought a removeable downrigger and a 55lb thrust trolling motor etc. But I still wasnt happy with the overall boat. So I figured I'd go all the way.

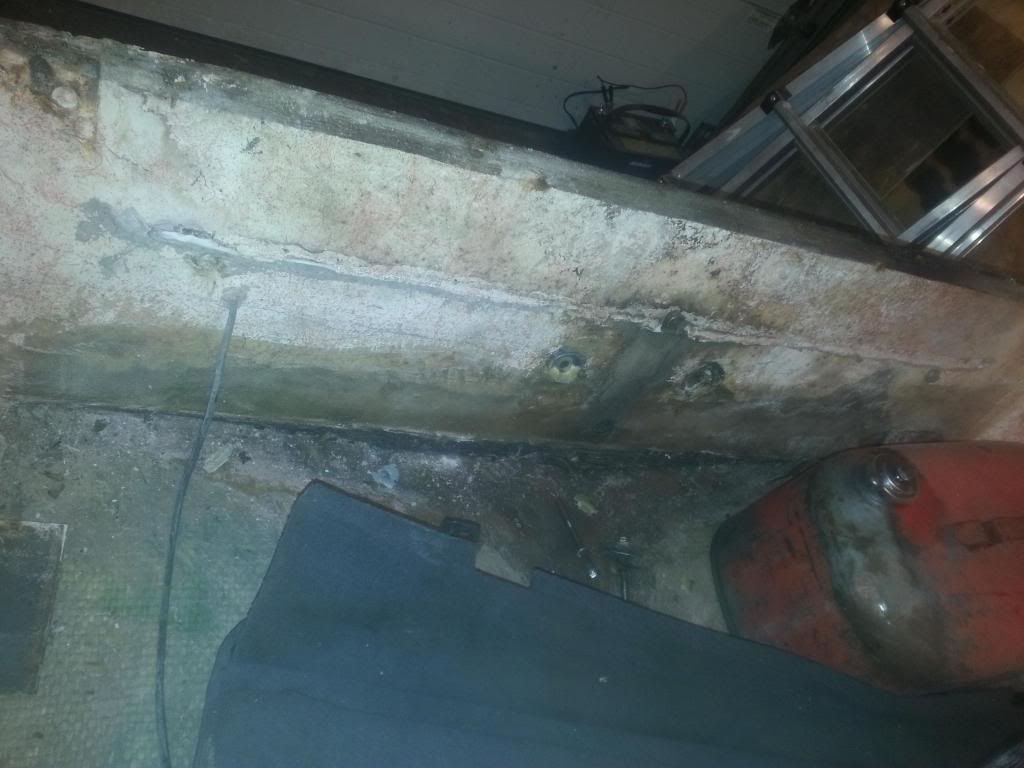
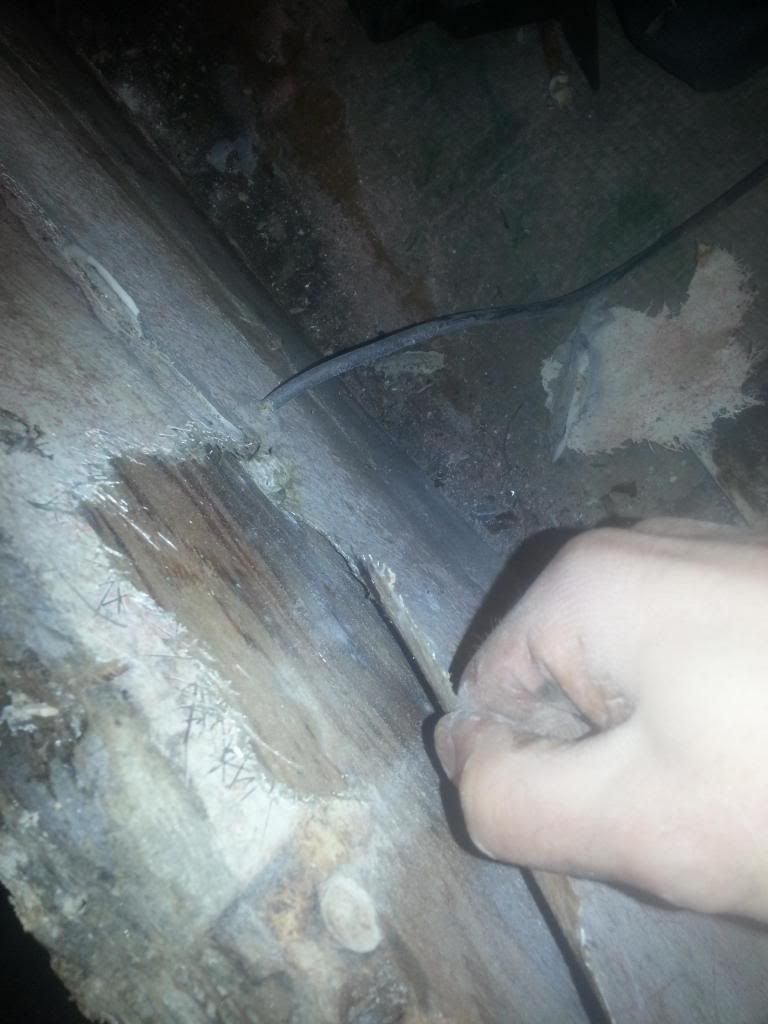
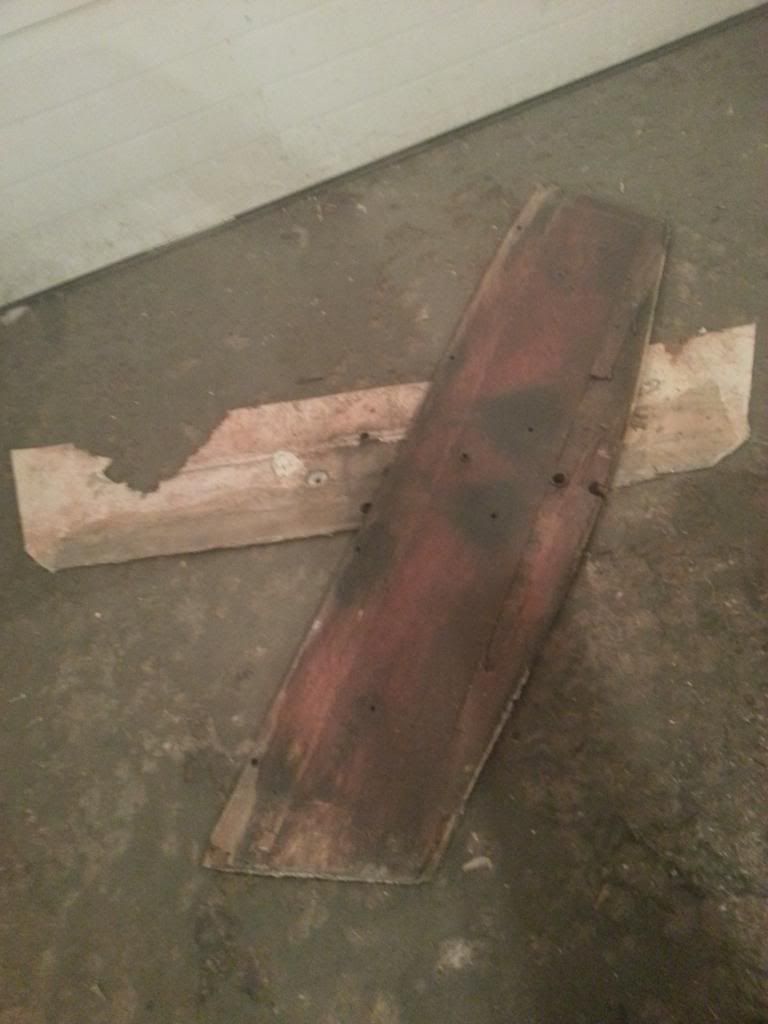
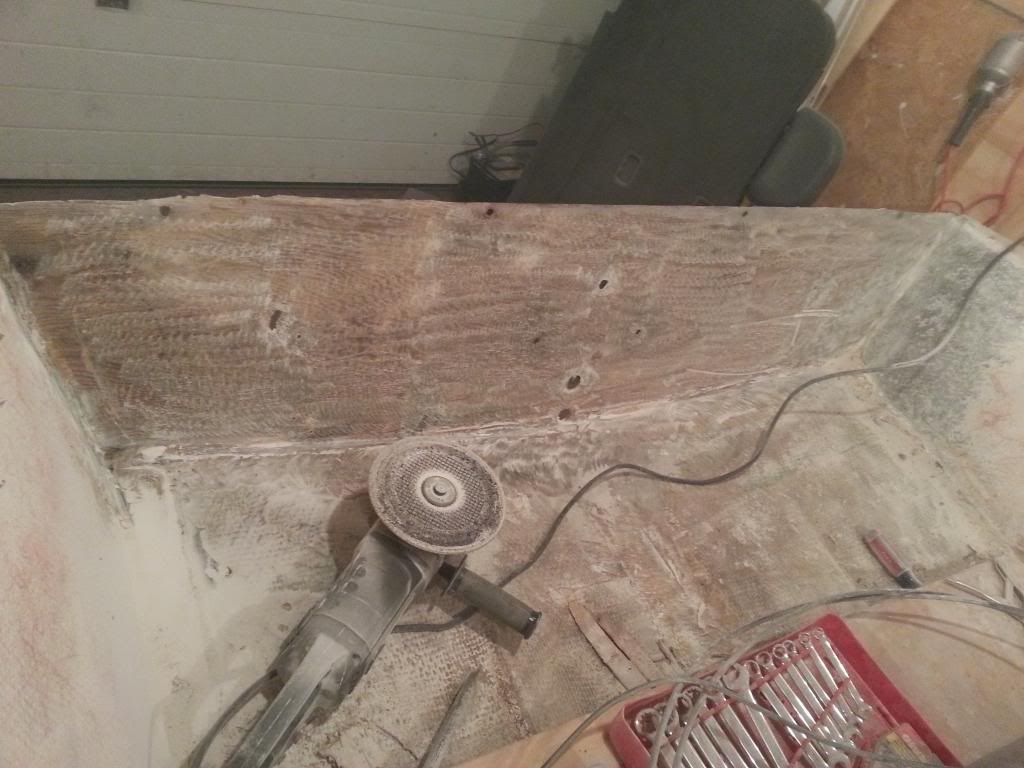
Tonight I pulled the outboard off (40hp merc) and seperated the cap from the hull. Needless to say, Im VERY glad I did. The transom was toast. I suspected it was bad, but it was TERRIBLE. It was actually bowing outwards at the top and looked like it was getting ready to bust right off. It had pulled out from under the cap and was bowed way back at the top. Here's some pics. Its supposed to be straight and even with the top of the cap. SEE THE BEND at the bottom!?!?!

20130121_174537_zps67174e5c.jpg


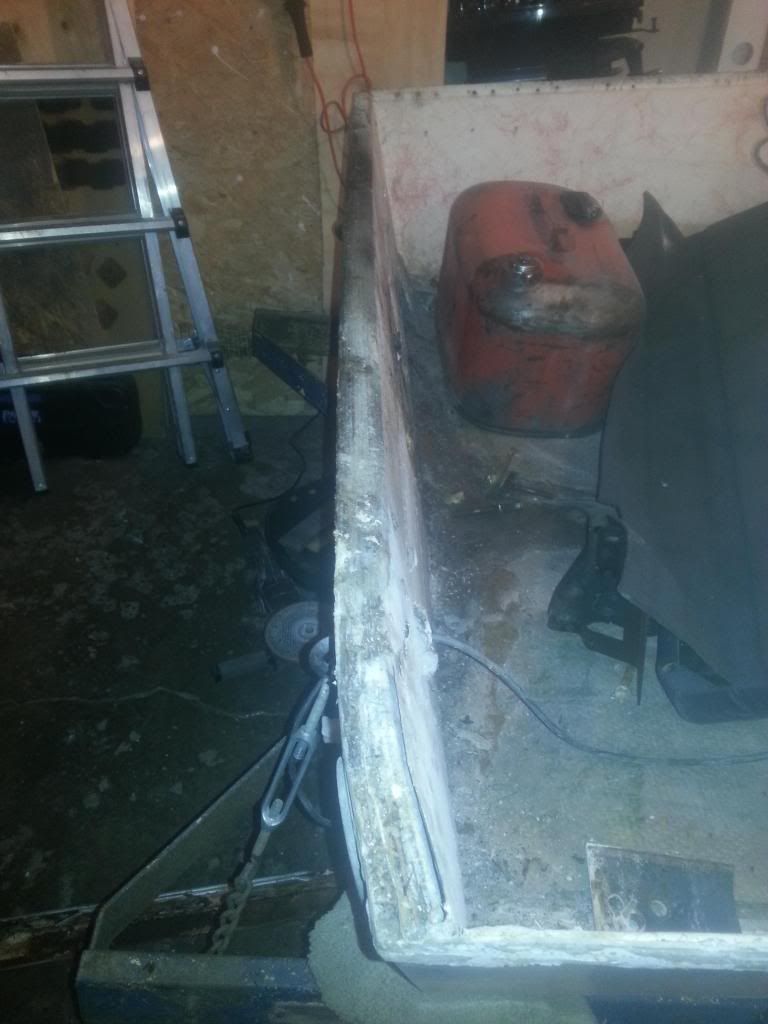
And you can see the color difference in the transom on this pictures
20130121_174528_zps1021bea3.jpg
 

CK07R6

Cadet
Joined
May 23, 2011
Messages
28
Re: Restoration of my unknown 13.5ft fiberglass

Its clearly rotten and needs some serious work. The previous transom replacement was terrible. They didnt do anything to help with bonding of the glass to the plywood. Once I got the cap off I could literally pull the fiberglass off with my bare hand in chunks the size of an ice cream bucket. Easy for me I guess.

20130121_174556_zps671ab710.jpg


So excuse the HUGE mess in the garage, and be very patient with me. But soon to come is a transom replacement and I'll probably put some knee walls in. I didnt take the floor all the way back to the transom because of the giant splashwell. Part of it was lack of access to the very rear, and partially I just saw no reason for it. This way allowed the bilge to drain easily. The stringers didnt go all the way back, so why take the floor all the way back?

Coming up in the transom replacement, knee walls and extensive cap repair and repainting. Im still debating what to do with the hull. Flip it and paint it? Flip it and wetsand and polish it? So torn.

Anyways, theres the start to the project. What do you guys thing? I'm going with some automotive SUV rear seats in the back. Dont judge me too much until you see them finished. I know they arent ideal because the foam isnt covered, blah blah blah. Realistically, those seats will only take water off the passengers rear end from a swim suit, and the boat will never be stored in the rain or see poor weather while in my ownership.

PS: New speedometer Pitot arrived today, and brand new rub rail should be here any day. Still trying to figure out how to work the speedo Pitot, smart tabs, outboard and trolling motor all on the relatively small transom.
 

CK07R6

Cadet
Joined
May 23, 2011
Messages
28
Re: Restoration of my unknown 13.5ft fiberglass

Oh ya, so the boat originally came with the cable steering. Im not a fan. Complicated, space hog and a pain in the rear. If I go with the teleflex kit, it measures out to about 12'9". They suggest adding 6" and rounding up to the nearest foot. That makes it 14'. Seems a bit long. But I'd rather too long than go with 13 and have too short I guess. Aside from their "universal kit" and a steering wheel what else do I need? An outboard connection kit? Its all a little overwhelming because it doesnt really show whats included in each kit.

My current steering wheel has a keyed tab which is a pain. I'd rather use an automotive wheel. Is that what the new 3/4" taper is matched up for is automotive type wheels?
 

Bob_VT

Moderator & Unofficial iBoats Historian
Staff member
Joined
May 19, 2001
Messages
26,022
Re: Restoration of my unknown 13.5ft fiberglass

You can convert to single cable steering for about $125 and it is well worth it. Yes you will not notice the extra 6" of cable and it will fit fine. Just make sure you have a steering tube or you will have to order extra parts to hook up the motor.
 

CK07R6

Cadet
Joined
May 23, 2011
Messages
28
Re: Restoration of my unknown 13.5ft fiberglass

Yeah I've looked at the iboats store pretty exensively, and I think I've got a cable that will work. But Im having a hard time finding the parts for the hookup at the motor.

Today I got out and tried to do a little bit of work to the boat. I had previously separated the cap so today I pulled the transom.

It took some prying and hammering but the transom came out in one piece. It looks like its the original and was still so wet (after over 1.5years indoors) that it weighed a ton more than it should.

I'll put some pics up tomorrow. Im too lazy right now.

Oh did I mention that one week ago today I had hernia surgery and am not supposed to lift more than 5 lbs and exert zero effort? Oops
 

jbcurt00

Moderator
Staff member
Joined
Oct 25, 2011
Messages
24,863
Re: Restoration of my unknown 13.5ft fiberglass

CK from experience, do not over exert yourself during your recovery, don't even come remotely close to the 5lb limit. It is extremely difficult. I had to pre-board, and have assistance w/ my bag during both recoveries. It was uncomfortable & awkward. And forget about grabbing a gal of milk on the way home, 8+lbs, once you're cleared to drive. That shouldn't be for 10days -2wks post-op.

I need to have my 3rd repair done to an umbilical hernia. Each repair makes another hernia more likely.... Mine are not 'techincally' related to over doing it. They manifest slightly L/R Up/Down of the last one that was repaired. But they might be.....

As a result of a combination of age & weight (it wasn't ever a problem until about 3yrs ago) I also have a diastasis, which is similar but higher in the chest just below the sternum. The muscle fibers across my lower chest/upper abdomen have started to separate.

It's suprising how much you use your abdominal muscles doing basic stuff...

This all puts a serious damper on what I can, or will ever be able to do, and I'm 'only' 46. There's still some mileage I'd like to cover.....

Sorry about that ^^^ but don't mess around w/ your health & well being...

OK, on the boat stuff:
Nice boat, a Merc 40 should push it pretty well......
 

CK07R6

Cadet
Joined
May 23, 2011
Messages
28
Re: Restoration of my unknown 13.5ft fiberglass

Yeah I thought the 40 would push it pretty well too. But the only time I had the combo out on the water last summer I couldnt even get it to plane. I dont know if it was just too heavy in the rear with the motor, gas tank and battery back there or what.

I've got plans to relocate either the battery(s) or the fuel tank to under the bow. We will see. Otherwise I guess smart tabs are in my future
 

jbcurt00

Moderator
Staff member
Joined
Oct 25, 2011
Messages
24,863
Re: Restoration of my unknown 13.5ft fiberglass

A 13.5' glass boat w/ a 40hp shouldn't need trim tabs..... Adjust motor's trim angle, raise lower anti-vent plate to just about even w/ the bottom of the keel for sure. But trim tabs seem a tad much for such a small boat.. Most vintage runabout boats had battery & fuel under the splashwell, so unless it was overpowered w/ the 40, I doubt the fuel & bats were the problem.

If you want to use automotive seats in the rear that is up to you, probably not the best choice, but certainly up to you. Are they metal framed seats? That may be problematic in a wet environment.

If the seats are covered w/ vinyl, which seems likely, can you remove the covers & reinstall them?

If so, you can cover the foam w/ a variety of plastic using some 3M spray adhesive. There's been original seat cover removed around iboats somewhere, and it had the plastic bag from a 24-36 roll pack of TP covering the seat foam. Must have been cost cutting day at the seat factory. Once covered w/ plastic, put the cover back on. The plastic walmart bags have been used....

Better then not covered....
 

CK07R6

Cadet
Joined
May 23, 2011
Messages
28
Re: Restoration of my unknown 13.5ft fiberglass

The seats are metal framed seats but Im not overly concerned. Im inland so its all freshwater lakes and the odds of the seats even getting wet aside from the occasional splash is pretty slim. Its not a boat to be swimming out of, nor is it big enough or powerful enough to pull someone behind. But if the seats rust and wear out, I can either replace with with another $40 set, or get dedicated boat seats.

So here's the transom pulled out. Beneath the wooden transom is the single layer of glass that was holding it in. There was next to no adhesion so it pulled out really easy. Great for me, but explains why the transom was bent from a 40hp motor. Im wondering if its the original transom because it looks like its 3 pieces of wood spliced together. The top and bottom grain goes a different direction.

20130122_171801_zps95fd915f.jpg


I also got some grinding done. Not as much as I would have hoped, but thats always the case.

20130122_171822_zpsdbe01bd8.jpg


I wont be getting any work done on the boat today I dont think. I have dinner plans with the GF's family and I should take a day of relaxation to recover.

Im almost at the point of laminating my transom together. What's the "BEST" method? I've seen people laminate the ply together with PL, and others use PB. Is one better than the other? Im going to have issues fiberglassing. Im up in the great white north and dont have a heated garage. I've been getting by with a small propane unit, but with the fiberglass fumes that wont be an option. I might have to get creative.
 

jbcurt00

Moderator
Staff member
Joined
Oct 25, 2011
Messages
24,863
Re: Restoration of my unknown 13.5ft fiberglass

Titebond3 is easy to work with, relatively inexpensive, easy to get at most big box home improvement places, and dries quick. Once dry it's waterproof, while still wet, it cleans up w/ water......

Many cycle the heat on until the BOAT & all materials to be used are above 60deg, then turn it off while working. Then turn it back on to maintain 60+ thru curing.. Depending on area needing to be heated, a tarp & a twin lamp halogen light may provide sufficient temps....
 

CK07R6

Cadet
Joined
May 23, 2011
Messages
28
Re: Restoration of my unknown 13.5ft fiberglass

I've never used titebond before. How is it for fumes? Can I clamp it in the house so it dries faster or will the fumes be too much?

Maybe I'll try to make a pattern for the transom tonight after dinner. Im not too sure how I'll be able to get the plywood cut in my condition, but Im sure I'll find a way. Im sure I can put the GF to work ;)
 

jbcurt00

Moderator
Staff member
Joined
Oct 25, 2011
Messages
24,863
Re: Restoration of my unknown 13.5ft fiberglass

TB3 looks, smells & act's like 'regular' carpenter's glue... Non-toxic, if gives off fumes at all.... Use it to glue the transom ply w/ clamps & screws, it'll cure in a couple hours & be ready for use...

WOG has some good links in his signature line, here's 1 for the current state of things:
"Fabricating Decks, Stringers, and Transoms"

Those long clamps are good for transom glue up w/ the TB3 & for installing it w/ PB against the transom skin as shown...

BTW: PL takes 72 hrs to off gas, so it'll be a 3 day wait to move on..


Please don't over do it, the repeat surgery & recovery is worse....
 

CK07R6

Cadet
Joined
May 23, 2011
Messages
28
Re: Restoration of my unknown 13.5ft fiberglass

Thanks jbcurt00, Im trying my best not to go overboard. The hardest part of recovery is convincing my girlfriend that I cant get off the couch to get my own beer but Im able to work on the boat still. Haha.

I appreciate the input.
 

Woodonglass

Supreme Mariner
Joined
Dec 29, 2009
Messages
25,924
Re: Restoration of my unknown 13.5ft fiberglass

As JB said TBIII will be fine in the house. Use Deck Screws to hold the two pieces together. You MUST coat it all with Resin and a layer of CSM prior to installation. The link JB provided as all the info you'll need.
 

CK07R6

Cadet
Joined
May 23, 2011
Messages
28
Re: Restoration of my unknown 13.5ft fiberglass

Well I got a tiny bit accomplished today. I went and got plywood, got it rough cut, glued and screwed together. 18x64" piece (not shaped to the transom yet) took the full 100 screw box. I couldnt find titebond III so I ended up using gorilla glue instead. I'll make sure I soak it well in resin and CSM once I cut it to shape.

Its not quite going as smoothly as I had hoped, but I'll get it there eventually. Im still trying to wrap my head around the sheer quantity of PB Im going to require to bed the transom to the hull.
 

jbcurt00

Moderator
Staff member
Joined
Oct 25, 2011
Messages
24,863
Re: Restoration of my unknown 13.5ft fiberglass

Gorilla glue is a great alternative! You probably needed 100 screws w/ the gorilla glue. It expands as it cures, almost like a foam....

setup up 4 qts of resin to mix into PB, 1 to mix & 3 'on stand-by'. and at least 2 MEKP measurements.

metric is easier to measure MEKP at 1.5% +/- 0.5% depending on temps. 100ml resin needs 1.5ml (cc's) of MEKP +/- .5ml

In a given container size, twice as much resin & MEKP kicks MUCH, MUCH faster then it does if the same amount of resin is mixed & used in separate containers...

Mix the 1st container of resin w/ fillers & MEKP. As you start to apply the 1st batch, have someone else mix a 2nd. And so on until you get the plywood & transom skin well covered w/ PB...


Practice installing the transom plywood, a few times, including clamping it up.
 

CK07R6

Cadet
Joined
May 23, 2011
Messages
28
Re: Restoration of my unknown 13.5ft fiberglass

All good tips! Thanks again ;) I appreciate it.

I'll make sure I post an update when I get to that point. I'm going to let the transom setup for a couple days in the heated basement and then I'll cut it to shape and go to town when weather permits. Which might be a while.

In the meantime Im going to try to poly the ceiling of the garage to help contain the heat from my propane heater. Wish me luck!
 

jbcurt00

Moderator
Staff member
Joined
Oct 25, 2011
Messages
24,863
Re: Restoration of my unknown 13.5ft fiberglass

Luck.... ;)
 

CK07R6

Cadet
Joined
May 23, 2011
Messages
28
Re: Restoration of my unknown 13.5ft fiberglass

Today I got some more grinding done. Cut out the template for the transom, but havent cut the transom quite yet. Sanded more of the cap and went to prime the front 3/4 of the cap, only to find out that my primer had frozen and was ruined. GRR! So I spray bomb primed a few spots where I had repaired and I'll try to pick up some more primer tomorrow. I had to remove the steering hub and speedometer etc to get it ready for primer too.

It really doesnt sound like a lot was accomplished but that took almost 4 hours. I'll take some pictures later tonight. For now, a cold one is calling my name.
 

Woodonglass

Supreme Mariner
Joined
Dec 29, 2009
Messages
25,924
Re: Restoration of my unknown 13.5ft fiberglass

IMHO you'll need 3 qts of Resin, 4 qts of Cabosil and 1 cup of Chopped milled fibers for installing your transom. PB mix is pretty close to 1 qt resin (1,000 cc's), 10 cc's of MEKP, 1 1/4 qts of cabosil, and 1/4 cup of CMF.
 
Top