Building a 23' Pacific Power Dory

sheboyganjohn

Senior Chief Petty Officer
Joined
Aug 2, 2005
Messages
753
I spent a year and a half building this boat from plans I got from Jeff Spira. I did a photo series on Facebook, but decided to do a complete build story here in the hopes that it well help someone else. I have never done a series like this so bear with me. I am attaching a picture of the boat on its first splash (more to test posting a photo) the rest will be from the start of the project on. Feel free to post any questions you might have along the way.
 

Attachments

  • IMG-20120927-00160.jpg
    IMG-20120927-00160.jpg
    146.3 KB · Views: 3

sheboyganjohn

Senior Chief Petty Officer
Joined
Aug 2, 2005
Messages
753
Re: Building a 23' Pacific Power Dory

I had built a cedar strip boat and enjoyed the process. I wanted to build a bigger boat. I was able to go out and do some duck hunting on Lake Michigan and loved it. Now I needed a boat to hunt out there. I kept bouncing back and forth looking for a boat I could use both on the Lake and the marsh. While mulling it over one day my wife said just build one for each. Since I already had a jon boat for the marsh I decided to do the big boat first. I wanted something with a self bailing hull. After much searching on the internet I settled on Jeff Spira's boats. He has a no nonsence approach to boat building that appealed to me. At the time his largest self bailing boat was 19'. I liked the Winchester at 23' but wanted it to be self bailing. I contacted him and he wanted to add a larger off shore dory to the line, thus he designed the one I built, the Farallon.

I did not take many pictures at the very beginning. I started by using some old MDF I had in the basement to build a lay-up board to make all the frames for the boat. This I did over the winter. I used mostly douglass fir, but had to mix in some SPF wood which is more of a crap shoot of lumber. The SPF was mainly used on the beams to support the hull, not the frames themselves.

Once spring came I built a strongback out of the left over strongback from the cedar strip boat. What I have found is that the most importatnt thing with a strongback it to have it level and nearly straight. Once it is level you can snap a chalk line down the center to measure off of, that is way I say relativly straight. I marked the location of each frame and started to lay them out.

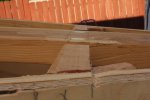
The next step was to install the keelson. I could not find a board long enough that was straight, made of douglass fir, and not full of knots so I had to scarf one together. I made a sloped box and bolted the router to a board to make the angles for the scarf joint. I then mixed up some thickened epoxy, layed the boards out on the ground and glued them up with a car battery as the weight. If you do not want to end up with the board glued to the ground or battery, use some wax paper. I have a pick of the chine log and sheer clamp being glued up the same way. While the keelson was drying I made up the transom. I then installed the keelson to the frames and the transom. I used grade 8 bolts to the frame and galvinized lag bolts for the transom.

I will have to get the pictures in the next posts, I am getting an error they are too large for Iboat to process.
 

djpeters

Lieutenant Commander
Joined
Jun 9, 2010
Messages
1,824
Re: Building a 23' Pacific Power Dory

Looking forward to seeing the whole process.

The best way to post pictures is by using photo-bucket. I believe the best size to be 480x 640. Then just past the "IMG" code from photo-bucket into your post.
 

sheboyganjohn

Senior Chief Petty Officer
Joined
Aug 2, 2005
Messages
753
Re: Building a 23' Pacific Power Dory

Scarfing the shear clamp and chine log.

IMG_4340.JPG

Frames all in place.

IMG_4341.JPG

using a rachet strap to pull the keelson down into place. 2x6's do not like to bend like this.

IMG_4344.JPG
 
Last edited:

sheboyganjohn

Senior Chief Petty Officer
Joined
Aug 2, 2005
Messages
753
Re: Building a 23' Pacific Power Dory

Looking forward to seeing the whole process.

The best way to post pictures is by using photo-bucket. I believe the best size to be 480x 640. Then just past the "IMG" code from photo-bucket into your post.

I just went and started adding them to my photobucket account. That is going to take a while. I chose all the project photos from my computer to upload and it was over 1 gig. I am going to have to do this in chunks.
 

sheboyganjohn

Senior Chief Petty Officer
Joined
Aug 2, 2005
Messages
753
Re: Building a 23' Pacific Power Dory

When I put the transom on I was trying to figure out how to keep it in alignment while I drill holes. That is when I finally decided that I am glassing and epoxying this whole thing, a few extra small holes will not make any difference. So screwed and boards were put to use througth out the project to hold things, make clamping surfaces, tie off points etc. Here is how I used two screws to pull the transom into the keelson so I could drill the holes.

IMG_4349.JPG

Here is a pic after the bolts were all in. I still have to remove the scews used for clamping.

IMG_4356.JPG

Now I need to get all the frames properly spaced. It took a lot of time squaring up to the center line. I then used a 1x2 to hold each frame place. I double checked the measurements and pulled everything to the correct spacing.

IMG_4348.JPG
 
Last edited:

Teamster

Lieutenant Commander
Joined
Nov 8, 2010
Messages
1,923
Re: Building a 23' Pacific Power Dory

Also subscribing,.....
 

jbcurt00

Moderator
Staff member
Joined
Oct 25, 2011
Messages
24,871
Re: Building a 23' Pacific Power Dory

Great

When you finish posting thru to the splash, ask a mod to condense this thread & copy it over to the completed project thread... Completed projects don't come up in an advanced search unless it is from the forum's main home page. If the search is from the resto forum, I don't thing the results include the Completed projects..... Hmm, I need to PM tonnee to check about that, this, and the rest of the completed projects are a great resource that should be included. Can't ask questions, but the good projects have lots of pix & info....... hmmmmm..

Tagging along... Thanks for sharing your successful build & chronicling it here.............
 

sheboyganjohn

Senior Chief Petty Officer
Joined
Aug 2, 2005
Messages
753
Re: Building a 23' Pacific Power Dory

Now it was time to put on the sheer clamp and chine log. I forgot to take a pic of this but I will try to explain it. The sides of the boat were easy, just use a scrap of the material used and mark a like across the top of the frame and on the side of the frame to get the outline needed, then use a japanese saw to cut the recesses. When you make the curve to the bow, that is a different story. What I did here was to clamp on the board on the outside of the frames. Use that as referance point for each frame for the angle. I would then lay the scrap board on the top of the frame and align it with the board clamped on, and the stern corner of the frame. When you are done cutting these out the stern side of the frame will fit in flush and the bow side of the frame will stick out proud. That will be removed shortly. The same thing happened with the bottom of the frames towards the bow where the keelson bent down, you keep the frames square to the sole of the boat, not the bottom. This picture you can see how I had to plane down the stern side of the frame to even it out.

This photo is missing because I could not figure out which one went here. Photobucket cut all the links so I have to guess which pictures go where. Guess it wasn't bad enough they stopped 3rd party hosting without a warning. At least I had the links to the photos when I rebuilt the Sea Ray thread.

If you look at the bow stem and the first frames back you can see where the frames sit proud.

IMG_4369.JPG
 

Attachments

  • IMG_4396.JPG
    IMG_4396.JPG
    143.5 KB · Views: 3
Last edited:

sheboyganjohn

Senior Chief Petty Officer
Joined
Aug 2, 2005
Messages
753
Re: Building a 23' Pacific Power Dory

The chine log was easy to put in place, connect to the stern and pull down into place at the bow. The sheer clamp was another story. It has a nice sweeping curve to it. After a lot of pulling and swearing It came to me, more 1x2 strapping and a but load of clamps. It is amazing how you can get wood to move with a little effort.

IMG_4364.JPG
IMG_4366.JPG

When you get to the bow stem, simple lap joint is made and you cut to lengh on the boat. For the most part you cut on the boat, that way you are working off of the real joints and not trying to make measurements.
IMG_4367.JPG
 
Last edited:

sheboyganjohn

Senior Chief Petty Officer
Joined
Aug 2, 2005
Messages
753
Re: Building a 23' Pacific Power Dory

Now we have the basic skeleton assmebled it is time to get it ready for sheeting. Time to plane, plane, and plane some more. I did all this work with hand planes. You could use power planes to speed things up, but my motto is the faster the power tool, the faster and farther you screw up. Had to plane down the bow stem, the forward frames both top and sides, and the edge of the chine log all the way around.

IMG_4376.JPG IMG_4380.JPG IMG_4379.JPG


One of the old highschool shop planes I picked up off of E-bay for this project.
IMG_4399.JPG
 
Last edited:

sheboyganjohn

Senior Chief Petty Officer
Joined
Aug 2, 2005
Messages
753
Re: Building a 23' Pacific Power Dory

It is now time to get the skin on this thing. I started off putting the sides on. Since I did not have the room to do end to end scarfs on 3 sheets of plywood I used simple butt joints with butt blocks behind them. I planned out the joints so they fell on the flattest parts of the boat. Plywood will only bend one way, the flat way so don't think you can pull it into place by forcing it up or down a tad. I just pulled the sheet into the frames and traced out along the sheer clamp and chine log, took it off, cut it and then put it on. I used 1/2 Baltic Birch for the sides.

Here you can see the seam with the screws on either side of it going into a butt block on the inside of the hull.

IMG_4394.JPG

Once the sides are on, it is time to plane again. Need take the edge of the plywood down even with the chine logs.
 
Last edited:

sheboyganjohn

Senior Chief Petty Officer
Joined
Aug 2, 2005
Messages
753
Re: Building a 23' Pacific Power Dory

The next step was to cut out the 3/4" Blatic Birch plywood for the bottom of the boat. I wanted strong backing on the seams so I used the keelson as a quasi butt block. I planned on putting on an outer keel so this seam will be covered. I did not want a butt joint midship so I made a scarf joint. That was the biggest pain in the butt. I could not figure out how to rig up the router so I did it all by hand. I could not get away without a butt block seam in the bottom, but that ended up very close to the bow which made it a very short seam.

The scarf joint in the bottom.
IMG_4383.JPG

Here is the main bottom seam running up the keelson.
IMG_4384.JPG

I wanted to cut the bottom on the boat. I was trying to find a way to mark the outer edge and came up with this contraption after seeing something similar on another boat build.

IMG_4389.JPG
IMG_4390.JPG

The next one was to mark the screw locations along the chine log, which called for another home made tool.

IMG_4391.JPG
 
Last edited:

film842

Petty Officer 3rd Class
Joined
Mar 6, 2010
Messages
98
Re: Building a 23' Pacific Power Dory

I'm enjoying reading about your project, especially since I've built a boat much like this in the past and am about to start on another. Some years ago I built the Glen_L version of this called the "Hunky Dory" and now I'm about to start on the the Glen-L "Little Hunk" which I'll extend to 21'.

Out here, many of these dorys are beach launched through the surf at Pacific City. I found mine to be perfect for what I wanted which was a beachable, sturdy workboat that I can crab with and troll for salmon and can take some use. Other than pounding in the swells which is what all flat bottomed boats do, I think the design is ideal. (and I like the way they look)

It looks to me as if your Spira design has higher freeboard than the Glen-L equivalent. Do you know what it is? Thanks.
 

sheboyganjohn

Senior Chief Petty Officer
Joined
Aug 2, 2005
Messages
753
Re: Building a 23' Pacific Power Dory

Waterline to the lowest point along the sheer clamp was somewhere between 30" and 36" if I rmember correctly.. I have put two larger scupper drains on the side which ride about 10" above the water line. I am going to make plugs for them to use when anchored cross seas for hunting.
 

minuteman62-64

Lieutenant
Joined
Apr 12, 2011
Messages
1,350
Re: Building a 23' Pacific Power Dory

Great thread! I've had in mind building this type of boat for some 40 years now - and build many of them in my head, starting with the Carolina Dory Skiff and Pacific City Dory from plans by "Captain Jim (something)."

I may never actually get to building one myself, but I'll follow your thread and have the virtual experience.

Thanks.
 

sheboyganjohn

Senior Chief Petty Officer
Joined
Aug 2, 2005
Messages
753
Re: Building a 23' Pacific Power Dory

Once I had the plywood all cut out it was time to glue it down. I traced out all the frame location on the plywood and took it off the boat. I then mixed up some straight epoxy and painted inside the lines to presaturate the wood so it would not suck the epoxy out of the thickened mix (PB) making it too dry and loose it strength. I then put a layer of PB on the plywood and on the frames and screwed them on with coated deck screws. Then the fun part, crawling under the boat to try (key word try) and smooth out the ooze out at each joint. The hard part is the warmer the epoxy got it became runny. Since heat is the by product of curing, this gave me some headaches. End up just cleaning things up the best I could and did more fillets when the boat was flipped.

On this pic you can see the sqeeze out around the frames. You can also see the bolts holding the keelson to the frames. The big bolt in the middle of the keelson is holding the outer keel on.
IMG_4433.JPG

Here you can get an idea of the strongback I built and the supports I put into it. This held up the entire hull along with myself climbing all over the top during the glassing. I did some rough calculations and determined the hull was around 1,000 lbs when complete.
IMG_4432.JPG
 
Last edited:

sheboyganjohn

Senior Chief Petty Officer
Joined
Aug 2, 2005
Messages
753
Re: Building a 23' Pacific Power Dory

Once the plywood was on it was time to start taping and fairing all the seams along with filling screw holes. I started with the plain thickened epoxy which was white. I then added blue dye which made it much easier to see where it was going on.

IMG_4400.JPG

IMG_4403.JPG

IMG_4404.JPG
 
Last edited:

sheboyganjohn

Senior Chief Petty Officer
Joined
Aug 2, 2005
Messages
753
Re: Building a 23' Pacific Power Dory

I then covered the entire hull in fiberglass. This was the least favorite part of the project for me. There is not a whole lot of room for error when your are glassing such a larger surface. Other then the occational spot where the glass did not fully wet out (the dreaded white spots) it went fairly well. Until the last piece on the starboard bow. My son was helping me. We were just putting the last section on when he uttered the worst thing he could "boy dad this is going on real easy". The fiberglass got a snag in it, then it pulled off part of the boat we already had it on, when we finally got everything back in place and rolled out the last little bit, the pot of epoxy kicked off. The next day I explained to him you do not say anything is going easy until after it is complete.
 
Top