1976 Tom Boy Boat, 1976 40 HP Johnson Outboard and who knows what Trailer

Woodonglass

Supreme Mariner
Joined
Dec 29, 2009
Messages
25,924
My rub rail used stainless screws and they were not counter sunk due to the configuration of my rubber insert By the sound of it you wouldn't need to countersink either. Stainless round heads should do the trick.


gm280

Supreme Mariner
Joined
Jun 26, 2011
Messages
14,590
Okay, I got the sunny warm days order number now. Do you remember how much those days cost? :loco:

I think the stainless steel route is on the agenda now as well. :applause:

I am going to clean up the junk left over from working on the Blazer in my shop and move the boat in there and crank on the K1 Kerosene heater... I got to get this boat finished so I can try to get some fishing done again. If I don't get back to fishing soon, I will have to start learning all over which end of the fishing rod to use again... :drum:
 

gm280

Supreme Mariner
Joined
Jun 26, 2011
Messages
14,590
Okay another serious question. I have received everything I need to start the install of the stringers and transom and of course the floor and rod boxes and such. Problem is the weather is not the best and so I stored the resin (435 laminate type) in the house. And because of that We can smell that resin everywhere in the house. I even stored it in one of our back bedrooms that we are not presently using and closed the door closed off from the rest of the house. But still can smell that crap everywhere. So how cold is too cold for that resin? My shop isn't quality controlled heating like the house, but I honestly don't think it ever gets to freezing either. So how cold is too cold to store that resin until I can start using it....hopefully in a week or so?
 

saginawbayboater

Senior Chief Petty Officer
Joined
Mar 8, 2012
Messages
677
My rub rail used stainless screws and they were not counter sunk due to the configuration of my rubber insert By the sound of it you wouldn't need to countersink either. Stainless round heads should do the trick.


Wood, the Junior Sample license plate, Hee Haw reference "BR549", always a crowd pleaser! :laugh: :applause:
 

Woodonglass

Supreme Mariner
Joined
Dec 29, 2009
Messages
25,924
Put it in the garage and don't worry about it !! Throw some Old Blankets over it and sprinkle some baby powder on em!!;):D

Gloom Despair and Agony on Me!!!
 

gm280

Supreme Mariner
Joined
Jun 26, 2011
Messages
14,590
I already move it to the shop. Since I built that shop, I have never ever seen a freezing temperature in there yet! It isn't heated but well insulated indeed. I have a digital thermometer in there and can see it readily and it is always well above freezing temps. So It is now in the shop with the actual boat too. In fact I am working on my five gallon bucket pouring device presently until I get the warmer temps... I will start posting pictures shortly too... WOG, Thanks for your replay and concern!
 

Woodonglass

Supreme Mariner
Joined
Dec 29, 2009
Messages
25,924
I have a 20x30 unattached, unheated shop. I built a wood cabinet to put my paint and stains and resin in and when I fear that it's gunna get so cold that things might freeze I put this in side the big cabinet with a 150 watt bulb in it and use my Christmas light timer for 10 hours I've NEVER had a problem yet.


gm280

Supreme Mariner
Joined
Jun 26, 2011
Messages
14,590
Okay since the weather is not cooperating, :rain: :cold: I decided to make my transom clamps in preparation for warmer weather....one day! :violin: I used WOG's design...some what. I had to change them a little because I also make other woodworking projects and therefore they can be reused down the road for other clamp issues as well. So I modified WOG's clamps, but only a little WOG. Don't be ill with me. ::facepalm: I decided to make little 3/16" steel plates and screw then on with 1/2 nuts welded on them instead of gluing the nuts inside the 2 X 4's. And I also bought threaded rod instead of 1/2 inch bolts. So I can make them basically any size I need. I welded on the nuts on the ends of the thread rods so I can still use impact tools if I need to tighten or adjust the clamping pressure. Here are a few pictures:


Boat Clamp 1.jpg


Boat Clamp 2.jpg


Boat Clamp 4.jpg


Boat Clamp 5.jpg

Boat Clamp 6.jpg

Boat Clamp 7.jpg

Boat Clamp 8.jpg


Boat Clamp 9.jpg

Boat Clamp 10.jpg


So they will have to join my other clamp collect now!
 

Attachments

  • Boat Clamp 6.jpg
    Boat Clamp 6.jpg
    21.7 KB · Views: 0

Woodonglass

Supreme Mariner
Joined
Dec 29, 2009
Messages
25,924
WOW!!! I'm Impressed.!!! Those are NICE!!!!! Practice with em. Remember...Loosen on top to tighten on bottom!!! Tighten the bottom bolt first to snug up the top of the transom and then LOOSEN the top bolt to tighten the tip of the clamp on the bottom of the transom!! A few dry runs and you'll get the hang of em.;)
 

gm280

Supreme Mariner
Joined
Jun 26, 2011
Messages
14,590
WOW!!! I'm Impressed.!!! Those are NICE!!!!! Practice with em. Remember...Loosen on top to tighten on bottom!!! Tighten the bottom bolt first to snug up the top of the transom and then LOOSEN the top bolt to tighten the tip of the clamp on the bottom of the transom!! A few dry runs and you'll get the hang of em.;)

Thanks WOG, I wasn't sure you'd still comment being how I deviated from the design. And thanks for the info on usage. They actually work exactly like my other Jorgenson clamps, so I am familiar with them...somewhat. It still takes some manipulating them to achieve what you want. But that learning curve is very quick... Next I'll post the steps for my five gallon bucket pouring contraption. It is pretty close to finished as well. One day the sun will return and real work can begin with the poly... :glee:
 

Woodonglass

Supreme Mariner
Joined
Dec 29, 2009
Messages
25,924
Yeah, I know whatcha mean. It's gunna be a Wind Chill factor of -10? in Okieland tomorrow!!!! It's my day off from work soooo I'm gunna stay inside and do some Upholstery work!!!!
 

sphelps

Supreme Mariner
Joined
Nov 16, 2011
Messages
11,432
Hey are you trying to dethrone nurseman of being the Mayor of Clampville ? :D
Btw , your shop is way to organized ! How can you get anything done in such environment ... :lol:
 

gm280

Supreme Mariner
Joined
Jun 26, 2011
Messages
14,590
Hey are you trying to dethrone nurseman of being the Mayor of Clampville ? :D
Btw , your shop is way to organized ! How can you get anything done in such environment ... :lol:

If you only could actually see my shop. Pictures make things look good some times. I fight keeping it relatively clean. But when you have multiple projects going on, things pile up. However, even with everything piled up, I can go to any tool or part I need regardless if it is wood, metal, electronics, painting, soldering, welding, ammo reloading, bullet molding, grinding or whatever. Of course nobody else could find anything, but isn't that how everybody's shop goes? I actually really like my shop. When I get tired of whatever I'm doing, I simply close the door and go back into the house. And all that clutter stays there for the next day's work....

WOG, I will try to finish the bucket pouring device next and hope the warm weather comes soon. Actually they are now showing next week in the 70's around my area. Finally some good temps to mix and poly parts...
 

poppop51

Petty Officer 2nd Class
Joined
Feb 18, 2013
Messages
131
Wow, just read thru your thread. thats a pretty neat boat. Nice work, I'll be following along with your build.
 

gm280

Supreme Mariner
Joined
Jun 26, 2011
Messages
14,590
Ha thanks poppop51 for the kind words. I am hoping that I can get started with the poly work now with the weather getting warm enough to do such. Take a look at the trailer thread and the OB thread. Those two things are part of my total boat, motor and trailer project and are now finished as well. The boat is the last of it... Thanks again...
 

gm280

Supreme Mariner
Joined
Jun 26, 2011
Messages
14,590
Okay while the weather is starting to warm up (finally) I figured I better get a few things built in preparation. So here are the pictures of my version of a heavy five gallon bucket pouring device for the 435 polyester resin I will be using (hopefully tomorrow too):

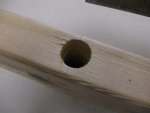
I started off with two pieces of plywood found the centers and drilled a 1/4" hole part of the way through..

Bucket Pour-2rs.jpg

Bucket Pour-4rs.jpg

Bucket Pour-5rs.jpg

Bucket Pour-6rs.jpg

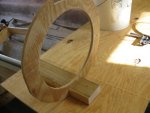
And I cut two circles and another one out of the center of one of them

Bucket Pour-7rs.jpg

Then I checked to see how everything was going to fit...nice so far.

Bucket Pour-8rs.jpg

I dado cut the thickness of the plywood on the two longer 2 x 4's so the top would have more support.


I also cut half the distance into the plywood to give everything a real solid fit.

Bucket Pour-10rs.jpg

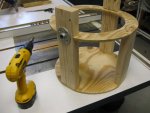
And with glue and screws, I assembled it this far.

Bucket Pour-11rs.jpg

Bucket Pour-12rs.jpg

Then I bought two 3/4" threaded pipe flanges and one 6" peace of thread 3/4" pipe. Both sides are now fitted with the pipe flanges

Bucket Pour-14rs.jpg


Bucket Pour-15rs.jpg

Next I cut that 6" 3/4" pipe exactly in the center yielding me two 3" sections and threaded them in.

Bucket Pour-16rs.jpg

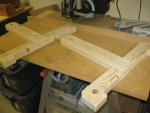
Then I cut two sections of 2 x 4 and dadoed the center section of one 2 by 4 and rabbit cut the other piece of 2 by 4 so they will fit together very tightly for great support. Of course I made tow of these assemblies.

Then I drilled one 7/8" hole all the way through the top sections of the assemblies and glued and screwed the parts together. Very strong. I also drill two 1" holes in the lower sections but only 1" deep not all the way through.

Bucket Pour-18rs.jpg

Then on my wood lathe I turns two 1.5" by 1.5" square sections with a 1" dowel section on both ends, and I also turned a little bat looking part with a 1" dowel section as well.

Bucket Pour-19rs.jpg

Now you can see what those 1" dowel sections were for. Extremely strong joint. I don't think I could break a 1" dowel section off...

Bucket Pour-20rs.jpg

And a final picture of its last glue up. Amazingly solid!


And the final test to see if it was going to work. That is one of the five gallon buckets of 435 polyester resin in that contraption. You can tilt and pour with one finger. If you can see I drill some small hole for cotter pins in both ends to secure everything in place. Put honestly . I can see how anything would come apart. The top wood strap actually clamps down just a little to secure the bucket from moving and holds it totally solid and in place...


Bucket Pour-25rs.jpg

Well there it is. Solid, easy to use and a total back saver for me. I know it looks stupid, but it works and tilts like it is on ball bearings. :facepalm:
 

Attachments

  • Bucket Pour-9rs.jpg
    Bucket Pour-9rs.jpg
    35.5 KB · Views: 0
  • Bucket Pour-13rs.jpg
    Bucket Pour-13rs.jpg
    34.2 KB · Views: 0
  • Bucket Pour-17rs.jpg
    Bucket Pour-17rs.jpg
    28 KB · Views: 0
  • Bucket Pour-23rs.jpg
    Bucket Pour-23rs.jpg
    29.5 KB · Views: 0

sphelps

Supreme Mariner
Joined
Nov 16, 2011
Messages
11,432
Looks like a fancy smansy fangle dangle deluxe resin pouring contraption to me ! ;)
 
Top