1976 Tom Boy Boat, 1976 40 HP Johnson Outboard and who knows what Trailer

archbuilder

Vice Admiral
Joined
Sep 12, 2009
Messages
5,697
GM the workmanship is wonderful! And most impressive to me is you have created something simple, clean....nice aand crisp / sharp....that is usually really hard to achieve in design and something I have a great appreciation for. That is going to be a really nice looking hull, you should be very proud of it! Excellent execution on both the design and paint work!
 

sphelps

Supreme Mariner
Joined
Nov 16, 2011
Messages
11,435
I could see where visualizing what it will look like upside down would be a pain in the neck . But at least ya have good blood flow to your brain while you stand there with your head upside down .lol!!
As arch said nice clean sharp lines gm .
Looks really nice !!
 

ezmobee

Supreme Mariner
Joined
Mar 26, 2007
Messages
23,767
That looks amazing. Even better than vinyl decals. Very nice work!


In about a minute or three, I could show anybody how they could duplicate it perfectly. Painting skill is all in the preparation and ability to tape off things cleverly. The actual painting is the easiest part.

LOL, me and spray paint don't get along at ALL. I guarentee that even with your tutelage I could make a mess of it.
 

gm280

Supreme Mariner
Joined
Jun 26, 2011
Messages
14,592
Thanks everyone for the nice words.

I was hoping it wasn't too much or too little. But it could look different once I flip the hull back over. I hope not though. Again, it looks more difficult then it really was. The only parts are using your eyes to make sure it looks straight and terminals at the proper points. Yes I did have to remove and reposition the tape a few times. But that is what it takes I guess. The taping is the hardest part. Once you convince yourself it is right, the painting is a piece of cake.

And funny that I have a lot of little nice airbrushes to do such thing. Some costing a little much and others not so much. But I always revert back to a very cheap simple airbrush that I bought decades ago when building R/C planes. I paid a mere $6.95 dollars for it and it is as simple as it could get. But it sprays well and can be adjusted for a fan outlet. That is all you need for this type painting. Compressor wise, any compressor will work. Even those little bench top portable football size or smaller will work. Heck they even make air cans for these airbrushes that work well. I just use my normal compressor that I adapted to and lower the pressure to about 20PSI with a standard regulator at the compressor.
Cheap airbrush.png
I used one very similar to this. Extremely cheap and simple. But it works well for this type painting. You can adjust the fan from almost nothing to about 3" in diameter. And when you are painting small areas, it helps to not spray paint everywhere.

And remember, if I can do this, everybody else can as well, and probably easier. It only takes time.

Until next time, you all have a wonderful day.
 

SkaterRace

Senior Chief Petty Officer
Joined
Mar 20, 2016
Messages
741
GM that paint job looks amazing I sure hope my repaint this year turns out half as nice as yours. I guess a little time, patience and a massive amount of skill gets those results. Well done.
 

gm280

Supreme Mariner
Joined
Jun 26, 2011
Messages
14,592
GM that paint job looks amazing I sure hope my repaint this year turns out half as nice as yours. I guess a little time, patience and a massive amount of skill gets those results. Well done.

Thanks SkaterRace. It really isn't as hard to do as you would think...honestly. Preparation is everything. The better the prep work, the nicer the finish. Just take your time and think it out before hand. Then work towards your design and just go slowly. I bet it will look very nice. And If you do need any advice, let me or others on here know. WE all can help. JMHP
 

Pusher

Lieutenant
Joined
Sep 2, 2014
Messages
1,273
Looks awesome GM! Nice job on being patient and persistence. It's going to look awesome when flipped, and I agree with everyone else. You came up with a very nice clean look where simplicity is the complexity. I look forward to seeing it flipped with motor mounted 😃

Is there a name for the airbrush or did they stop production? I've been thinking about trying one out.
 

gm280

Supreme Mariner
Joined
Jun 26, 2011
Messages
14,592
Looks awesome GM! Nice job on being patient and persistence. It's going to look awesome when flipped, and I agree with everyone else. You came up with a very nice clean look where simplicity is the complexity. I look forward to seeing it flipped with motor mounted 😃

Is there a name for the airbrush or did they stop production? I've been thinking about trying one out.


Once again, thanks for the kind words @ pusher. I wanted something simple and not overwhelming, but a little to take away from a bare white side. I hope this accomplished that. I just wanted a little color and I think I not got it. :noidea:

As for airbrushes. They are available everywhere. We have a Micheal's and Hobby Lobby arts and crafts stores in the area and I know both sell them from a mere few dollars to hundreds of dollars, depending on what you want. However, The one I use mostly is a very very cheap simple syphon feed 2 oz bottle like I posted. Mine is light blue in color, but very close in design to that posted one.

I also have some more expensive types that allow a very fine adjustable pattern and can spray almost a straight line pattern. It really depends on what you are painting. They make both syphon feed and gravity feed airbrushes. But unless you have some very intricate patterns to spray, a simple setup will suffice very well.

The amount of paint I sprayed was merely 1/4 oz to 2 ozs for all those colors. After you spray for a while, you can guestimate the amounts very closely.

So buy a cheap one and play with it and see what you can do. You may surprise yourself. Check your craft stores and buy something cheap for starters. JMHO
 

jbuote

Lieutenant Junior Grade
Joined
Aug 17, 2016
Messages
1,001
Wow gm!! Nice work! I just read the thread from the start.. (Took me about 2 days... lol)..
​Bought my first boat last August. The more I learn in getting her ready, the more I'm finding I need to check, so decided to read some restoration posts. Thought I'd get some insight as to how boats are built this way...
What an adventure you've had with this project!
​Should I find I have to do more than I thought with mine, I can assure you, I'll be referring to your posts here, and the knowledge and wisdom you've shared and learned, Along with what others have shared here too!

​Looks wonderful!!
 

gm280

Supreme Mariner
Joined
Jun 26, 2011
Messages
14,592
Thanks jbuote for the compliments. I honestly appreciate them. If you ever need any help or ideas, please feel free to contact me. If I can help anybody I have no issues doing that. These forums have a ton of expert helpers and advisers.

A little update so you all don't think I am neglecting this Tom Boy Boat project.

I had a little issue when I pulled off the stencil material setup with the latest graphics. The tape came off without issue. However, the vinyl tape not so much! Seems it pulled off some of the paint off, AND left some adhesive behind as well. NOT GOOD! So the wheels in my head were turning thinking how can I remove the adhesive? I thought about sand it off. So I took 1200 grit wet/dry paper and proceeded. Not even going to work.

So I come to the evil thought to use ACETONE! Yea I know Acetone and fresh uncatalyzed Acrylic Urethane is not a good idea. But I needed to remove the adhesive. So out comes the Acetone and a clean rag. Oh yes, it does remove the adhesive, put also the paint like magic all the way down to the harden primer coat. And while I was removing the adhesive, I was seeing a horror story entering the picture...and I knew this was going to happen too! :eek:

I stopped after realizing I may have to do the entire graphics all over again if I continued. That was not a pretty thought. So no more Acetone. But I still had lots of adhesive to still remove and I was only working on one side of the hull at this time.

After a day or two thinking about how to remove the adhesive without destroying the graphics, an idea came to me. How about using an eraser. I got out a typical eraser and tried it. Not working much at all. But I didn't give up. I decided to use a different type eraser. I had a couple old school "Magic Erasers" and tried one of them. Amazing! It did remove the adhesive without even harming the paint. Yes it took a lot of elbow grease but well worth the time in the end. All the adhesive was now gone. But I still had to deal with the paint that was removes and wiped off in the Acetone effort.

Now I am taping off each color and touching them up one by one. I am about finished with that effort and it is all looking pretty good now. I just thought I would post this information so others know not everything works out as well as it may seem some times. We all make Uh Oh's and have to deal with them. Not everything is as it looks on these forums every time.

But it is how you deal with them that makes the difference. :smile:
 

gm280

Supreme Mariner
Joined
Jun 26, 2011
Messages
14,592
Okay, woo, after a long day of taping things up and doing touch up airbrush painting (three colors), I think I have it back under control. :noidea:

But I certainly have learned a great lesson with this now. And once the weather clears, we presently are under a tornado watch, I will do a wet sand with 1200 grit paper and then it should be ready for clear coating. I will post those finished pictures once I get it clear coated. Then I let it cure for a few days and flip it back over for the final install of the seats, carpet, gauges, final wiring and such. Sound like I am getting close, but there are a lot of things yet to do. But it is closer then last month anyways. :smile:
 

archbuilder

Vice Admiral
Joined
Sep 12, 2009
Messages
5,697
I hate mistakes in paint, they are never fun to fix. Glad you sorted out a way to salvage most of it. Looking forward to seeing it with some clear on it!
 

gm280

Supreme Mariner
Joined
Jun 26, 2011
Messages
14,592
Yes Arch, paint mistakes can be pretty bad. But luckily I hadn't yet clear coated anything.

Although I have touched up two stage paintings before without any problems. A lot of folks think that if you go base coat, clear coat paint finishes, that you will have troubles if you need to touch up the paint down the road from Uh Oh's. However, you simply sand the finish like you would normal do with single stage paint finishs. Then base coat again and clear over it and you can't tell where you touched up anything. It blends that easily. But that is a little secret. Don't tell everybody. :whistle::tape:

Well I had great plans to wet sand the hull today with wet 1200 grit in preparations for the clear coat. But sadly a bad case of sorriness set in. So I didn't do it. :eek:

However, I was picking up the many branches that our last storm system has blown out of the trees in the yard. Most were pretty small, but a few were of substantial size. While I was dragging a couple of the larger branches to the burn pile, my hand started hurting/stinging. I look at my hand and WALA ants were enjoying themselves chomping down on my hand. The pain quickly got bad and I brushes most of them off my hand only to see them on my leg too. I brushed them off and then seen them on my shirt. Amazing how quickly they can navigate your clothes and body and chomp down all at the same time. That, my friends, is team work at its finest.

I am sure tomorrow I will have those little puss mounds on the bitten areas. It always happens that way. I guess one of the branches had them on it and I failed to see them. Did I tell you how much I hate ant bits? :faint2: No need for any pictures. I am pretty sure you all have been into ants before. We have the fire ants here in the south. And their bits feel like little burn places on your skin. You will know it instantly... :censored:
 

gm280

Supreme Mariner
Joined
Jun 26, 2011
Messages
14,592
Okay, It finally happened today. I was working towards this for soooooo looonnnnnnngggggg. And now I did it. :cheer2:

I finally clear coated the hull. And there is an interesting story that goes with it....as usual. :eek:

I decided that today would be the day to clear coat the hull. So yesterday I wet sanded the entire hull with some 1200 grit wet paper. And then hosed it off well. But even though it was the perfect day yesterday as well, I wanted to be sure that all the water had evaporated off before shooting clear coat.

I got up this morning and prepped the hull for the clear coat finish. Since the only thing on the hull presently was PPG base coat Acrylic Urethane paints (graphics and all) and it wasn't sealed or anything else over it yet, it was very soft and could easily be wiped off with almost anything. But I had to wipe down the hull to remove all the pollen and bugs first. After thinking about it, I tried rubbing alcohol. It was a 91% solution and I tried that on a little area to see if the paint came off.

NO it didn't, but the pollen and bugs did. So I wiped the entire hull down using the 91% rubbing alcohol and some clean shop towels. That worked pretty good. So now all I had to do was dress up in safety gear for the spraying and mix up the clear coat with the hardener and spray away.

I mixed up the first gun full and strained it through the typical strainer and shot away. Amazing to see the hull come to such a nice gloss after so long. And I sprayed the first gun and ran out a heck of a lot quicker then I figured. I only had half the hull sprayed. So second batch mixed up and away I go again. But that too ran out and then panic set in. I was out of hardener.

I cleaned the gun, removed all the safety clothes and respirator and drove to the PPG store and bought another quart of clear and another pint of hardener. It is a simple 4:1 mix. Arrive home again, re-suited up and mixed up more. I continued spraying until the entire hull was coated, and even applied a second coat.

I really need to figure out the paint coverage better. This is the second time this has happened to me. :facepalm:

WOW, I am really liking it. But it will take a wet sanding with 2000 grit and then polish before it is ready to flip back over again. Here are a few shots of it now.
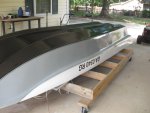
Clear Coat (1).JPG
Yes is looks nice and shiny, but it also has a little haze in it now. That is where the wet sand and polish will clean that up.
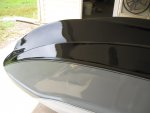
Clear Coat (2).JPG
Here is a little better look at it. Again wet sanding followed by pollising will bring out the true shine.
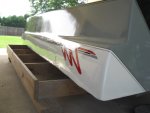
Clear Coat (3).JPG
And now that the side graphics are coated, they are there to stay.
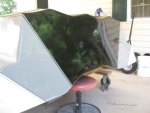
Clear Coat (4).JPG
Oh yea, the transom. The engine should look great sitting on that. I hope....:noidea:
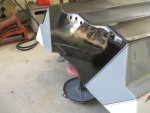
Clear Coat (5).JPG
Another angle. You can see the ripple in the clear coat. That is what wet sanding and polish should take care of.
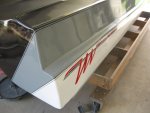
Clear Coat (6).JPG
And the other side. This is actually the port side but it is flipped over.
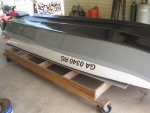
Clear Coat (7).JPG
And a shot of the basic hull. I am so glad this stage of the build is near completed now. Obviously a lot more work in this boat then it will ever in a million years be worth. However, I wanted to see what it could look like and the laborious hours are pretty much forgotten over time.

Okay until next update, you all have a wonderful day.
 

kcassells

Fleet Admiral
Joined
Oct 16, 2012
Messages
8,600
GM,
It all looks so darn nice I don't think I could put her in the water!:joyous:
 

archbuilder

Vice Admiral
Joined
Sep 12, 2009
Messages
5,697
Outstanding work GM! I used a full gallon of clear on Miss Morgan if I remember correctly. Sorting out how much paint you need is kind of tricky if you don't paint everyday. It sure is nice to see that clear on, makes you want to keep on trucking after all that hard prep work!
 

sphelps

Supreme Mariner
Joined
Nov 16, 2011
Messages
11,435
Really nice gm !!!
Looking forward to the rest of the build ...There's fish out there to catch !
 

gm280

Supreme Mariner
Joined
Jun 26, 2011
Messages
14,592
Outstanding work GM! I used a full gallon of clear on Miss Morgan if I remember correctly. Sorting out how much paint you need is kind of tricky if you don't paint everyday. It sure is nice to see that clear on, makes you want to keep on trucking after all that hard prep work!

I used just shy of two quarts. But then I have only shot the bottom and it is a 14 foot hull. So I am sure your boat took a lot more. I am really glad to be finished with this part of the refurbish boat now. I think I will allow it to thoroughly cure for a least a week or so after I polish it. And then flip it over on some carpet on the same cradle still so I can get in and out of the hull easier to do the finish wiring and install all the gauges and the carpet and seats. Then I will load it onto the trailer to set the engine.

kcassells and Arch, I was really hoping that it would attract the fishies so I maybe could hopefully catch them. Well I can dream can't I? :fish2: :whistle:
 

archbuilder

Vice Admiral
Joined
Sep 12, 2009
Messages
5,697
Lol!

You might want to check with your paint shop before you wax. My local guys recommended 30 days before wax. Color sanding and buffing is no issue, I think wax had to do with the paint off-gassing. I think the concern was the wax sealing up the surface and not allowing total curing. Which doesn't make a lot of sense with a catalyzed paint....but you might check. Maybe an old wise tale.
 

kcassells

Fleet Admiral
Joined
Oct 16, 2012
Messages
8,600
All that Super hard work will pan out;
work-or-fish.jpg
 
Top