1976 Tom Boy Boat, 1976 40 HP Johnson Outboard and who knows what Trailer

sphelps

Supreme Mariner
Joined
Nov 16, 2011
Messages
11,432
I guess you could get a metal shop to bend one for ya ...
Btw , with no pics , well you know the rest ..... :D
 

Woodonglass

Supreme Mariner
Joined
Dec 29, 2009
Messages
25,924
One of our longstanding members, andgott, built his own windshield frame and had to heat and bend it to shape. It was aluminum channel and he posted a great post on all the details. I'll see if I can find it and give you the link.
 

gm280

Supreme Mariner
Joined
Jun 26, 2011
Messages
14,591
One of our longstanding members, andgott, built his own windshield frame and had to heat and bend it to shape. It was aluminum channel and he posted a great post on all the details. I'll see if I can find it and give you the link.

Ha WOG that sounds interesting. I could see myself doing something like that.
 

gm280

Supreme Mariner
Joined
Jun 26, 2011
Messages
14,591
Well this morning I am going to purchase the primer and hopefully I can fill in all the little blemishes with the special "Magic Formula" mixture and feather everything out, then wipe down and prime. Probably won't get to shoot primer today, but I am shooting for this week for sure...well...maybe...hopefully? :facepalm:

I am sure you all know how plans work out most of the time. usually not happening. But we still make them anyway trying to convince ourselves that we have things under control. :eek:
 

gm280

Supreme Mariner
Joined
Jun 26, 2011
Messages
14,591
I bought a gallon of PPG JP202 primer and one quart of JH301 Hardener (4:1 mixture), and some assorted measuring cups in difference sizes. Oh yes, a little expensive, but it is a great 2K two part mix high build primer that I've used before with great results.

Then I came home and wiped down the entire hull with Lacquer Thinner. That actually took longer then I was expecting. I usually use Lacquer Thinner over Acetone because Lacquer Thinner doesn't evaporate quite as fast as Acetone. And a gallon of Lacquer Thinner cost considerably less then Acetone as well. And since they both accomplish the same thing, I'll go Lacquer Thinner most of the time. But that is just me.

Then I mixed up another batch of Magic Formula. But this time I used fresh polyester resin and it was nice and smooth without any clumps. Easier to apply and seems to do a pretty nice job too. It harden up in about 20 minutes and I haven't sanded it out yet. But I am getting closer to shooting primer now.

Until next time, you all have a nice day.
 

sphelps

Supreme Mariner
Joined
Nov 16, 2011
Messages
11,432
Looking forward to primer pics !
Is the ppg primer an epoxy that your using ?
 

gm280

Supreme Mariner
Joined
Jun 26, 2011
Messages
14,591
Looking forward to primer pics !
Is the ppg primer an epoxy that your using ?

Well that is kind of iffy. The primer is two part, but I honestly don't know if they call it epoxy or not. It is called a 2K high build primer surfacer. If you mix it 4:1 and shoot, it is a primer. But if you add in some reducer (4:1:1), then it is called a surfacer. But either way it does have a hardener that has to be used. The PPG site calls it a catalyzed urethane primer surfacer. So I guess it literally isn't an actual epoxy. Hope that explains it better.
 

gm280

Supreme Mariner
Joined
Jun 26, 2011
Messages
14,591
Well today I continued sanding the fairing putty I mixed up and applied yesterday. However, while going around the hull sanding the putty out, I came across two areas that had some iffy looking cracks in them. So I decided to grind them out. Well I am glad I decided to grind them to solid material .They both were voids in the initial fiberglass from the factory. So I grind them to fresh solid material, then mixed up some polyester, Cabosil and 1/4" fiberglass strands. And mixed that up and filled them in. That mixture isn't easy to sand, but that is exactly what I wanted as well.

So I will continue fairing them as well and see if there is anything else I need to putty up yet. I do like the Magic Formula of Poly, Cabosil, Glass Bubbles, Acetone, Surfacing Wax and MEKP. It is a little effort to measure all those ingredients out and put it all together, but it is a very smooth mixture that does the job and sands pretty nicely too. So I will continue. I would have posted pictures, buy since the last pictures looks pretty much like it sits now, I didn't think it would be of as much interest. So maybe next report update.
 

gm280

Supreme Mariner
Joined
Jun 26, 2011
Messages
14,591
If you don't have any you might look into these...

http://www.bettymills.com/non-steri...tent=Medical&gclid=CKfRm_jlsM8CFQEuaQodIPQBZg

Makes measuring multiple mix-ups a LOT easier.

WOG I actually have some measuring cups from the PPG store. They give a quite a few of all the different sizes to me when I buy their products. So I have different ones marked for the different ingredients and before doing a mix up, I measure out all the items and set them they until I get everything going. Looks like a Martha Steward making some new recipe as I pour in the different items and start mixing everything together. I always wait until everything is mixed very well before pouring in the MEKP. And that is because the MEKP is on the heavier side percentage wise and I don't want it kicking before I get everything mixed up. But I do thank you for the suggestion and link. You just ever know when you will need something for such a place. :thumb:
 

gm280

Supreme Mariner
Joined
Jun 26, 2011
Messages
14,591
A little early today with any progress. And that is because while they are talking about fall weather, summer has not left Middle Georgia in the least. Still well over 90 degrees and once I get sweated soaked, that is it for the day. But I did get some progress done anyways. Not much but a little.

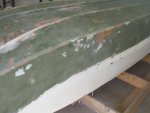
Yesterday I found two voids just under the gel coat and grind them out and mixed up some poly, Cabosil and 1/4" chopped fiberglass stands and filled them in. Did I tell you how hard that stuff is to sand? That stuff is like sanding rock. But I did contour them and it is now solid. Still sanding (4).JPG

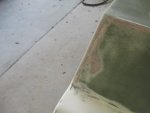
This corner on the port side of the hull by the transom was one of those voids. You can see it is now contoured and solid again. Still sanding (5).JPG

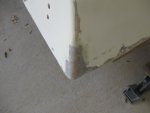
And this on the exact same area is the other void I found. It too is contoured and solid. You can see the 1/4" fiber glass stands. But it is smooth now and ready to proceed. Still sanding (6).JPG

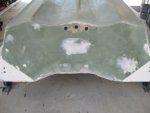
And this is the transom ready for primer now. the only holes you see are the holes for the tie down strap eyes and the typical drain, live well inlet and outlet. I realize it looks blotchy, but it is baby-butt smooth. Of course I have seen some serious diaper rash before. :eek:

So I decide to try some Ever Coat polyester spot putty. I used this stuff when dong auto body work and it was great. But I had no idea if it still was good. So I mixed up a little and started to apply and bingo that stuff kicked in less then 2 minutes. So I didn't get much applied in the little pin holes. I guess it is still good. Still sanding (1).JPG
Still sanding (2).JPG

So I will be quicker next time with it. Still sanding (3).JPG

Once I get those holes spotted and feathered in, it is on to primer. YEAH!:bounce:

I realize I am probably take too much effort for a segment of the boat that for the most part will never be seen. But I also realize that preparation is the key to a very nice finish too.

So until next time, maybe we will get some fall weather and I can do a lot more at a time. :thumb:

You all have a wonderful day.
 

Patfromny

Lieutenant Junior Grade
Joined
Dec 2, 2012
Messages
1,197
You'll get alot of people telling you you're nuts for doing so much to the bottom of the boat and that it will never be seen again...I'm not one of those people. I think you should do it now because you will never see the bottom of the boat again. It's turtled, why not go the extra mile. Looking good gm.
 

gm280

Supreme Mariner
Joined
Jun 26, 2011
Messages
14,591
You'll get alot of people telling you you're nuts for doing so much to the bottom of the boat and that it will never be seen again...I'm not one of those people. I think you should do it now because you will never see the bottom of the boat again. It's turtled, why not go the extra mile. Looking good gm.


Thanks Patfromny. I have a bad habit of going too far sometimes with things. A perfectionist if you will. And that is also a fault too. I just like to do things to the absolute best of my ability. But I am my own worst critic as well. And sometimes that isn't a good thing. JMHO
 

Patfromny

Lieutenant Junior Grade
Joined
Dec 2, 2012
Messages
1,197
What's the point if your not giving it your all. The build is half the fun. Who cares if it takes a week more to get it right. I'm the same type of person. My wife won't even help me with household projects. She assigns them and walks away. It has to be done perfect and my way or the way the instructions say. She can't deal.
 

89 resorter

Petty Officer 1st Class
Joined
Oct 3, 2013
Messages
287
Looking good GM....... and I'm with you and Patfromny that if your going to do it, do it 100%.
 

gm280

Supreme Mariner
Joined
Jun 26, 2011
Messages
14,591
Looking good GM....... and I'm with you and Patfromny that if your going to do it, do it 100%.


Thanks 89 resorter. I always try to give anything I do 100%. I never try for 110% or more because there is no such thing. :eek:

A little update.

Well today being Thursday means mowing, edging, and blowing the yard, driveway and walk off before anything else gets done. And since I did get an early start dong that, I was able to squeeze in a little boat work as well.

Again I mixed up some Ever Coat Easy Sand polyester spot putty to fill in some of the little holes in the fiberglass from the original manufacture build. And once again I didn't get very far because that stuff set up quickly. So I cleaned up the mixing plate and mixed some more using a little less hardener. And once again it hardened up before I used it all up. So again mixed up more with even less hardener and it still hardened before all was used up. But I had enough covered so I didn't mix anymore. I will say that that spot putty sand extremely easy. So not a huge problem will all the little holes to be sanded now. Hopefully once I get those pin holes filled and sanded, it will be time to shoot primer. I hope.

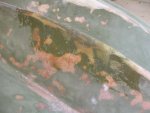
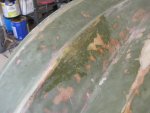
I did come across another issue that I honestly didn't like and again grind all the stuff out to fill with a more solid layup. The actual Keel had about five different colored materials in the area and there were some very little lines that I just didn't like how they looked. While it felt solid, I wasn't so sure it would take any abuse before it cracked out. So I grind it all out and mixed up some polyester resin, Cabosil, and 1/4" chopped stand fiberglass and mixed up a filler to reform that keel area. Yes that stuff it very hard to sand, but it will hold up better then what was there in my opinion.
001 (3).JPG
Here is the refilled area that is yet to be feathered in.
002 (3).JPG
And from the other side.

I took a few shots of the spot putty as well. It looks a mess, but really sands easy and all those holes will be filled.
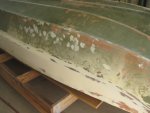
006 (3).JPG
007.JPG
And the opposite side too.

Looks like both sides about a third of the way back had the most pin holes. I guess who ever was make the boat that day didn't spend much time in those areas. :noidea:

I also took a few shots of some of the sanding tools I will use once I start sanding out the primer. Once the primer is shot, I will use a guide coat powder that will allow me to see the low ares. But you can't do that with your hand. You have to use straight or long board sanders. Obviously you an buy all those things at most any auto body store. But you can easily make them your self too. Here are two such home made long board sanders I made.
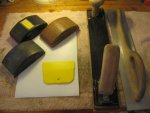
003 (3).JPG
The two sanders on the right are those long board sanders. The rest of the items are typical sanding block for doing tighter areas.
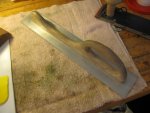
004 (3).JPG
This sander was built from a piece of 1/8" aluminum and a self designed handle.
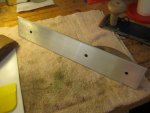
005 (3).JPG
There are three countersunk screws holding on the handle. And the plate is sized for the typical auto body sanding material. This one uses sticky backs sanding pieces. AND they stick extremely well. You can buy such sanding sheets in most any grit and they really are not as expensive as you would think. The black sander uses the same size sanding sheets but it can use either sticky back or non-sticky back sheets, because it has locking clamps on both ends. So see what is available and make some yourself. They work nicely to make a smooth surface without all those ripples in the finish.

Until next time, you all have a very nice day.
 

gm280

Supreme Mariner
Joined
Jun 26, 2011
Messages
14,591
I sanded out the initial poly, Cabosil, 1/4" stranded mix. And I mixed up some of the same mixture but without the fiber glass 1/4" strands as a final faring effort. It looks very good now and I like it tons better. At east it is all the same material now and not four or five different mixtures of who knows what from the original patcher.

So if everything looks good, I will try shooting some primer. If I take and try to fill all the little pin holes first, I will be at this for another week. I honestly think the primer viscosity will fill them better anyway. They literally are the size of a pin prick or smaller. And the larger ones I filled and feathered already. So I guess we will see. If they show through, which I seriously doubt, I will go back and spot fill them. So with fingers crossed, I will see. Of course it is hard to use a HVLP spray gun with fingers crossed. :facepalm:
 

gm280

Supreme Mariner
Joined
Jun 26, 2011
Messages
14,591
Looking Great GM! YOu go Boy!

Thanks Kcassells, I try.

I have to admit, life is so funny some times. Today I decided to actual wipe the hull down and shoot a coat of primer. The weather is very nice and no wind either. So as I am sliding my hand over some areas to verify everything was basically smooth. I felt this little area that was really noting much but I wanted it gone before priming. So I sanded it down quite a bit and since it was a little lower then the surrounding area I thought, no problem I will simply mix the Every Coat Easy Sand spot putty and once that cures in mere minutes, I will sand it out and be done. Well, life does work that way all the time. I mixed up the usual mixture that before was curing before I got it all used up. But for some reason today is decided to not cure in ten minutes or less. In fact It still isn't cured. So Primer is on hold now. Rats...

Funny how things change so easily. :confused: :doh:
 

gm280

Supreme Mariner
Joined
Jun 26, 2011
Messages
14,591
Well the Ever Coat Easy Sand spot putty finally cured enough for me to sand it smooth and blend it all in nicely. So I set everything up to still shoot a coat of primer today. However, even though I just bought a new one gallon can of 2K primer, I didn't have them shake it up. So I opened the top and about 2 inches down in the gray soup, it was like thick putty. I tried stirring it, but you know how that actually works with a tippy top full can. You can't really mix up the solid material easily unless you want to spill it all over the place and waste it. So I closed up the can and will have them shake it up tomorrow. I guess I really wan't suppose to prime today after all. :eek:
 
Top