1976 Tom Boy Boat, 1976 40 HP Johnson Outboard and who knows what Trailer

gm280

Supreme Mariner
Joined
Jun 26, 2011
Messages
14,590
Do you have any Local marinas or suppliers that might have Gelcoat?

WOG, YES and NO. There are a few boat selling places around me. However, the only one that actually does fiberglass type work or repairs, is so questionable and lacks so much on their shelves, I would be very leery to buy anything that would have any type shelf life to it. I visited that place one time. And sad to say, they just didn't come off as having very much knowledge about repairing any type fiberglass issues. In fact they suggested totally different fiberglass ideas then the usual methods on these forums. Their Ideas were centered around quick, easy and get it out of there. Not so much about doing things correct. So I am willing to wait for the Gel Coat before buying anything from them. I will search out other possibilities. And if it comes to ordering it, I can wait for it to come in.
 

Woodonglass

Supreme Mariner
Joined
Dec 29, 2009
Messages
25,924
Hey I just thought of something. If/When you get around to restoring those fuel tanks, make sure and take out the Float assembly and check the corks. Mine were not functioning and I had to replace the cork floats. I finally found a source for them and I bought a dozen. IF you find that you need to replace yours...PM me with your address and I'll send you a couple. My tanks now register the amount of fuel perfectly.
 

gm280

Supreme Mariner
Joined
Jun 26, 2011
Messages
14,590
Hey I just thought of something. If/When you get around to restoring those fuel tanks, make sure and take out the Float assembly and check the corks. Mine were not functioning and I had to replace the cork floats. I finally found a source for them and I bought a dozen. IF you find that you need to replace yours...PM me with your address and I'll send you a couple. My tanks now register the amount of fuel perfectly.

Thanks Mike. I'll check and see and take you up on that if they are suspect. I haven't started those restorations as of yet because I want to bring them back to absolutely perfect condition. And since they both are different as for the writing on their sides, I have to get the stencils made to put them back to original. However, my older adult son has the capability to make those stencils and it shouldn't be a huge issue. I am contemplating the actual red color they used originally. I want them to look new like original so I will have that colored matched. And only they are refurbished, I will be using one of them for certain. It actually fits in the place in the boat better then the plastic model I presently have. I do have one question concerning them. They have three protruding prongs extending from the fuel outlet attachment. But I can only find the typical OMC two prong type fuel fittings. Is that what they take? :noidea:

Thanks again Mike. :thumb:
 

Woodonglass

Supreme Mariner
Joined
Dec 29, 2009
Messages
25,924
Post a pic of the fittings.

Do they look like this??
s-l225.jpg
 
Last edited:

gm280

Supreme Mariner
Joined
Jun 26, 2011
Messages
14,590
Post a pic of the fittings.

Do they look like this??
s-l225.jpg

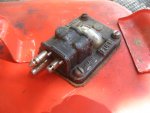
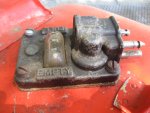
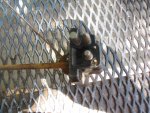
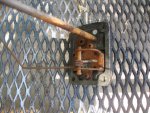
Mike, here are a few pictures of the tank fuel connections and the float arm.
IMG_0001.JPG
Both tanks are identical with this type connection.
IMG_0002.JPG
Nothing is broken or rusted beyond some minor surface rust.
IMG_0003.JPG
I removed one from the tank and interestingly enough, as I was removing one of the attachment screws, gas vapors spewed/escaped. So they are sealed without any holes. In fact there was a very minor amount of gas in the bottom of this tank and it still smelled like gas too. That's good news.
IMG_0004.JPG
The surface rust on the underside is about it as far as rust goes. And since these do come apart, no problems remove that surface rust and refinishing them again.
IMG_0005.JPG
Even this cork looks good with no soggy or soaked material. I can't see any problems with this one. But who knows about the other tank.
IMG_0006.JPG
Here is that side writing on one of the tanks that I will reproduce and refinish. And since neither of the tanks have any dings or dents, I believe they both will come out amazingly nice. Just down my ally of things I like to do and know how. :thumb:

So you can see the three prongs from the connection setup. But I have yet to see anything that attaches to this type fuel outlet other then the typical two prong Johnson or OMC fuel connections. Is that what they use? I have searched about old tanks and even OMC/Johnson/Evinrude type connections and nothing that looks like a fit to me. :noidea:

Any ideas? :help:
 

Woodonglass

Supreme Mariner
Joined
Dec 29, 2009
Messages
25,924
That's the standard Evinrude/Johnson tank fitting.
fuel%20line%20fitting%20johnson%20evin_large.jpg

Both my tanks look like that and this fuel line fitting works just fine!!! No Worries. With my new corks I coated them with 5min epoxy to ensure they would be preserved in the future. The bottom of the fuel line pickup tube has a screen filter so make sure and get it clean. I filled both my tanks with boiling hot water and Dawn dish soap and two hands full of large nuts and bolts. I then taped both openings shut and used bungee cord to strap themto my rear lawn tractor wheel. Jacked up the rear of the tractor and put it in gear to spin the tank and let the grease cutting features of the dish soap and the agitation of the nuts and bolts to clean the inside. After 30mins of this I dumped em out and shown a light inside. VOILA' looked almost new. I then put 2oz of outboard fuel oil in each can and swirled it around to ensure it wouldn't rust. I had my tanks powder coated to ensure any leaking fuel would not destroy the paint job.
 

gm280

Supreme Mariner
Joined
Jun 26, 2011
Messages
14,590
That's the standard Evinrude/Johnson tank fitting.
fuel%20line%20fitting%20johnson%20evin_large.jpg

Both my tanks look like that and this fuel line fitting works just fine!!! No Worries. With my new corks I coated them with 5min epoxy to ensure they would be preserved in the future. The bottom of the fuel line pickup tube has a screen filter so make sure and get it clean. I filled both my tanks with boiling hot water and Dawn dish soap and two hands full of large nuts and bolts. I then taped both openings shut and used bungee cord to strap themto my rear lawn tractor wheel. Jacked up the rear of the tractor and put it in gear to spin the tank and let the grease cutting features of the dish soap and the agitation of the nuts and bolts to clean the inside. After 30mins of this I dumped em out and shown a light inside. VOILA' looked almost new. I then put 2oz of outboard fuel oil in each can and swirled it around to ensure it wouldn't rust. I had my tanks powder coated to ensure any leaking fuel would not destroy the paint job.

Yes that is the same connectors I find as well. But I was, mistakenly I guess, thinking :eek: that because it had three prongs, that there was a three prong connection too. Guess not. Up to this point all the OBs I ever deal with were either Mercury's or Sear Ted Williams, oh and the neighbor's Johnson as well. So never plumbing for any OMC type engine, I didn't know.

So I can buy those type connectors and fix that issue now. Great! As for the rust inside these tanks, there is none. I mean I looked and there is only metal exposed without any rust. The only rust on these two tanks are outside and under the fuel fitting assembly that I posted the picture of before. In fact there isn't any rust to speak of on the bottoms of them either. And the outside rust is so little that a typical stripping of the paint and light surface sanding in preparation for primer will be a piece of cake. I plan on using the PPG Shop Line products to refurbish these tanks. Once cured it is 100% impervious to any oils, fuel, or any type fuel additives. I will strip the present finishes and then wipe them down after a minuscule sanding effort and shoot the primer. Then I will wet sand the primer and shoot a couple or even three base coats of paint, followed by the stencil for the white coat paint for the wording and then a couple coats clear coat finish. They should look amazing.
 

Woodonglass

Supreme Mariner
Joined
Dec 29, 2009
Messages
25,924
Yup I agree they should look really nice. Note: It only cost me $10 bucks a piece to get mine powder coated. Not sure what your prices are down there.
 

gm280

Supreme Mariner
Joined
Jun 26, 2011
Messages
14,590
Yup I agree they should look really nice. Note: It only cost me $10 bucks a piece to get mine powder coated. Not sure what your prices are down there.

Mike, I actually did think about powder coating. But I would still have to shoot the wording on the sides and then clear coat them to seal the wording paint as well. So I decided to just shoot everything in PPG paints. It is not the cost that is of any concern. At this point boat repair'refurbish costs are not even talked about anymore. :eek:
 

gm280

Supreme Mariner
Joined
Jun 26, 2011
Messages
14,590
Got a question for anybody that possibly knows. The typical gas can cap that fits the older 6 gallon OMC metal fuel tanks, are they easy to find? Does anybody know of a simple replacement for them? Does a new metal gas cap you see in the auto parts stores work? I would like to buy one for some experimenting I have in mind and I don't want to alter the original one. :help: :noidea:
 

gm280

Supreme Mariner
Joined
Jun 26, 2011
Messages
14,590

Well that was quick Mike. I didn't look for a part number because I honestly didn't know what the part number was. And I would have easily over look that cap because I was looking for the original type metal cap. Just proof that you live and learn everyday. Thanks Mike, I should have just asked you in the first place. :doh:

I did some work today on an old Motor Guide III foot controlled trolling motor, after cutting the yard and edging and blowing everything off, of course. I think the TM is ready to sell now. It seriously looks like new and once I proof everything out, it will work like new as well. But the heat finally got to me and I stopped short of testing it today. Maybe tomorrow morning before the heat gets too bad.

Have a great day Mike. :thumb:
 

Woodonglass

Supreme Mariner
Joined
Dec 29, 2009
Messages
25,924
Yeah it's been REAL hot in OkieVille too. Trying to finish my upholstery job was NOT FUN!!! My shop is a 600 sq ft metal building with very little insulation in the roof. I bought a 220 volt 15,000 Used AC for it but it only keeps it around 85? so it's better than nothing but still HOT!!!
 

gm280

Supreme Mariner
Joined
Jun 26, 2011
Messages
14,590
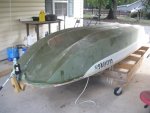
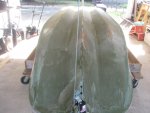
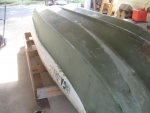
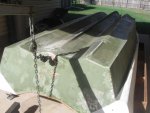
Okay I finally have something positive to post here. I know it seem like a long time to flip a boat. But with the heat and so many other family issues going on, I didn't have much to post about. Well here are some new pictures and now I can start the prep work on the hull for the paint job. :cheer2:

001.JPG
My oldest son came by this morning and between the two of us, it was a breeze to lift and flip. Honestly is was so predictable and easy to handle, I should have done this a few weeks ago. But then hind-sight IS 20/20.
002.JPG
003.JPG
004.JPG
Between the front come-a-long attached to the rafters over head, and the engine hoist on the transom drain outlet, it was so easy it couldn't have gone and easier. However, not wanting the edge of the sides of the hull to hold much if any real weight, I built a wooden plate type assembly for the hull to rest on the two seat boxes installed in the hull and the boat cradle and that allowed the hull to sit a little higher then the edges on the cradle. So no chance of damaging the fiberglass now. :thumb:

While I figured the hull was weighing a lot, the two types of lifts didn't even feel like there was any weight on them. :noidea:

And now looking over the bottom, it really doesn't look that bad. There are a few ares that will need a little attention, but not much. I was surprised how sound it looks now. So with the weather cooperating (if the heat and humidity will go away), I can get this ready for primer and paint now. :encouragement: :pray2: :applause:
 

gm280

Supreme Mariner
Joined
Jun 26, 2011
Messages
14,590
Congrats on the flip ! Let the sanding begin !

Actually Sam I am again excited about the project now. I can see there is not much prep work, or at least not as much as I once thought, to get this ready. Now my only obstacle, (you knew I had to come with one didn't you :facepalm:), is the weather. Between the heat and humidity, it is brutal out there...yet. But I do know nicer weather has to be coming soon and I want this boat to be so ready for next spring's crappie spawn. :thumb:
 

gm280

Supreme Mariner
Joined
Jun 26, 2011
Messages
14,590
I haven't even touched the sanding portion yet, but if the weather would cool down, to even 90 degrees, maybe I could. We've now had 57 days above 95 degree this summer with humidity to match or higher. I usually can make it work until about 85 to 90 degrees with this humidity, and then I've had enough. And that basically allows me to get the yard work done. I really am excited to get sanding and prepping now. So I watch the long range forecast with much anticipation, but sadly, I don't see fall coming any time soon. :eek:.

However, that does pose a question or more for those in the know. I plan to use the unique mixture of poly 435 resin, MEKP, Cabosil, Acetone, Glass Bubbles and Surfacing Wax. In fact I already have all those supplies on hand waiting. My question is, have any of you used this mixture and if so, how long does it take to cure for sanding. Second question is, have you ever mixed up everything but the MEPK and then mixed the MEKP as needed? And if you have, how long can the premix last?

ask these questions because I've used some very good auto-body fillers (PPG K36 two part body filler) that you mixed and had about 10 minutes before it was hard as a rock. And it sanded pretty easily. And it was some great quality type filler material but probably not suitable for marine work. Does the boat poly mixture mimic those properties at all?

I honestly wish I could use that K36 PPG filler because it smooths out like peanut butter and hardens very quickly (I actually had it harden while mixing until I got the hang of it)., and it really doesn't plug the sand paper bad either.

Just trying to get some advice to keep the obvious learning curve as short as possible. :help:
 

sphelps

Supreme Mariner
Joined
Nov 16, 2011
Messages
11,432
Just use the g/b and wax ... Cabosil makes it harder to sand ...imho ...
It's a little pricey but the 3M Premium Marine Filler will work like your ppg filler and is made for below waterline ..
You will need to play with your mix a bit til you get the consistency you like ... Dries pretty much at the same rate as your regular glass work ...
 
Top