1976 Tom Boy Boat, 1976 40 HP Johnson Outboard and who knows what Trailer

gm280

Supreme Mariner
Joined
Jun 26, 2011
Messages
14,593
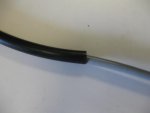
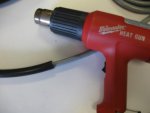
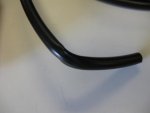
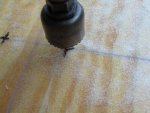
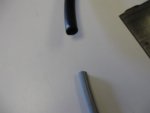
Here are a few pictures of my latest tube bending idea. As you can see The 10 gauge twin round gray wire easily fits into the black tube. And then a little heat form the heat gun and WALA a bent tubing. I know it looks like it still collapses, but there is a huge area in there to allow multiple wires to fit through easily. And that is basically all I needed it to do. That way in the future if there is ever a problem, you can easily remove and pull new wires through if need be. However, it also protects the wire from and any type abrasion and/or water being in the tube or around the wires. Sounds like over kill for such a meager 14' tri-hull boat project like this, but I have to do thing to please myself... Yea, a little OCD probably! :facepalm:
Wire bend-1.JPG
Wire bend-2.JPG

Wire bend-3.JPG
Wire bend-4.JPG
I am trying to fight the heat and make some progress. Once I have all these tubes installed, I can PB the floor in and tab it to the sides. Then seats and rod boxes are next. :encouragement:

You all have an amazing day... :thumb:
 

Woodonglass

Supreme Mariner
Joined
Dec 29, 2009
Messages
25,924
Now THAT is a Kool idea and It worked...Which is even better!!! Mikey Likey!!!!!:eek::D;)
 

gm280

Supreme Mariner
Joined
Jun 26, 2011
Messages
14,593
Okay!!! I actually have some progress pictures to report. Now I know they really look like some others I've posted. But honestly they are new with a lot of little things accomplished. I pushed myself to work in the heat to try and make some real progress and I finally think I'm about ready to seal this puppy up now. I managed to drill the holes for the black tubing to fit now and also cut the PVC pipes to the proper length and even removed one section because the live well hoses didn't go as far forward as I initially thought. So that is now taken care of as well. So everything I can presently think of is finished under the floor. However I haven't drilled the pour holes for the mix and pour foam. And that leads me to a good question. Do you all think it would be better to take the time now and drill all those holes and then button up the floor, or wait and drill them after the floor is intact? Reason I ask is because I can easily line them up now and drill them out of the hull with relative easy and not have so much mess later in the hull. I just don't know if there is a better way to do that...just asking. I guess one of my real fears is to PB the floor in place and think of something I didn't do and have to cut section up again. I know that sound stupid, but it really makes me hesitant at this point. Anybody else even have the worry? :noidea:

Anyways here are the pictures with every thing but the wipe down ready otherwise. I have plans to not use any screw fasteners but a lot of concrete blocks to hold each section until they cure, being how the floor sections are totally flat now and fit perfectly. Good idea or not?
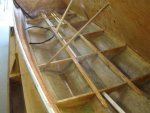
Ready-1.JPG

I used some pieces of wood to hold up the sections so I could work under then to get the correct lengths of tubing cut and fitted. Ready-2.JPG
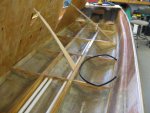
I rear view and you can see the one black tubing laying there. Ready-3.JPG
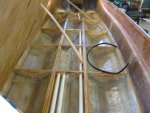
At the fro9nt of the hull there is a section without a OVC pipe section. That is because the trolling motor battery is in that section and will feed from and rear with power cables when finished. Ready-4.JPG
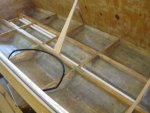
If you look real close, you can see where I cut out two PVC sections for the live well. I Initially had the PVC pipe going up to the next bulkhead and that was too far forward so I had to remove them and PB over the holes. Ready-5.JPG
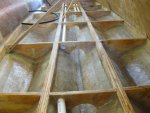
And finally a straight front to rear shot. You can see little holes in the bulkheads that I already waterproofed before installing the tubes. Those holes are for the seat boxes and live well lights. There are also cross holes drill so I can run tube and wires for the rod box lights as well. So unless I am really forgetting some, I think it is time to PB this puppy together... IDK! :noidea:

If you guys can think of anything I may have missed, Please let me know. Tomorrow, hopefully, is the PB floor time...unless you can think of something else I really need to do first... :decision:

I wish you all a wonderful evening... :thumb:
 
Last edited:

bonz_d

Vice Admiral
Joined
Apr 22, 2008
Messages
5,274
Looking good my friend. Have 1 question. If you are going to drill and fill for the foam what it your plan to fill and seal the fill holes? How big a hole is this?

Side note. I really can relate to your heat issue and it hasn't even been that hot up here. I was out in the sun the other day cutting the holes for my new pedestal bases and then putting the lower unit back on after a pump kit. Had to come in and rest/cool when I was finished. After 10 years of working in the dark and being in an AC bedroom by 1:30pm I forgot how brutal the afternoon sun can get. I've completely ruined my moon tan!
 

gm280

Supreme Mariner
Joined
Jun 26, 2011
Messages
14,593
Looking good my friend. Have 1 question. If you are going to drill and fill for the foam what it your plan to fill and seal the fill holes? How big a hole is this?

Side note. I really can relate to your heat issue and it hasn't even been that hot up here. I was out in the sun the other day cutting the holes for my new pedestal bases and then putting the lower unit back on after a pump kit. Had to come in and rest/cool when I was finished. After 10 years of working in the dark and being in an AC bedroom by 1:30pm I forgot how brutal the afternoon sun can get. I've completely ruined my moon tan!

bonz_d, I was going to mimic friscoboaters idea of keeping the cutouts to reinstall with PB over the fill holes after the mix and pour and then CSM over top of them. I will probably use a hole saw around 2" for the pour holes. I was just thinking I could easily cut those pour holes out ahead of time to keep the wood shavings and dust out of the boat hull... but I can do whatever you all think is best. As for the sun and heat, this has got to be the hottest summer we've had in years. I honestly can't remember the last day that we haven't reached 95 plus degrees and that is without the humidity factored in...our heat indices are well over 100 to 110 daily. And being middle Georgia, the summer humidity is always high. :eek: But I am going to push myself to get this boat project moving again. Once the floor is sealed up, I can see it getting a lot more progress again. I have a ton of interest and energy and then when I get out there in the shop (with the doors open and two fans going) the heat finally over takes my enthusiasm and it is over for the day...I always come back in with a completely soaked shirt and pants. :facepalm:
 

bonz_d

Vice Admiral
Joined
Apr 22, 2008
Messages
5,274
That certainly answers my curiosity. Again you're doing a bang up job as -is. Just stay hydrated and don't over do it like I have a tendency to do.
 

sphelps

Supreme Mariner
Joined
Nov 16, 2011
Messages
11,435
Looks and sounds like you have everything covered .. I like the idea of pre cutting the holes . Bring on the PB ! :joyous:
Btw , my boss has a hunting camp/farm up in Screven County just north of Sylvania .. Every now and then he sends me up there to take care of some things for him .. Maybe on one of my trips I can swing by and chew the fat for a bit ..
 

gm280

Supreme Mariner
Joined
Jun 26, 2011
Messages
14,593
Looks and sounds like you have everything covered .. I like the idea of pre cutting the holes . Bring on the PB ! :joyous:
Btw , my boss has a hunting camp/farm up in Screven County just north of Sylvania .. Every now and then he sends me up there to take care of some things for him .. Maybe on one of my trips I can swing by and chew the fat for a bit ..

Ha Sam, come on down...I mean up...which ever direction. But I could pick your brain for hours... This IS my first boat project. And I'm certain that shows as well...so any info is great info in my opinion! :thumb:

After thinking it over night, I think I will drill the pour holes before PBing the floor. It will be the least messy way in my opinion. And since I can easily mark and drill them out of the hull, I think I'll do that. Also the holes can aid in moving the sections into place...

You all have a wonderful day... :thumb:
 

gm280

Supreme Mariner
Joined
Jun 26, 2011
Messages
14,593
All right another HOT update. :flame:

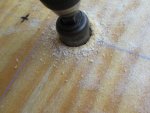
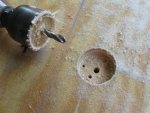
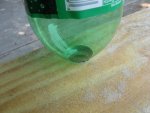
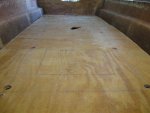
Today I managed to get all the mix and pour holes drilled in preparation to PB the floor down. I was originally going to drill 2" holes for both the pour and overflow holes, but thought of a better idea...I think anyways. I drilled 1.5" pour holes and mere 1/2" overflow outlets. My idea was the average 2 liter bottle was about 1.5" opening at their tops, and therefore they would make really good pour funnels...again I think. And the over flow holes would still show the foam with merely an 1/2" opening making it to the rear of each section...I think! So that is what I drilled...all 24 holes. But I also drilled the holes over the deepest sections of the tir-hull "V" sections on the sides so that the pour foam would have to build up there for the best coverage. So I snapped a blue chalk lines length wise and then snapped other blue chalk lines crosswise to let me know where each bulkhead was located. Then I drill just shy of those bulkheads for both size holes. Hope this works... :noidea: While 24 holes really doesn't seem like much work, Those 1.5" holes took some time as anybody knows who has drill with hole saw bits. I collected all the plugs to fit back in with more PB after the mix and pour foam. Then some pieces of CSM and more poly and they are again sealed waiting for the rod boxes to be installed next with the live well and seat boxes too. Here is verification, and I left the shop when the temp hit 92.6 degree in there...by then I had enough... :facepalm:

Ready-7.JPG
The crossing blue chalk lines is where a bulkhead will pass under.
Ready-8.JPG
Ready-9.JPG
Amazing the amount of shavings and dust just one hole makes. I had already blew this cut off twice before drilling through... Just glad I did these drills out of the hull on a saw horse. Saved vacuuming the hull for the 40th time.
Ready-11.JPG
Test fit a 2 liter bottle...looks like it fits nicely...
Ready-12.JPG
You can see all the blue chalk lines and the 24 holes drilled now.
Ready-14.JPG
Already...now...again...unless I think of something else that needs done... :noidea:

You can see the opening for the live well hoses and tubes and such. Now all I have to do is calculate each section capacity and label them on top so when I get ready to pour, I have an idea how much to mix up. Obviously every section is different and no square boxes to work with either. But I'm sure you all have had similar situation to work out as well. Just hope my math holds up... Maybe I should have listened in class a little better. :eek:

That's it for today, you all have an amazing afternoon. :thumb:
 

sphelps

Supreme Mariner
Joined
Nov 16, 2011
Messages
11,435
With your attention to detail I'm sure your calculations should be pretty darn close .. With the angled hull and all it's really difficult to figure volume sometimes .. Just don't wait to long to get it in the hole while mixing .. :eek::D
 

Woodonglass

Supreme Mariner
Joined
Dec 29, 2009
Messages
25,924
Uhmm, You might wanna rethink this a bit. The viscosity of the pour in foam is such that a 1 1/2" hole might not be ideal. It really doesn't "Flow" all that well. Also your 1/2" vent holes might not be ideal as well. The foam once it begins to expand and harden might need a larger vent hole. All that I have seen used the same size vent hole as the pour hole and the foam came pouring out of it. If you miscalculate just a bit there's no way the foam will be able to push up thru the 1/2" hole and the pressure WILL build up under the Floor. JMHO
 

bonz_d

Vice Admiral
Joined
Apr 22, 2008
Messages
5,274
I haven't done any pour yet so I can't comment either way though I would state that all the tins I've done so far the foam seams to have been poured before the ply was put down. Some look to be multiple pours.
 

gm280

Supreme Mariner
Joined
Jun 26, 2011
Messages
14,593
Okay daily update.

Now I know you expect to see PBed floors today. Well I was too. But WOG suggested I stop and redo the holes because they would not work at the sizes I picked out. SOOOO that is what I started doing today. I say started because while drilling the much much better then new larger holes, we got a deluge of rain that still is coming down. And since I had to close the shop, the work stopped as well. I was redrilling these holes outside on the saw horses again. However, I broke out one of my corded 1/2" larger drills to help this along quicker. And that drill works so much faster then the battery powered drill(s). So I managed to get 15 of the 24 holes finished. I went from 1/2" expansion holes, to 2 1/8" (my largest hole saw) bit. And since I already had 1 1/2" pour holes, I had to redrill them to 2 1/8" as well. Now I don't know if any of you have ever tried to redrill a good size hole bigger. But I can tell you if you don't have some type backer board for the center drill to first grab into, it is not going to work...period. You, (okay, I, couldn't) keep the hole saw bit in the same place so I had to use a backer board to let the hole saw center bit stabilize first to keep the hole saw bit from wondering. Worked really good after understand that for a few wild seconds. So once I finish the new better larger holes, I will again proceed to PBing....again! If I drill anymore holes in this floor, I will have Swiss Cheese for floors. These new size holes are huge. I believe I could use them for cup holders... :biggrin: I can also tell you that now I have to take a scrap piece of plywood the same thickness as the floor, and drill 24 new plugs for the new holes. Because the old holes had to be enlarged making the existing old plugs worthless. They new plugs will get the usual poly treatment to waterproof them before usage. So once again, does anybody else see any problems before I move on. If so please say something before I royally screw up...again! :noidea:

I am also working on something that if it works out well,I will be displaying here for others to use. But we will see how it works first... :decision:

You all have a wonderful day...:thumb:
 
Last edited:

Woodonglass

Supreme Mariner
Joined
Dec 29, 2009
Messages
25,924
OMG!!! Sorry I caused so many problems Maybe I'll break out the drill and Mail you some plugs!!!!:eek: I do think when you do the pour you'll see the importance of the larger sized holes.;)
 

gm280

Supreme Mariner
Joined
Jun 26, 2011
Messages
14,593
OMG!!! Sorry I caused so many problems Maybe I'll break out the drill and Mail you some plugs!!!!:eek: I do think when you do the pour you'll see the importance of the larger sized holes.;)

Ha WOG, This is my first time rebuilding any boat. So I will take all the quality advice I can get. And if that means delay another day or more, well then so be it. I'd rather do it correct them screw it up, especially now after so much work is invested. I can say one thing, I believe I can almost get my hand in those holes....okay maybe not! :facepalm: But don't let that keep you from feeding me info and suggestions. That IS what I'm asking for... I just have to comment with more humorist terms then most...I think! :confused: And with my well equipped shop, I can turn out most anything I need... Keep the ideas coming! :thumb:
 

gm280

Supreme Mariner
Joined
Jun 26, 2011
Messages
14,593
Daily verbal update. :smile:

Yesterday I went to the shop a little earlier then usual in hopes to get all the holes finished AND even PB a section or two down. HOWEVER, things changed shortly there after. As I was drilling out holes to the larger sizes, two guys walked from the neighbor's yard towards me. I've seen these two guys before and they were there to visit my seriously ill neighbor. Seems they all use to work together before they retired and once a year they come from out of state to visit each other. And when they come to visit, they try to help my neighbor out with some fix it things he needs done. So they chose his dilapidated fence gates. Those gates were rusted out for a year or more and I even offered to repair them before. But my neighbor says he hates to keep asking me for help being how I'm always doing things for him presently. SO, the three of us tackled those two gates. Obviously we did the work at my shop and that pushed my boat efforts back. But my neighbor seriously can't even stay outside for about 15 minutes before he can't breathe anymore because of the heat. He is already 24/7/365 on O2 and his last lung isn't getting better either. So I didn't manage to do basically anything with the boat. I did get more holes drilled out but that is about it. Maybe today will be different... :thumb:
 

bonz_d

Vice Admiral
Joined
Apr 22, 2008
Messages
5,274
You're a good man Charlie Brown. Kind of goes along the lines of MT post in the chat. The olden days when neighbors used to help and watch out for each other. Today it seems if you ask a neighbor if then need help they all think you're looking for something in return.

I too have started to get outside earlier in the morning while it's still cool and then head for the house by 11am. OH no I think I'm turning into my mother!
 

gm280

Supreme Mariner
Joined
Jun 26, 2011
Messages
14,593
You're a good man Charlie Brown. Kind of goes along the lines of MT post in the chat. The olden days when neighbors used to help and watch out for each other. Today it seems if you ask a neighbor if then need help they all think you're looking for something in return.

I too have started to get outside earlier in the morning while it's still cool and then head for the house by 11am. OH no I think I'm turning into my mother!

bonz_d, my neighbor is about the same age as I but he has had lung cancer and they had to remove one of his lungs because of that. And his last lung is slowly deteriorating as well. He has had so many heat attacks now that I can't even count them all anymore. And he is using more and more O2 to the point he seriously can't even drive anymore. So I do take care of his problems as they come about. So I figured the boat can wait another day or two to get his things done. I know the boat will be there when I get finished fixing his things. So it really isn't that much bother to me...

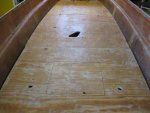
I did finish up with redrilling the larger holes. But I also broke three 1/4" drill bits while using the hole saw. There is a center 1/4" drill bit so you can center the drill to give a support for the hole saw to not wonder all over the place. But any little snag seems to take it out on that 1/4" center bit. I guess the extra torque from the larger 1/2" corded drill snapped three off. So I guess another drill bit order is going to happen again... I now have to calculate the area in the side sections and then PB time...yea! :bounce:
 

bonz_d

Vice Admiral
Joined
Apr 22, 2008
Messages
5,274
I've got a 2.25" hole saw that I've been using to cut those holes for the pedestal bases using a 3/8" drive electric drill. Just cutting 5/8" ply and it's taking some work mostly because I think this saw is about used up.. My biggest problem is finding 5/16" SS tee nuts and machine screws locally. No one seems to go above 1/4". I also know what a pain it is to try and recut holes. Has to do that last time when I thought a 2" was big enough.

My mom was on O2 for many years before she past. Myself I just finished on the phone with my cardiologist because the new statin he's got me on is starting to cause problems again. So my work has slowed to a crawl, was hoping to have it in the water this week for a test run.
 
Top