1963 Aluminum Starcraft Restoration 1st timer

wrecked em'

Seaman Apprentice
Joined
Apr 25, 2012
Messages
38
First, I'm extremely glad I've found this forum. Second, I'm pretty sure I'm posting in the right place but if not, please point me in the right direction. Third, I know a lot of informtion is already out there, but much of it is hard to find and I also find it easier to understand an answer to a question that I have asked directly.

I have just completed gutting my 63 starcraft. I have a lot of questions, but I thought it would be best to ask one at a time as I go.

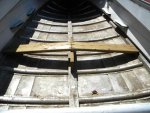
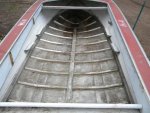
To begin, I've stripped it down to basically the shell. Before I get to carried away with putting in my new floor though, I need to know if there is anything I need to do the the aluminum ribs or to the bottom interior of the boat in general to prep it for the flooring. I have cleaned it fairly well including a powerwash.

Do I need to clean better? Scrub with some sort of solution and a brush of some sort? Do I need to apply some type of coating? Any information that would be relevant to ensuring that I start the rebuild properly would be much appreciated, especially in regards to the interior aluminum floor as I'm struggling to find any info on that particular aspect.

Also, you will see in the picture that there is a piece of flat thin guage aluminum running on top of the ribs almost from bow to stern. What is that? The boat was rebuilt by the previous owner.

Thanks for any and all input. ribs2.JPG
 

kfa4303

Banned
Joined
Sep 17, 2010
Messages
6,094
Re: 1963 Aluminum Starcraft Restoration 1st timer

Hi wrecked em'. Welcome to iboats. Cool toy you got there. It looks like you've done the worst part which is to remove the old wood and/or foam. Now would be a good time to do a leak test. If you can get it to the water and float it with a bit of weight in it that would be best, or you can fill the boat with a few inches of water to see if it leaks anywhere. When/if you do find some leaks there are a couple different ways to fix them. A lot of folks simply paint the interior seams with a product called Glu-vit, which is a paintable 2-part epoxy you apply to the interior seams of the boat. It dries tough, but flexible and should seal up all the nooks and crannies. Be sure you only apply it to the interior seams. Once it cures, it needs UV protection so you'll either need to paint over it, or install a floor. You can also drill out any old/bad rivets and replace them with new pop-rivets. Once the hull is nice and water tight, you can start installing the below deck flotation foam. Most folks here use oink/blue insulation board from Lowes/HD and/or pool noodles from the dollar store. 1 cu. ft. of foam will float 60 lbs, and 1 pool noodle will float about 100 lbs. Once you have all the foam in you can install the floor and transom. Rule #1 is that you never use pressure treated lumber on an aluminum boat as it will cause electrolytic pitting in the hull. Instead, use (1/2"-3/4") non-PT exterior grade plywood and seal it with either epoxy, fiberglass and resin, or Spar Urethane. Once the deck and transom wood are sealed, you can install them with stainless steel hardware dipped in 3M 5200 marine caulk/sealant. Lots of folks use aluminum angle and stock to form braces across the ribs of the boat using pop-rivets to give them something to attach the floor too. As far as paint goes, sand the hull to remove any old loose paint, apply a light dusting of aerosol Zinc-Chromate Self Etching primer, then paint. That's really all there is to it; No PT wood, closed cell foam flotation below decks, stainless hardware and/or aluminum pop rivets, ZC Primer then paint. Check our the Starcraft forum tons of ideas and inspiration. Good luck. Keep us posted.
 

jigngrub

Fleet Admiral
Joined
Mar 19, 2011
Messages
8,155
Re: 1963 Aluminum Starcraft Restoration 1st timer

Pretty much what kfa said.^^^

... but.

1. Now would be the best time to check your transom for rot, even if it isn't rotten and the wood looks old it would be a good idea to go ahead and tear it out now before you get the boat any cleaner or start leak testing and stuff. You'll have plenty of scrap decking leftover to make a new transom with later... but tear it out now.

2. Leak test, try to get the boat as level as you can and a fair amount of water in it and watch the outside bottom for leaks. If you find any leaking rivets, this is an easy way to fix them:
http://www.youtube.com/watch?v=L0MA1-5NXjs&feature=related
After you've fixed any leaky rivets use the Gluvit or Coat-it to seal your seams and rivets on the inside of the hull.

3. Floatation foam is very important and you need to install as much as you can below deck. Polystyrene sheet foam is the most affordable. It's the pink or blue insulation board at most home centers.

4. Decking, your deck plywood has to be exterior grade plywood, exterior grade is made with the waterproof glue. This can be as low of a grade plywood as CDX sheathing or a fancier ABX Aruco plywood. As stated above, no pressure treated wood.

5. Sealing your decking, you should seal your decking after you've cut the pieces to fit into the boat. Multiple coats of sealer are best, but you need to use 2 of whatever you choose to seal with.

There is more info and stuff for you to do after the deck is sealed, but this will get you started and keep you busy for a while.
 

wrecked em'

Seaman Apprentice
Joined
Apr 25, 2012
Messages
38
Re: 1963 Aluminum Starcraft Restoration 1st timer

Thanks a lot for the extremely informative and enlightening responses guys. The time, effort, and information in the responses are all much more than I had expected and are much appreciated. My confidence level on this project has just skyrocketed. I now have no doubt that along with the expertise and wisdom from folks on this site, my project will be completed and will be completed correctly.

I will definately be back with more questions as well as info and photos of my progress.

Thanks again. So glad I found this site. You guys are great.

Sean
 

GA_Boater

Honorary Moderator Emeritus
Joined
May 24, 2011
Messages
49,038
Re: 1963 Aluminum Starcraft Restoration 1st timer

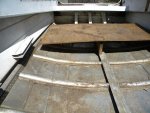
wrecked em - Welcome to iboats, I agree with all the advice so far except one thing. Was the old flooring flat or did it match the curve of the ribs? The reason I'm asking that is some of the smaller SCs used 1/4" or 3/8" ply that bent to curve to the ribs. If you had a flat floor - Well never mind, go with what the guys said. Do you still have the old flooring to use for a template?

I would check the transom, it would be a shame to fix her up only to tear back in to her for a transom re-do.

Is the flat piece down the center raised or right down on the ribs?

Have fun and enjoy a nice old hunk-o-tin.
 

jbcurt00

Moderator
Staff member
Joined
Oct 25, 2011
Messages
24,871
Re: 1963 Aluminum Starcraft Restoration 1st timer

Only thing I'd add is to make sure to get 100% aluminum CLOSED end rivets on the hull, ESP below the water line. Steel mandrel rivets (the shaft you 'load' into the rivet gun) will rust and leave a hole through the center of the rivet behind. Make sure the grip range matches whatever you are joining.

I'm sorry I don't have a link to post for the rivets, but a few places have been posted in quite a few threads.

I think KFA nailed the aluminum stringer mounted from the transom up to the bow along the top of the ribs. Although it may have been changed by the last owner, there should be an attachment along there for the deck to attach to.

Good luck on your project, & the clean out looks good! KFA & JigGrub will give you lots more advice, as will GA & others along the way.

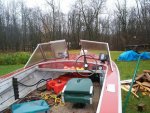
How long is this hull? Maybe it's the pix perspective, but the rear set of seat brackets mounted to the hull, look like they are way far forward of the front edge of the splashwell. Is this an OB or an I/O model?
 

wrecked em'

Seaman Apprentice
Joined
Apr 25, 2012
Messages
38
Re: 1963 Aluminum Starcraft Restoration 1st timer

Thanks again for the responses and advice. I got started yet today. However, I am posting some pics to answer the question about the old flooring. I had a few scraps left and placed a small section back in to give a general idea. Hopefully they will be usefull.

Also, the seat brackets seemed way up front to me as well. I thought maybe they were done by whoever worked on the boat before I got it. The original seats were gone and two old bus bench seats were put in. If I can find a pic of the boat before I tore it down, I'll post that as well.

ThanksDeck3.JPGDeck2.JPGDeck3.JPG
 

wrecked em'

Seaman Apprentice
Joined
Apr 25, 2012
Messages
38
Re: 1963 Aluminum Starcraft Restoration 1st timer

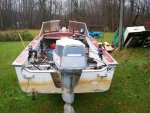
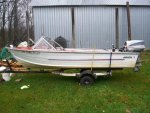
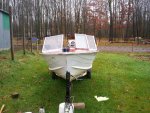
Here are the only pics I could find before I tore the boat down. I don't have any with the bus bench seats. I took them out a few years ago and replaced them with a single seat. Hope these help answer any questions.before2.JPGbefore1.JPGbefore3.JPGbefore4.JPGbefore5.JPG
 

jigngrub

Fleet Admiral
Joined
Mar 19, 2011
Messages
8,155
Re: 1963 Aluminum Starcraft Restoration 1st timer

Thanks again for the responses and advice. I got started yet today. However, I am posting some pics to answer the question about the old flooring. I had a few scraps left and placed a small section back in to give a general idea. Hopefully they will be usefull.

Also, the seat brackets seemed way up front to me as well. I thought maybe they were done by whoever worked on the boat before I got it. The original seats were gone and two old bus bench seats were put in. If I can find a pic of the boat before I tore it down, I'll post that as well.

ThanksView attachment 143183View attachment 143184View attachment 143183

That deck framing design is what we call a "Billy Goats Butt Sewed Up With A Grape Vine" here in Alabama. That is some really bad redneck engineering and I hope you don't intend on duplicating it.

You should really consider framing your deck out of aluminum angle or square tubing, this material can be bought at a scrap yard or recycle center for scrap prices. Aluminum framing will give you a lifetime build unlike wood and will only be a fraction of the weight of wood framing.

If you want to know more about framing your deck with aluminum just say so, I'll be checking back in on this thread this evening.
 

jbcurt00

Moderator
Staff member
Joined
Oct 25, 2011
Messages
24,871
Re: 1963 Aluminum Starcraft Restoration 1st timer

It may have been the pix perspective, the seat brackets do still look a little far forward but seem to be original, because they look exactly like the 1's in mine.

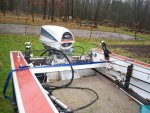
Nice Evinrude... I think I have the similar vintage Johnson 40 electric shift in mine..

Best of luck w/ your project, got a target splash date?
 

jasoutside

Supreme Mariner
Joined
Dec 20, 2009
Messages
13,269
Re: 1963 Aluminum Starcraft Restoration 1st timer

Howdy! Just wanted to say welcome to the iboats drydock and welcome to the Starcraft metal boat club:D

Looks like the guys have ya set up real well with some great advice. Your rig will make for an excellent project:)

At this early stage I'm sure you are doing tons of brainstorming. If you click on the "Starcraft Rebuilds" link in my signature you'll get everything you need to know in a one stop shop:)
 

wrecked em'

Seaman Apprentice
Joined
Apr 25, 2012
Messages
38
Re: 1963 Aluminum Starcraft Restoration 1st timer

Thanks again for the replies. I pretty much figured that the framing that was installed was pretty goofy. I didn't even know of aluminum angle or square tubing but would be interested in it. I'm open to all options and suggestions.

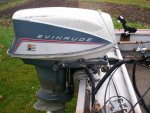
The evinrude is a 66 40hp big twin. I'll be restoring/rebuilding that as well. No ideas on a "splash date" yet. Got the feeling it will be a long project and I'm going to take my time and ask a lot of questions to ensure it's done properly.

jasoutside, I will definately check out your link when I get a chance. Thanks.

Here's a pic of the motor as well.Motor.JPG
 

kfa4303

Banned
Joined
Sep 17, 2010
Messages
6,094

1988Starcraft

Seaman
Joined
Nov 30, 2011
Messages
72
Re: 1963 Aluminum Starcraft Restoration 1st timer

Good luck with your project. I'm just about finished with my 1988 Starcraft refurbish project and lots of the advice you got in pieces can be found if you go through my thread ("Replacing The Floor On My 14 Foot Starcraft"). My boat isn't exactly like yours but there are enough similarities to give you lots of good information. The link for the rivets is www.rivetsonline.com. Gluvit, and various glues and sealants you'll probably you can get through Amazon or at Home Depot which has a surprising amount of marine epoxy and sealant products. Lowes has the Arauco Ply you'll want to use for the decks. It's great stuff. I used a product called Grizzly Grip (www.grizzlygrip.com) as my non-skid floor coating instead of the original vinyl. It's brand new now but it looks great and it's also used for truck bed liner so it should wear like iron. A gallon was plenty for my 14 footer. I also didn't seal my floor with resin. The underside has two coats of exterior deck paint and the Grizzly Grip is on the top and edges but I keep my boat in the garage and there shouldn't be any reason the floor gets really wet for any length of time. The original floor didn't have anything sealing it and it lasted 24 years, so the new one will probably outlast the hull. My transom was good so fortunately I didn't have to deal with that.

The guys helping you already were a great help for me. 1988 Starcraft
 

wrecked em'

Seaman Apprentice
Joined
Apr 25, 2012
Messages
38
Re: 1963 Aluminum Starcraft Restoration 1st timer

Thanks for the replies and the links to the threads. Had some things come up and was unable to work on boat for about the last week. I did find a lot of leaks, mostly on seams, that I need to try and get repaired today. Then, tomorrow I'm headed off for the weekend for WI's fishing opener. Then, if all goes well, I'll be able to tear into things again on Monday. Like I said, I'm going pretty slow on this one as I want to make sure it's done right and my schedule isn't always open. So, again, thanks for the replies. It will probably be the norm for me to be off the project and the forum for a week or two at times as I have other responsiblities. Just don't figure I've given up if I don't post for awhile. This project will get done.

Thanks again
 

wrecked em'

Seaman Apprentice
Joined
Apr 25, 2012
Messages
38
Re: 1963 Aluminum Starcraft Restoration 1st timer

Ok, I have sealed all the seems that were leaking, I think. I couldn't find exactly what was recomended so I stopped at the local marine shop and used the same stuff they use. It takes around 7 days to cure so I can't do another leak test for a week or so.

I did remove the transom which was fairly rotted. That turned into a much bigger chore than I expected. I had no idea so many screws and bolts held that thing in place. Anyway, now that it's out, I need to replace it. It looks like it was just a piece of laminate floor joist cut to fit. So, for the replacement, should I use exterior grade plywood sandwiched between foam? If not, what should I use to replace the transom? I'm a little confused on this point other than that I'm fairly sure I won't be using floor joists.

Thanks in advance.
 

jbcurt00

Moderator
Staff member
Joined
Oct 25, 2011
Messages
24,871
Re: 1963 Aluminum Starcraft Restoration 1st timer

It looks like it was just a piece of laminate floor joist cut to fit. So, for the replacement, should I use exterior grade plywood sandwiched between foam? If not, what should I use to replace the transom? I'm a little confused on this point other than that I'm fairly sure I won't be using floor joists. Thanks in advance.

2 pcs of 3/4" exterior grade plywood, or auruco (sp?) cut to fit & glued together w/ : TiteBond III (waterproof once dried), epoxy, or PL premium. Then all sides & edges should be well sealed against delamination from water intrusion. Almost every tin thread has a decent way to seal the transom, some more expensive but longer lasting and are more tolerant of less diligent maintenance (sealing w/ multiple coats of epoxy & then a UV stable top coat). Others less costly, but have a shorter life expectancy, requiring more frequent sanding & re-coating, and then also need more attentive preventative maintenance year-round (exterior porch paint). Spar varnish is in there somewhere along that spectrum.

But anyway you choose to finish coat the transom, make sure to take extra care to seal the end grain (edges) of the plywood. Many coat the edges every time they apply a coat to the top & again when they do the bottom. The top & bottom faces each have 3 coats, but the edges have 6...
 

wrecked em'

Seaman Apprentice
Joined
Apr 25, 2012
Messages
38
Re: 1963 Aluminum Starcraft Restoration 1st timer

Thanks for the info. I'll be getting the needed supplies today and begin on the new transom.

Also, I can't thank the folks on this forum enough. The speed at which questions are answered and the depth of information and instruction which are so generously offered is greaty appreciated.

One more quick question though as long as I'm here. How bad of an idea would it be for me to remove the front top panel on my boat so I could build it into a walk thru with an elevated platform with a trolling motor and pedestal seat up front? Just a thought that had popped into my head.. I'm guessing it would take to much away from the originality of the boat and I should probably not do it. Any advice and opinions will be greaatly appreciated.
 

lakelover

Rear Admiral
Joined
Mar 26, 2003
Messages
4,386
Re: 1963 Aluminum Starcraft Restoration 1st timer

Hi wrecked em', & welcome. I just found your thread, I see it's been up for a couple weeks.

Looks like you have a Jet Star. You might find something useful in the threads shown in my signature below of my '64 that I did. One's the whole thing and one's the completed & shorter version.

Have fun!
 

jbcurt00

Moderator
Staff member
Joined
Oct 25, 2011
Messages
24,871
Re: 1963 Aluminum Starcraft Restoration 1st timer

One more quick question though as long as I'm here. How bad of an idea would it be for me to remove the front top panel on my boat so I could build it into a walk thru with an elevated platform with a trolling motor and pedestal seat up front? Just a thought that had popped into my head.. I'm guessing it would take to much away from the originality of the boat and I should probably not do it. Any advice and opinions will be greaatly appreciated.

Original or modified, good or bad, that is for you to decide based on your wants, needs & how you'll use the boat. I think you will find this thread an interesting read. It is similar to what you are talking about doing w/ your bow.

Have a great weekend...
 
Top