1988 Bayliner Capri Cuddy Rotten Resto Project - UK

jmmacky

Petty Officer 2nd Class
Joined
Jun 20, 2011
Messages
177
Re: 1988 Bayliner Capri Cuddy Rotten Resto Project - UK

Hi Funkeigh,

I am based in the UK as well and am also rebuilding a Bayliner. I have managed to get to the point where the new deck is fibreglassed in place but, frustratingly, my project is on hold until September when my current job with a 96 hour working week finishes! I found 1708 biaxial with CSM stitched to it impossible to source in the UK. It is possible to get the biaxial but not with the CSM attached...maybe you will have more luck. But if not I used a woven stitch matt from EC fibreglass. I found them helpful and they stocked most of the fibreglassing stuff I needed. Hope this helps.
 

1066

Cadet
Joined
Apr 18, 2012
Messages
11
Re: 1988 Bayliner Capri Cuddy Rotten Resto Project - UK

Hi there jmmacky
Not sure if you have looked here www.cfsnet.co.uk but there is just about all you need there :)
I've used them a lot for many bits and are very helpful too. Good prices and delivered!
Good luck with the resto! Mine will be finished soon if i get some descent weather!
 

1066

Cadet
Joined
Apr 18, 2012
Messages
11
Re: 1988 Bayliner Capri Cuddy Rotten Resto Project - UK

Hello there Funkiegh!
Sorry for the late reply! I've been busy with work the last couple of weeks so not had much of a chance to get on here!. Thank you for the compliments, too kind!
Clean and degrease as much as you can before you start!
Well where to begin, The ply i have used is 18mm CE 100%marine grade hardwood (no voids in laminate) (not Okume as it is just not worth it for this sort of work)I've used this throughout the boat.
I know this is thicker than the original 12mm/.5" +/- but to me it did not seem strong enough as it was, will give the boat a little more stiffness I hope too! Its not going to affect the weight massively so I'm not concerned.
The underside of the ply I coated in west epoxy for two reasons, once coated the ply becomes almost impervious to moisture and two it forms a great surface to bond to because it penetrates the ply. If you bond directly on the ply you will not get such a strong bond as the surface veneer is the only part of the ply you are sticking to! The new formers were bonded directly to the hull with colodial silica (west) and west epoxy mixed using about a 20mm radius around all adjacent faces also for two reasons; one a radius spreads loading over a larger area so making the joint stronger and two it allows for much better glass work over the top. Oh and yes I'm using CSM as its fine for this purpose, granted its not as strong as woven but its horses for courses and its plenty strong enough for this job and if you have a hot mix its much faster to work. I will add though that you will need to rough up the surface of the dry west and clean with acetone before glassing on top.
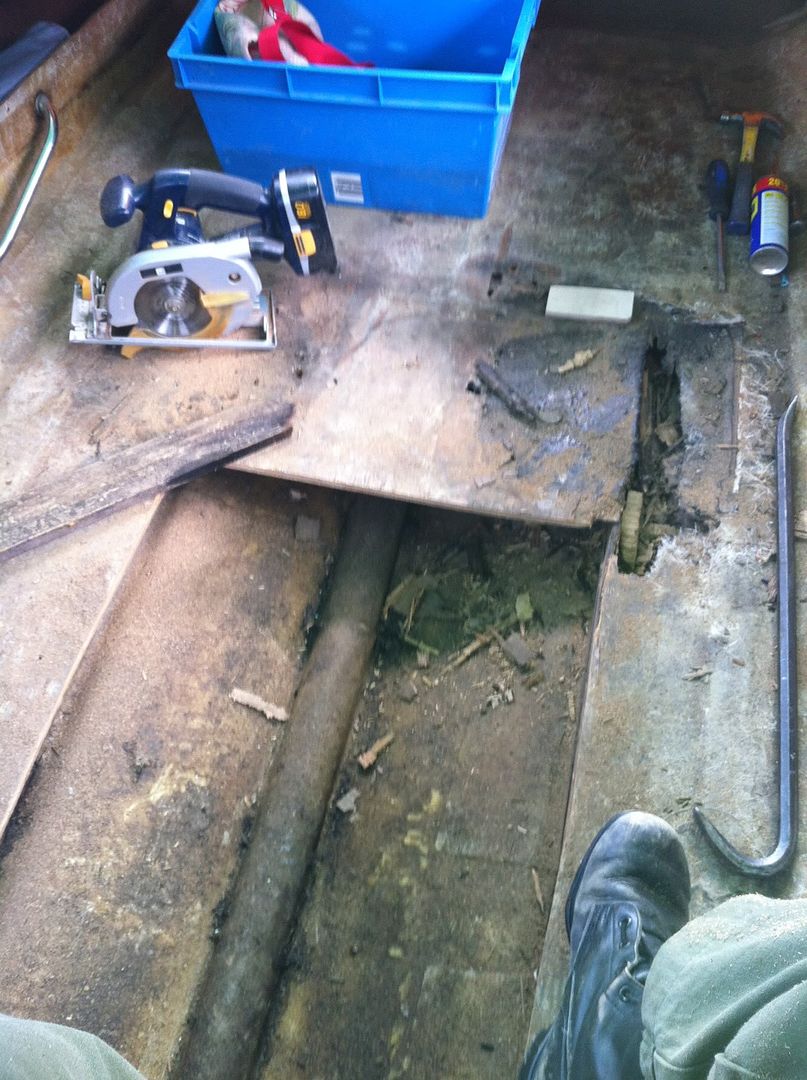
As far as prep work goes,Cover up as much of the boat as you can that you don't want dust in! it will get into everything! I cut out as much bulk as I could with a recip saw and a fein machine, then I'm afraid there is no way around getting in there in a tyvek suit with full dust protection kit and gloves unless you like having the inside of your fingers itch like buggery for days. and going at it with either a 4" grinder with a diamond blade for trimming and cutting out those last few chunky bits and then with a 4"p40 flap wheel on the grinder to prepare old glass surfaces a good 6-8 inches around either side where you are going to be bonding new bits (you only need to attack the old stuff not your new bits!) keep a few of the flap wheels handy as you will get through them quite quick but they rip stuff down very quickly so be extra careful over the top of the stringer as its quite thin! Use it to go over all areas that are to be bonded so you get a nice fresh surface to begin with.
Once you have cleaned out all the dust and believe me there will LOTS of it! get your acetone and use liberally on rags to clean and prepare all of your newly prepared surfaces, once again I would recommend gloves and a mask as the vapours build up in the hull quite quickly!
I have not put drains in the side compartments as the main reason for water ingress in the first place was poor construction, ill fitting wood and very low quality are the culprits! I have however removed most of the foam, I did leave a section in place against the hull to form a support for the new seat base while it was tacked into place. The idea being that once I have finished taping in all the seams on the new work I am going to bore several holes into the ply to fill with pouring foam, once cured I will trim off the excess and encase the whole cockpit in a couple of layers of csm covering the foam holes and flow coating making it 100% waterproof so no water should be able to get below the deck. I will be putting carpet back on top so it will appear like the original.
As far as bonding the new deck down, have a a good couple of test/dry fits before you bond and mark the centres of the stringers in a place easily visible once deck is in situ but not on the deck itself yet.
You want to make absolutely certain that you are going to be able to drop the deck down without any snagging or fouling as its a real race against the clock once you have mixed up your bonding and a small oversight could cause you many hrs of needless work cleaning up to start again. I should also mention too that the outside edges of the deck panel that meet the hull will need to be chamfered about 45 degrees for a clean fit.
what I used to bond the deck down was some micro-balloons mixed with poly resin, but a better choice would be west colodial silica and filleting compound mixed 50-50 with epoxy, again depends how far you want to go. Equally you could use Sikaflex 291 to bond to the top of the stringers. Spread it along the top of the stringers to form a sort of upside down "V" about 30mm high and along the edges where the deck meets the hull rise. Once you are certain you have left no voids slowly lower the new deck in place and once you are certain you have it in the right place use a straight edge to transfer your centre marks for the stringers to the deck, then very carefully drill pilot holes every 8" or so and wind in some 4.5mmX50mm Stainless screws to pull the deck down tight against the stringers and paying particular attention to the outside edges fill any voids and remove excess gunk!
Also its worth noting that avoid standing near the outside edges until cured as you will push out all the paste you worked so hard to get in there! Once its all cured you can then do all the seams, the easiest way to work with glass mat that I have found is to cut your strips and get a good size piece of cardboard large enough for you to easily fit one of your strips on, then with a "Fluffy" roller wet out liberally with resin and pick it up and place in position quickly as the binding in the glass will break down quickly and will just end up as a handful of fluff if you wait too long! work into area with more resin and roller then once you have all your pieces laid up roll them out with a penny roller before the resin starts to gel for good finish and to ensure all glass is wetted out correctly.
I'm not sure about the whole transom yet, I will have a better idea once I have removed the transom plate but as far as I can tell it all seems in quite good shape. I am however replacing all the other timber in the stern while I'm at it as it was mostly junk! Again poor construction and materials are the main problem.
I do currently have all the components made to go in the back there so it might be handy for you if you are going to replace any on yours as I presume they are the same, can easily run a router around them to replicate as many as I like at the moment :)
Thanks about the seats too, not a perfect copy but quite close, I could not re-upholster mine as the foam was gash and I just do not have time or inclination! to re manufacture them. If your bases frames and foam are good then it should not be too horrendous to get them re covered.
Thanks for the support too! Its easy to get dishartend and frustrated when things don't go as planed.
If you are having problems with glassing I can pop down some time and give you a few pointers if you like.
Anyway, this has turned into a bit of a essay! oops Well i hope some of this is helpful and look forward to seeing some more updates!

All the best!
 

jmmacky

Petty Officer 2nd Class
Joined
Jun 20, 2011
Messages
177
Re: 1988 Bayliner Capri Cuddy Rotten Resto Project - UK

Hi there jmmacky
Not sure if you have looked here www.cfsnet.co.uk but there is just about all you need there :)
I've used them a lot for many bits and are very helpful too. Good prices and delivered!
Good luck with the resto! Mine will be finished soon if i get some descent weather!

Haha cheers 1066! That would have been a helpful website to find before I started! Never mind, the combination matt that I used worked pretty well and is really strong.
 

1066

Cadet
Joined
Apr 18, 2012
Messages
11
Re: 1988 Bayliner Capri Cuddy Rotten Resto Project - UK

Haha cheers 1066! That would have been a helpful website to find before I started! Never mind, the combination matt that I used worked pretty well and is really strong.

Your welcome, shame its too late! Glad you have yours sorted though. Nice to have them all sealed up again!
 

kwik_uk

Petty Officer 2nd Class
Joined
May 25, 2011
Messages
155
Re: 1988 Bayliner Capri Cuddy Rotten Resto Project - UK

DSCN1213.jpg

I've got the same circular saw :D

IMG_1894.jpg


Nice work too mate, keep up the good work :)
 

93bayliner1800

Petty Officer 1st Class
Joined
May 9, 2011
Messages
239
Re: 1988 Bayliner Capri Cuddy Rotten Resto Project - UK

just keep plugging along....looking good! Just got my floor down in mine and wow it is a good feeling. Will be checking out your progress.
 

Funkiegh_g

Cadet
Joined
Feb 8, 2012
Messages
28
Re: 1988 Bayliner Capri Cuddy Rotten Resto Project - UK

Hi JB, thanks for the info - that's a great help. The weather in the UK has been rubbish over the last few weeks so unfortunately progress has ground to a stand-still. However, the rain clouds have parted for a while and I've just returned from a trip to Venice - watching all those boats zip around has fired me up again and I want to get mine back on the wet stuff!!
 

Funkiegh_g

Cadet
Joined
Feb 8, 2012
Messages
28
Re: 1988 Bayliner Capri Cuddy Rotten Resto Project - UK

Hi Funkeigh,

I am based in the UK as well and am also rebuilding a Bayliner. I have managed to get to the point where the new deck is fibreglassed in place but, frustratingly, my project is on hold until September when my current job with a 96 hour working week finishes! I found 1708 biaxial with CSM stitched to it impossible to source in the UK. It is possible to get the biaxial but not with the CSM attached...maybe you will have more luck. But if not I used a woven stitch matt from EC fibreglass. I found them helpful and they stocked most of the fibreglassing stuff I needed. Hope this helps.

Hi jmmacky, thanks for that - I now really need to get on with the grinding and complete my research on the materials and quantities, so I'm grateful for all the advice. Just not looking forward to all that fibre dust!! :eek:
 

Funkiegh_g

Cadet
Joined
Feb 8, 2012
Messages
28
Re: 1988 Bayliner Capri Cuddy Rotten Resto Project - UK

just keep plugging along....looking good! Just got my floor down in mine and wow it is a good feeling. Will be checking out your progress.

Thanks for the encouragement, and well done for getting the floor in! I just checked-out your thread - awesome stuff - it's clear that Frisco has inspired you. I too hope to feel the excitement of a solid floor someday :rolleyes:. I'll be keeping an eye on your progress too so good luck with it all.
 

Funkiegh_g

Cadet
Joined
Feb 8, 2012
Messages
28
Re: 1988 Bayliner Capri Cuddy Rotten Resto Project - UK

1066, thanks so much for all your detailed information and I'm sorry for not acknowledging that earlier.. With your propensity for such essays you really should author a book or two!
I take your point about the 18mm ply and I think I'll go the same way for the thickness - I cut a piece of 12mm and while it's just okay over the forward stringers and bulkhead section, the area over the gas tank is bigger and will flex a lot more. However, I'll probably go for standard WBP ply rather than 100% marine grade - I think the only difference is the guarantee of no-voids in the marine grade but at that thickness I'm not worried about an internal void or two..
I notice you're using West systems epoxy... again a little expensive for me and I'm planning to use poly resin with fillers and 1/4" chopped strands for a thickened mix. The block I have at the moment is actually getting on with the grinding.. I really need to steel myself and just get on with it... maybe this weekend :redface:
I think I'll go with a compound like you suggest (e.g. Sikaflex 291) for bonding the floor to the stringers etc. then use a thickened resin mix to fillet around the edge before glassing over. I'll screw the floor down to wooden battens attached to my new bulkheads so not going through the stringers as they're well glassed. Then, foaming and finishing the floor with CSM looks a good way to go.
Thanks again for your advice! :)
 

1066

Cadet
Joined
Apr 18, 2012
Messages
11
Re: 1988 Bayliner Capri Cuddy Rotten Resto Project - UK

Hi Funkiegh :)
Your welcome.
Maybe one day I might scribble a few lines lol!
The 18mm for the deck is a good way to go, you will not regret it! As for the epoxy, I did all of mine with one small .5kg kit, and its about ?30 +/- It goes quite a long way! (powders etc are about ?15 a tube and also go a very long way!) I have only used it on the underside and for mixing some bonding (coloidial silica, you can mix this with poly too).
I'm lucky as I work with boats and quite often end up with left over materials, otherwise I too might opt for a less costly resto!

I've been stalled for the last couple of weeks. I've been stripping off all the old anti fouling back to the original gel, its actually in surprisingly good condition with only two very small chips on the chines! Not bad for a boat of its age :)

Its been hard to stay motivated when you work on bloody boats every day and then work on another one in my free time!
Anyway I just wanted to let you know that if you need glass, resin etc a friend of mine over in Peasmarsh (Keith at Castle mouldings) does sell to the public too at very good prices.
I will post some updates soon, I've also discovered a new 3M material called Di-Noc, its a sort of heat shrink film in various finishes but I'm going to use it to cover all the window frames with a brushed aluminium film and hopefully will look like new :) its a little pricey but awesome finish.

Keep up the good work mate!
 

dillonshepley

Recruit
Joined
May 7, 2014
Messages
1
Re: 1988 Bayliner Capri Cuddy Rotten Resto Project - UK

Hey Funk,

Looks like you did a spectacular job on your boat! Do you have any pictures of the finished project? I am looking at possibly having to do something like this to mine also :(... Do you know how much it wound up costing you in the long run to finish her and about how many hours you spent? Thank you so much for your time. I don't have a ton of money into her at the moment and am trying to decide if it is worth it or not for me to take on such a task.

Thank You!
 
Top