1976 GlasPly 170SL

OrangeStang

Cadet
Joined
Mar 13, 2012
Messages
22
This is m first post, as well as the first boat restoration I have done. I have tried to used correct materials and methods throughout, but I'm sure some would have done things differently.

A few months back I was looking for a smallish starter boat as a run-about for some lake fishing, and fairweather ocean use. (I live in Victoria BC which is about 50 miles from Seattle.) I was undecided about open or closed bow, but my wife had me on a very tight budget which liited my options.

I have a background of vehicle restoration and my not very handy dad had boats when I was teen, but this is my first boat. I wanted something to use with my son for fishing and watersports.

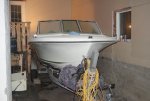
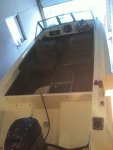
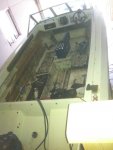
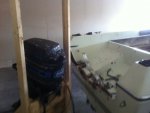
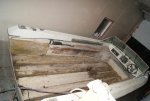
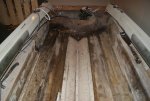
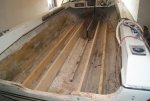
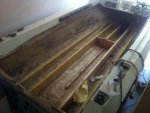
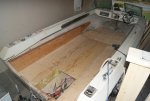
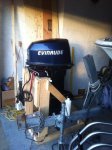
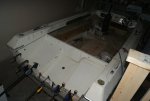
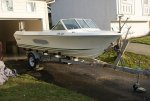
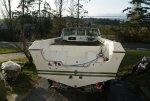
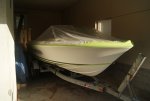
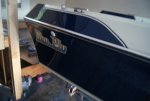
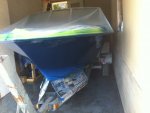
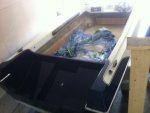
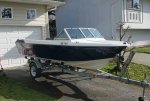
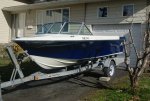
This is what I found. It is a 1976 GlasPly 170SL. It was "powered" by the original 85hp Merc which did not run and would not shift out of forward. It also came with a 6hp Johnson, and a trailer that was pretty decent. The floor was clearly very soft on the boat, and the whole interior was faded and gross.
 

Attachments

  • DSC03465.jpg
    DSC03465.jpg
    112.9 KB · Views: 0
  • IMG_0356.jpg
    IMG_0356.jpg
    54.3 KB · Views: 2

OrangeStang

Cadet
Joined
Mar 13, 2012
Messages
22
Re: 1976 GlasPly 170SL

I dragged the boat home and got a few rude surprises. First off, I noticed that the clearance between the tires and fender was quite small. I then noted that the boat had been stored with the plug in. I removed the plug and it took about 3 mins of gushing water for the flow to begin to slow. I don't know exactly how much water poured out, but it was a considerable amount that resulted in about an extra 3/4" of tire to fender clearance. Next I decided to try and tilt the motor down. When I went to lift the leg, I noted the transom flexed in about an inch.

Things were looking grim. I had hoped for a floor replacement, and that the stringers and transom would be OK. Clearly that was not the case. I began removing the floor and 35 years worth of poorly installed rod holder mounts, downrigger mounts, horrible wiring secured with marettes, etc..

As I tore up the floor my worst fears were confirmed. The transom and stringers were all just mush. There was hardy and solid wood left, and what small amounts there were, were completely saturated with water. The motor was pulled and sold for $50.
 

Attachments

  • IMG_0359.jpg
    IMG_0359.jpg
    104.1 KB · Views: 5
  • IMG_0401.jpg
    IMG_0401.jpg
    102.8 KB · Views: 5

OrangeStang

Cadet
Joined
Mar 13, 2012
Messages
22
Re: 1976 GlasPly 170SL

I now knew that if this project was to have any hope of completion and being able to be used without fear of massive structural failure I was going to have to completely gut everything. I cut out the the splashwell and got to ripping. I used an angle grinder with a cut off blade to slit the bottom of the stringers and transom. Removing the rotten wood was relatively easy because it ws all just mush that you could tear handfuls out of. Once the fiberglass was cut off the stringers a moderate kick was all that was needed to remove the rotten and very heavy wood.

The only part of this project that was sort of depressing now was the removal of the floatation foam. I would think this stuff is closed cell, but it too had become completely water-logged and saturated with water. I would cut out a small area of foam and water would just begin pooling in the low spot.

There must have been gallons and gallons of water trapped in this boat. I think I must have removed about 1000lbs of mushy wood, wet foam, and water.
 

Attachments

  • DSC03467.jpg
    DSC03467.jpg
    116 KB · Views: 6
  • DSC03470.jpg
    DSC03470.jpg
    131 KB · Views: 6

lselmes

Seaman Apprentice
Joined
Sep 21, 2006
Messages
31
Re: 1976 GlasPly 170SL

Hey Orange Stang, welcome to the trials and tribulations of boat ownership! Glasply's are awesome and I am the proud owner of a 1981 2100 Hardtop Sedan. Mine is used strictly for slaying salmon around the Howe Sound and West Coast of Van.Island. I'd like to steer you over to glasply.net where you'll find a wealth of info on your boat and great advice to boot. Look me up my tag is "leeply".

Cheers
 

OrangeStang

Cadet
Joined
Mar 13, 2012
Messages
22
Re: 1976 GlasPly 170SL

I used 2 layers of 3/4" ply laminated together and then cut to the proper shape using a cardboard template to remake the transom. I then fiberglassed it in place using a layer of thick and heavily saturated random strand matting on the hull side with the same thick random strand matting covered by some moderately heavy woven mat to glass the transom in. This was followed by the installation of the stringers which were cut using what could be salvaged of the originals to make templates. I used the thick random mat followed by the moderate woven again to attach these to the hull which I had roughed up the surface on to promote better adhesion. Also, I had obtained a whole bunch of kevlar sheets free from work, and although they are designed to be used with epoxy, I figured it wouldn't hurt to layer on a kevlar layer over the fiberlgass on the stringers, lower hull, and areas where the stringers meet the transom.

The Kevlar layer may not make a huge difference, but beefing up the stress/impact areas seemed like it couldn't hurt. I also made sure that there was drainage from the outer portions of the hul to the main bilge area. This was lacking in the facotry layout and I htink likely contributed to the water getting trapped and causing massive rot.
 

Attachments

  • DSC03494.jpg
    DSC03494.jpg
    126.3 KB · Views: 4
  • IMG_0431.jpg
    IMG_0431.jpg
    101.4 KB · Views: 5

OrangeStang

Cadet
Joined
Mar 13, 2012
Messages
22
Re: 1976 GlasPly 170SL

Next thing to do at this opoint was to re-install the floor. I used a 5/8" ply for this as I felt it was thick enough to no flex or be springy, and yet be a little bit lighter than 3/4". The side shelves were made with 3/8" as was the area under the bow cap, as these areas are not walked on, and I felt the thinner and lighter ply would be better suited to this area. Given the thick fiberglass of the hull, and the deep stringers, I felt this boat was heavy enough and I did not want to make it any worse. I did add a small amounto weight by making 2 short outer stringers on the very outer edge of the boat to give the outer perimeter of the floor somehting to attach to.

The flor was then glassed over with a single layer of woven matting. I used only a single layer here because I wanted the wood kept away from contactg with water, yet I don't think the floor glasssing serves as a main structural component. Again, why add weight and expense for no reason.

Another piece to the puzzle fell into place around this time when I bought a new main engine. It was only new to me, and was quite affordable. It is a 90hp Evinrude V4 Looper. Nothing exotic, but a proven and relatively strong motor. It was a trade in someone had brought in for a discount on a new 4 stroke. The hood had been repainted at some point, but compression, trim, and spark tests all looked really good. I bought it froma local marine engine place where a friend used to work. He helped broker the deal and we got to raid the store rooms for gauges, bolt kits, wiring harness, controls, etc.. We also completed a tune-up before loading it into my truck. They threw in 2 stroke oil and a floaty key chain and off I went.
 

Attachments

  • DSC03542.jpg
    DSC03542.jpg
    122 KB · Views: 4
  • IMG_0457.jpg
    IMG_0457.jpg
    51.9 KB · Views: 1

Woodonglass

Supreme Mariner
Joined
Dec 29, 2009
Messages
25,924
Re: 1976 GlasPly 170SL

Hopefully you glassed the bottom side of the deck as well. Did you fill the gap between the sides of the hull and the deck with thickened resin?
 

OrangeStang

Cadet
Joined
Mar 13, 2012
Messages
22
Re: 1976 GlasPly 170SL

Quite honestly no, I didn't glass the bottom side of the floor. I debated doing this for a while, but I thought that the likelyhood of water splashing onto the bottom of the floor during normal operation was fairly low. ANy water within the boat should flow into the rear center of the boat where there is no desking and be removed by the bilge pump. I though be leving it open, there would be a better chance of the wood breathing and not trapping moisture within. I could be wrong on this theory however, but that is what I went with at the time.

Regarding the second point, I did make sure that the space between the hull and the outer stringers was full of resin. I wanted to make sure there was a good bond in the area, as well as provide some additional strength in the area should the area contact a dock or some other obstacle.
 

OrangeStang

Cadet
Joined
Mar 13, 2012
Messages
22
Re: 1976 GlasPly 170SL

With the floor back in place, it was now time to put the splashwell back in. I was hoping to do this with only a tight cut line visible, but in order to get a nice solid fiberglass bond I needed to chamfer the edges back a good ways and therefore had to remove gelcaot and make things a bit ugly. I have a paint scheme in mind to cover the area, but it isn't really my ideal choice.

During this time, I figured I'd also respray and clear the hood of the motor. It looked good in pictures but was actually pretty rough in person. I also had some excess Paypal money so I bought an elaborate decal kit. It wasn't intented for this particular motor as it is not an E-Tec, but it still fit OK.
 

Attachments

  • DSC03612.jpg
    DSC03612.jpg
    99.3 KB · Views: 5
  • IMG_0482.jpg
    IMG_0482.jpg
    53.7 KB · Views: 1

oops!

Supreme Mariner
Joined
Oct 18, 2007
Messages
12,932
Re: 1976 GlasPly 170SL

hi stang.....welcome to iboats....


that is a perfect west coast rig !

they used to rent boats simmelar to that out at pedder bay.

i know your wife wanted an open bow.....but you really want a closed bow in the big water that can come up there.

are you on the brentwood side of sannich? or are you more towards the esquimalt side?......the reason im asking is because the sea lions on race rocks are a sight every kid should see !

i used to live aboard a yacht in toovey bay at the end of esquimalt harbour...docked almost in swimming distance of the six mile.
i was on CKDA/CFMS for a number of years....

but i moved to kelowna to warm up.....lol
 

OrangeStang

Cadet
Joined
Mar 13, 2012
Messages
22
Re: 1976 GlasPly 170SL

Now that the boat was basically structurally sound I started to move onto some cosmetic type issues. Blending cutout splashwell back in was challanging, as was filling 35 years worth of rod holder, depth sounder, down rigger, etc holes. I used alot of long and short strand fiberglass filler which was covered by gelcoat on the white areas. There were all the usual scuff and scratches on the hull you would expect. The hardest part was the down the sides. I think with 35 years of use and flexing there was a somwhat visible crease that I first thought was a docking accident, but upon further inspection I noted it was in exactly the same place on either side of the boat. It was actually caused by the inner side shelves where they were glassed to the hull must have created a more rigid area that would not flex like the rest. There was no easy fix, so I ground down the thick fiberglass part on the inside and moves the mounting location a bit higher to not re-encounter the same issue in the future. On the outside I deeply scuffed the gelcoat with some coarse paper and wiped it with some powerful thinner to re-soften the gelcoat. I then filled the small crease with some long strand fiberglass filler. This was followed by a lot of block sanding and some additional short strand filler where required. I then primed over it.
 

Attachments

  • DSC03691.jpg
    DSC03691.jpg
    138.3 KB · Views: 1
  • DSC03698.jpg
    DSC03698.jpg
    143.4 KB · Views: 1

OrangeStang

Cadet
Joined
Mar 13, 2012
Messages
22
Re: 1976 GlasPly 170SL

that is a perfect west coast rig !

they used to rent boats simmelar to that out at pedder bay.

i know your wife wanted an open bow.....but you really want a closed bow in the big water that can come up there.

are you on the brentwood side of sannich? or are you more towards the esquimalt side?......the reason im asking is because the sea lions on race rocks are a sight every kid should see !

Actually I'm kind of happy with the boat I ended up buying. It was largely just a fluke of what was available and affordable. I live much closer to the Brentwood area now, but my first starter home was in the Esquimalt area.

I'm also somewhat familiar with the Pedder Bay area as one of my co-workers has recently taken over his grandfather's Reinell which is tied up at the Marina there. We've fished the area a few times now albeit with limited success.
 

Woodonglass

Supreme Mariner
Joined
Dec 29, 2009
Messages
25,924
Re: 1976 GlasPly 170SL

If you used Poly resin without any filler then I'm afraid it will eventually crack and allow water penetration. Did you tab the deck to the sides of the hull with the woving material? If so this will help some. As for the bottom of the deck, the air space between the hull and the deck, with the variances of temperature and moisture will create condensation. Just like a house. Without some sort of a moisture barrier the wood on the bottom of the deck will absorb moisture and without air circulation it will start the rotting and mold process. That's why it's important to glass the underside. It will take several years for this to occur but my experience has shown be that it will occur eventually.
 

OrangeStang

Cadet
Joined
Mar 13, 2012
Messages
22
Re: 1976 GlasPly 170SL

If you used Poly resin without any filler then I'm afraid it will eventually crack and allow water penetration. Did you tab the deck to the sides of the hull with the woving material? If so this will help some. As for the bottom of the deck, the air space between the hull and the deck, with the variances of temperature and moisture will create condensation. Just like a house. Without some sort of a moisture barrier the wood on the bottom of the deck will absorb moisture and without air circulation it will start the rotting and mold process. That's why it's important to glass the underside. It will take several years for this to occur but my experience has shown be that it will occur eventually.

The resin was added with fiberglass matting. I used the random strand stuff that was torn up, dunked in the resin then stuffed into the area between the outer stringer and side of the hull. My thought process was that if that is what the rest of the hull is constructed from it would likely be helpful to maintain the same material to fill the voids.

Regarding the floor, when I redid the stringers I put a 45 degree relief cut into the bottoms of them to allow a pathway for drainage and I would hope some airflow. The size of the cutaway was something I debated with myself over. I wanted it big enough to allow easy drainage and some airflow, but not so big as to compromise structure where the stringer meets the transom. I guess we'll see how my plan turns out.
 

OrangeStang

Cadet
Joined
Mar 13, 2012
Messages
22
Re: 1976 GlasPly 170SL

We are now progressing to the part that doesn't take long but ends up being dramatic. I used the Interlux Brightside paint and gun thinner loaded into my HVLP gun. Tape off show the ugly cut line on the splashwell. These phots don't show the masking on the lower hull, but you'll get the idea with future photos. I will say I regret not doing a better job masking the lower hull, as I am still dealing with overspray removal in these areas.
 

Attachments

  • DSC03746.jpg
    DSC03746.jpg
    90.9 KB · Views: 2
  • DSC03747.jpg
    DSC03747.jpg
    91.3 KB · Views: 2

OrangeStang

Cadet
Joined
Mar 13, 2012
Messages
22
Re: 1976 GlasPly 170SL

And this is the result. Overall the Brightside paint was good to work with, although I had a few battles with coverage, and some fish eyes on the starboard side which was annoying because I had wiped the hull down carefully with surface prep prior to painting and used a good tack cloth.
 

Attachments

  • DSC03755.jpg
    DSC03755.jpg
    87.2 KB · Views: 2
  • IMG_0513.jpg
    IMG_0513.jpg
    95 KB · Views: 1
  • IMG_0514.jpg
    IMG_0514.jpg
    97.1 KB · Views: 1

OrangeStang

Cadet
Joined
Mar 13, 2012
Messages
22
Re: 1976 GlasPly 170SL

Here is the boat outside during some rare west coast winter sun.

I sometimes wonder if I have angered any GlasPly purists by painting over the GlasPly side stripes as well as removing the giant tusks that GlasPly called bow rails.
 

Attachments

  • DSC03792.jpg
    DSC03792.jpg
    135 KB · Views: 2
  • DSC03795.jpg
    DSC03795.jpg
    142.2 KB · Views: 3

OrangeStang

Cadet
Joined
Mar 13, 2012
Messages
22
Re: 1976 GlasPly 170SL

Hey Orange Stang, welcome to the trials and tribulations of boat ownership! Glasply's are awesome and I am the proud owner of a 1981 2100 Hardtop Sedan. Mine is used strictly for slaying salmon around the Howe Sound and West Coast of Van.Island. I'd like to steer you over to glasply.net where you'll find a wealth of info on your boat and great advice to boot. Look me up my tag is "leeply".

Cheers

Thanks for the encouragment and advice. I will definately check out the GlasPly site!
 

OrangeStang

Cadet
Joined
Mar 13, 2012
Messages
22
Re: 1976 GlasPly 170SL

What did you bed the stringers in?

I did. For this I used random strand matting torn up and dunked into unwaxed resin. I left about 1/4" of the originalfiberglass that surrounded the wood of the stringer and used that as a sort of a "well" to hold the resin and matting mix. I then placed the new stringers into the "well" and stood on them and wiggled them allowing the excess resin and matting to ooze out, and hopefully remove any air pockets. Not sure if that is the recommended practice or not, but it seemed to make sense to me, so I went with it.
 
Top