12' alumacraft rebuild

Joined
Jan 30, 2012
Messages
26
Re: 12' alumacraft rebuild

More Pictures
 

Attachments

  • 272797_1979670766100_1073070010_31824587_1872584_o.jpg
    272797_1979670766100_1073070010_31824587_1872584_o.jpg
    110.8 KB · Views: 0
  • 281429_1979680126334_1073070010_31824604_4614775_n.jpg
    281429_1979680126334_1073070010_31824604_4614775_n.jpg
    51 KB · Views: 0
  • 278926_1979677006256_1073070010_31824602_7586270_o.jpg
    278926_1979677006256_1073070010_31824602_7586270_o.jpg
    124.7 KB · Views: 0
  • 282793_1979645725474_1073070010_31824532_3122272_n.jpg
    282793_1979645725474_1073070010_31824532_3122272_n.jpg
    70.6 KB · Views: 0
Joined
Jan 30, 2012
Messages
26
Re: 12' alumacraft rebuild

After checking out some of the other rebuild projects on here I figured I'd post mine. Like others on here I got tired of the bench seats and started over. I framed the entire front in with 2" aluminum angle and then used 1"x8" boards across the width where the seats were to support the upper deck. Its also supported lengthwise down the middle from the bow to the battery compartment with the aluminum channel. The lower deck is mounted directly onto the ribs running across the bottom. Upper deck is 1/2" plywood and the rest is 3/8". The upper deck is completely open underneath for storage. I will add a flush mount seat base (it will actually bolt directly onto the frame where the old front seat used to sit). This seat is going to have the 6 inch offset pedestal to allow for extra room for whoever is up there.

The stern port side box has a door which I can open up allowing access to all the electrical connections. The door has my switch panel mounted on it. Also in this box will be the rear lights, trolling motor plug, and maybe a speaker. From this box I have run a piece of electrical conduit to the center of the boat. I built a battery compartment here (look at the newer wood on upper deck) that has enough room for two batteries plus two small storage areas for important things (maps, emergency kit, keys, etc). The conduit then runs from this cabinet under the front deck to the electrical connections in the bow. Here i will have trolling motor plug and a power outlet. I also plan to use the power wire on the truck's trailer wiring to charge the batteries in the boat whenever the truck is running. The conduit allows me pull more wires in the future without much hassle.

the stern starboard box currently has two cup holders. i built it because i was going crazy not having symmetry. I have been trying to figure out if there is anything I can do with that starboard box that would make it more useful. I was thinking about adding a rod holder to both back boxes but that will wait until after i have seats installed.

I am quite happy with the progress so far. Hopefully after taxes I can order the carpet (i'm looking at Cabela's premium metallic grey, but if anyone knows of a cheaper place please tell me). Also, since most of you have a lot more experience fishing from a boat than i do, i would love some input. Any ideas on what i should change or add?
 
Joined
Jan 30, 2012
Messages
26
Oh boy, just ran across this and this needs some updating. Big time.

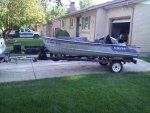
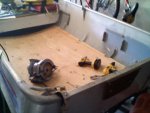
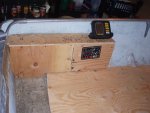
So this project is DONE!! I splashed her in May 2013. A lot ended up changing since my last post here. I modified the layout in the rear so that there were full length rails along each gunwhale. The starboard side houses the electrical and the port side is used for open storage and cup holders. The storage area has an elastic net/pocket over it (like in the back of an suv). I stuff coats behind the entire thing then keep tackle boxes, hats, other stuff in the pocket. It works great for organizing a small boat. The bow got a simplified storage area with one giant opening, and the middle still has the battery box. Above deck in the bow is a small cubby for storing things and to house the electrical connections.

The wiring is all done with jumper cables and runs into the middle box. I did wire the trailer to charge the boat while driving and that has been a life saver. It connects into the trolling motor plug and backfeeds to the battery. It is usually mostly charged by the time I get back from fishing two hours away. I ran waterproof led strip lights down one whole side of the boat to use at night. They shine down and not into your eyes. I love the idea but my lights are too bright. I end up having them off unless a fish is in the boat. I also changed the anchor light to an LED because of how many bugs were attracted to the incandescent.

Finally I brought the trailer back to life. All new wiring, LED lights, new side bunks, replaced the rollers on the bottom with bunks, 5 lug hubs, new tires, and new paint. I had already built custom metal fenders that I could stand on and I love those. Makes jumping in and out easy. Also I already mentioned it but the trailer is wired to connect to the boat and charge the battery.

I have both a 6 hp and a 15 hp motor for this boat. I prefer the 6 hp as the 15hp is a fuel hungry beast. However with that 15 hp it cruises around 10 mph with two people and gear in it. One person and just enough weight to hold the bow down (plus the guy getting as far forward as possible) and it hits 16 mph.

I know everyone will want pictures. I will post those up next.
 
Top