Love, Necessity and Pride

Status
Not open for further replies.

GT1000000

Rear Admiral
Joined
Jul 13, 2011
Messages
4,916
So , where will the Bassassin be splashed ? Hopefully not to far from a lake or river for ya !

Got some nice lakes and reservoirs within about an hour, and within a 2-3 hour drive there are many more lakes and reservoirs to explore...
Rivers not good for power boats, as most of them are fast flowing, shallow and rocky...good for thrill seeking rafters and kayakers, tho.
Although there are abundant opportunities to wade in and fish from the banks.

Love the shop. That will be a good place to hide when the snow piles up, and up, and up...

I do too! Maybe not too great to hunker down in until I either get it insulated or heated or both...:smow:

Welcome back GT! Long road you hauled on....place looks like the perfect place!

Thanks kc, It has been a long haul getting here, but definitely worth it!

Hi-ya Gus,
It's good to hear from you again. Congrats on the new digs.
I'm kinda lurking around here again too.
Dave

Glad to hear from ya Dave and thanks!

Holy cow Gus you been buuuuusssy! Awesome place there! Glad to hear from ya!!!

Nice to hear from you too, SBB!
I am definitely stoked to have this place!

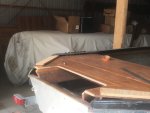
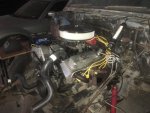
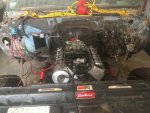
Well, as promised...
A bit of progress...

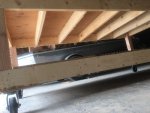
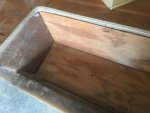
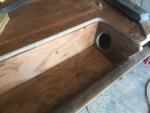
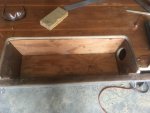
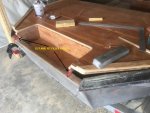
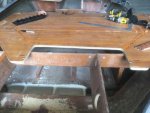
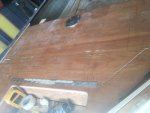
As previously mentioned, the lower motor bracket bolt locations, required a bit of massaging so they would sit nice and flush against the transom.
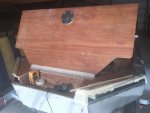
A support brace for the main cross brace prevented the washer and nut from properly seating so a bit of careful trimming while working upside down and backwards was performed with a hole saw. To guide the bit in the center of the bolt hole, I slipped a piece of plastic tubing over the centering bit and into the bolt hole in the transom. The pics should explain it better...
The with a wood chisel and some awkward taps with a hammer, the offending obstruction was removed enough to allow the washer to sit nice and flat against the transom.
IMG_4334JPG.jpgIMG_4340JPG.jpgIMG_4345JPG.jpgIMG_4343JPG.jpgIMG_4347JPG.jpgIMG_4348JPG.jpgIMG_4346JPG.jpgIMG_4351JPG.jpgIMG_4357JPG.jpgIMG_4359JPG.jpgIMG_4365JPG.jpgIMG_4368JPG.jpgIMG_4371JPG.jpg
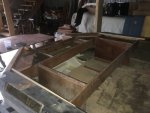
Hey, I can make sawdust with the best of 'em...:eek:

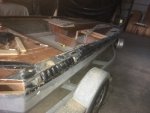
I have already ordered some resin so that I can reseal those areas and continue where I left off the last time I worked on the boat.
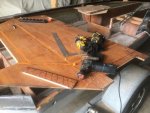
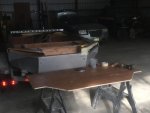
A bit of a side track, but a very necessary one is to build a strong, sturdy and portable work table.
So I went into town today and picked up the necessary lumber to build my portable work bench...
Should have it finished by tomorrow and then...
I can get suited up:painkiller: for a good long grinding session on the Bassassin to open up the pores on several areas that need to be addressed as far as needing to be sealed up with some resin and cloth.

Happy boat restoration to all, and to all a good night!:sleeping:
 

Watermann

Starmada Splash of the Year 2014
Joined
Jan 12, 2013
Messages
13,753
You're going to love boating on the cold, clear deep waters of the west. No more brown or green shallow water.

y4mvyBfuVXp-yBXEPLtVDPIcSz_kyFtUq4AfYixs_6_3jiwSCaZXky-mS_9D8lDIdYg6V78VHoWUEWdIUcizhg1NgBUg52w6RViZZdk0s93R_GTC-NWq6LY8DSQz5waD5upCF7h65CUJX_mx8CBc6QjBapUrIuQBLECWxYi_KBxK8SyasxiSetpf9fMlyKV4Mb5c_a_AcDQrflvk4ovi2vIlw
 

ahmincha

Lieutenant Commander
Joined
Jul 21, 2012
Messages
1,512
Gt glad to hear from you and very happy for you and the family best wish's on the new place.
But I know you fell in love even before seeing the house HAHAHA
 

GT1000000

Rear Admiral
Joined
Jul 13, 2011
Messages
4,916
You betcha H2Odude!
No more murky greenish brown waters or salty oceans to deal with...:rolleyes:

Hiya Minch! Glad to hear from you...hope all is good with you and yours!

After a slight delay, had to run into town and pick up some lag bolts and washers to attach the rollers...

The work table is ready for action...
IMG_4391.jpg
IMG_4394JPG.jpg
IMG_4395 (1).jpg
IMG_4397-1 (1).jpg

Should be able to throw about a 1000 pounds on it with no issues...;)

And the majority of supplies and PPE are on hand and ready for application...
IMG_4401JPG.jpg

Gotta run some errands today and tomorrow, but hopefully Sunday I will be getting suited up in the michelin man suit and get to some much needed grinding...Yeehaaa!

Have a great weekend and I'll be back with any updates as they occur.:)
 

Attachments

  • IMG_4395 (1).jpg
    IMG_4395 (1).jpg
    37.5 KB · Views: 0

gm280

Supreme Mariner
Joined
Jun 26, 2011
Messages
14,590
Wait a second there GT1M, you mean you are not going to poly the work table and spray it with some metal flake finish? Oh, I don't know what to say about that now. :eek:

The table looks solid enough and I am sure it will work for holding most anything. Good to see you posting again. I always enjoyed seeing your new ideas posted. Keep posting. You give me lots to think about.
 

Watermann

Starmada Splash of the Year 2014
Joined
Jan 12, 2013
Messages
13,753
Heck yeah now that's a tool cart and a half, you could even add on to one end an outboard stand. :thumb:
 

GT1000000

Rear Admiral
Joined
Jul 13, 2011
Messages
4,916
Where to begin...:indecisiveness:

As usual, most things are easier said than done...

My plan is to get to a point where I can permanently mount the motor bracket to begin the assembly of the tower of power.

The part of the plan that gets me to that point is not as quick and easy as it seems.
A few things have to happen before the motor bracket can be permanently installed.

First, I need to create and install the splash well.
2nd- Reconstruct and fit the rear section of the now cut up and heavily modified cap. ( More like a trim piece, now:rolleyes:)
Do a ton of sanding and grinding in preparation for glassing...
Then, actually do all the glassing.
Finally, apply bilge paint to the majority of the inner hull.
At which point I may have reached my goal of mounting the motor bracket...permanently!:thumb:

Sooo, on to the point of this post...

Actual progress as depicted in the following pics...
Mount the rear fishing deck and attach the modified cap (trim) pieces to begin the process of figuring out what will become permanent sections of the hull and where access hatches will live.
Some pieces of plywood and 1X4 fir are cut and trimmed to provide needed pieces, parts and supports for final glassing.

For informational purposes; Most cuts that need a straight edge, I use the circular saw. Cuts that only need to be rough shaped, I use the jigsaw. For final fitting and trimming, I use the 4.5" grinder, freehand, with both 36 and 80 grit discs. All of the pieces are custom fit and require a combination of cardboard templates, measurements, best guess and lots of eyeballing. Due to the fact that most of these old production boats were built to somewhat loose tolerances...there are variances in dimensions of as much as 1" from side to side, top to bottom and front to back. So eyeballing and guess-timation play a huge role in creating the illusion of symmetry...:twitch:


Have a few more details to work out then I can blow everything apart in preparation for grinding, glassing and painting.
Have to pick up some materials in town before I can continue forward progress, so until the next update...May all your boating dreams be fulfilled with happy boaters enjoying fun times under bright skies!:watermelon:
 

GT1000000

Rear Admiral
Joined
Jul 13, 2011
Messages
4,916
FYI, no pix only X marks.
Hi Bill,
Sorry bout that...I might have screwed up...
:confused:
Something is not adding up?
I see the pix on both my PC and Iphone...
Might I be doing something wrong???
I am using Picresize to resize my pics and am retrieving them from my pic files...?!?
J I C..
I will try and upload them again ...
I am only going to try and upload one of them here as a test...
To all, please let me know if this worked.
Sorry for the interruption.:redface:
IMG_4480JPG.jpg
 

Attachments

  • IMG_4478JPG.jpg
    IMG_4478JPG.jpg
    53 KB · Views: 0
  • IMG_4479JPG.jpg
    IMG_4479JPG.jpg
    56.7 KB · Views: 0

dirtmod61

Cadet
Joined
Jul 29, 2012
Messages
24
Welcome back, Gus! I'm with Willyclay on the "x"s, but I can see your reposted pic. Congrats on the move (read:shop)!!!
 

nurseman

Lieutenant Junior Grade
Joined
Jun 2, 2013
Messages
1,045
Heck, I couldn't even see the X marks! But, I could see the re-posted picture just fine!
 

GT1000000

Rear Admiral
Joined
Jul 13, 2011
Messages
4,916
gee, I hope these worked...


Making some alterations to the rear fishing deck prior to mounting in place...
IMG_4453JPG.jpg

Making clearance for the vents..

IMG_4467JPG.jpgIMG_4451JPG.jpg

Adding spacers to support the cap trim and create the new border...

IMG_4456JPG.jpgIMG_4465JPG.jpg

Making cardboard templates for the splash well pieces....

IMG_4475JPG.jpg

Plywood cut and fit to form splash well...

IMG_4478JPG.jpgIMG_4479JPG.jpg
 

Attachments

  • IMG_4451JPG.jpg
    IMG_4451JPG.jpg
    73.1 KB · Views: 0
  • IMG_4480JPG.jpg
    IMG_4480JPG.jpg
    58.2 KB · Views: 0
  • IMG_4482JPG.jpg
    IMG_4482JPG.jpg
    300.4 KB · Views: 0
  • IMG_4452JPG.jpg
    IMG_4452JPG.jpg
    70.2 KB · Views: 0
  • IMG_4466JPG.jpg
    IMG_4466JPG.jpg
    49.3 KB · Views: 0
  • IMG_4461JPG.jpg
    IMG_4461JPG.jpg
    53 KB · Views: 0

Woodonglass

Supreme Mariner
Joined
Dec 29, 2009
Messages
25,924
Looking good Gus!!! I sincerely hope it all goes fast and easy so you can get on the water and enjoy the fruits of your labor
 

sphelps

Supreme Mariner
Joined
Nov 16, 2011
Messages
11,432
The fab is looking fab as usual Gus ! Really nice to see you back on the Bassassin and making progress !
 

GT1000000

Rear Admiral
Joined
Jul 13, 2011
Messages
4,916
No Title

Geez, time flies...
Sorry for the long delay, but even the simple life has a way of throwing wrenches in the works...
Nothing too major as to be life altering, just life bothering...

I had planned to get going on a bunch of grinding and glassing on the ol Bassassin, but then got side tracked with trying to revive my old truck...
Got it almost running and know I'm waiting for a new radiator to be delivered, before I can actually keep the engine running long enough to get the essential valve lash adjustments done, set the carb and base timing, and basically just get it running again, after about a 10 year layup...
Don't plan on registering it for use on public roads until next year, but I do plan on using around my new property to help me do some landscaping and running around my neighborhood's nice and smooth dirt roads...:rolleyes:.
fetch
fetch

Sooo, while waiting for that radiator to arrive, good 'ol Murphy decides to show up for a quick visit...
Thanks to the previously mentioned smooth dirt roads, my old van, which has been a super trooper hauling its loaded butt and pulling the Bassassin loaded to the hilt up from the 3rd world city I used to live in, decided it was time to puke up:puke: the chinese suspension parts I installed just a few months before moving.

Thank the Good Lord it happened on the way back from my mailbox, which is only about 3/4 of a mile away...
If that would have happened on one of the very narrow, very dirt, and very steep drop off with NO guard rail roads, on one of the many mountain crossings...
I may not be here to make this post.:whistle:

Anyhow, I am sitting at the 'puter:ranger: trying to figure out all the parts and who has the best prices and highest quality to replace everything I replaced before on the front suspension, but with good 'Merican pieces.

Soon as I get the van all put back together, hopefully better than Humpty Dumpty...my radiator assembly should be here and I can refocus on gettin the truck up and running...

Besides the usual chores, I should be able to spend the upcoming winter in the shop spending quality time on the Bassassin.
My main goal being to get it wet by next spring/summer...

In that vein, I would like to end this post with some actual pics of progress on the boat.

After thinking and mulling over things left to do, I finally decided to take a jig saw to the rear deck section and cut out what will become the access hatch to the mechanical section of the boat...
IMG_4530JPG.jpgIMG_4555JPG.jpg
I then installed the SS piano hinge
IMG_4553JPG.jpg
Everything is just temporarily installed and I have ordered a couple of gas spring pistons and required mounting hardware to actually help open and hold up the hatch.
IMG_4486JPG.jpg
Also temporarily installed one of the fishing seat bases.

Just a couple of steps closer to the end, but it feels good to know that progress has been made and with winter fast approaching, I'll have a nice shop to work in.

That's it for now, but I will be back with some updates just as soon as Murphy goes on vacation...

PS-I'm still not 100% sure I got this picture thing memorized, so if any pics don't show...holler!
 

Attachments

  • photo278326.jpg
    photo278326.jpg
    53.2 KB · Views: 0
  • photo278328.jpg
    photo278328.jpg
    47.7 KB · Views: 0
  • photo278329.jpg
    photo278329.jpg
    59.3 KB · Views: 0
  • photo278330.jpg
    photo278330.jpg
    61.4 KB · Views: 7
  • photo278332.jpg
    photo278332.jpg
    55.9 KB · Views: 0
  • photo278333.jpg
    photo278333.jpg
    75.7 KB · Views: 0
  • photo278334.jpg
    photo278334.jpg
    58.8 KB · Views: 0
Status
Not open for further replies.
Top