1976 Century Arabian - Mercruiser 888 - Boat Restoration

4Winns2

Petty Officer 1st Class
Joined
Nov 2, 2006
Messages
327
Re: 1976 Century Arabian - Mercruiser 888 - Boat Restoration

4Winns, I appreciate the comments on the work. Believe me, it is nothing to be intimidated by, especially when you consider the date I started. One little step at a time (the one year hiatus didn't help). I think about the process during the week and try to be as efficient as possible in the few hours available on the weekend. Thanks for the link also. I have not yet seen this and I love the history. Purchasing the Century book is probably in the near future.... thanks guys.[/QUOTE]

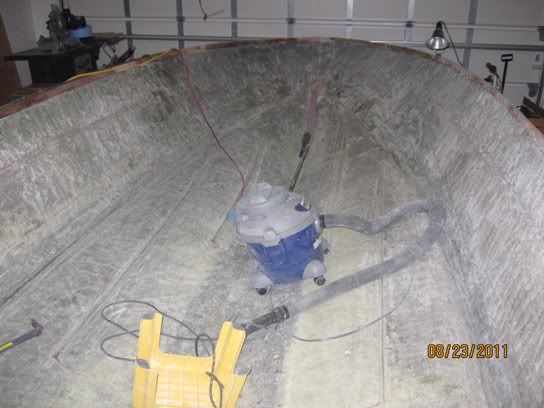
I agree, be efficient by setting manageable goals given the time you have. I have pulled the interior and the carpet (link to my resto thread in my sig) and the next step is pull the gas out of the tank and the tank then cut out the deck. My camera will be busy for reference shots and all here.

FYI: you're the second Arabian resto on this forum. A year or two older and it's an inboard. If you haven't seen it here it is:
http://forums.iboats.com/boat-resto...arabian-total-restore-618011.html#post4308616
 

4Winns2

Petty Officer 1st Class
Joined
Nov 2, 2006
Messages
327
Re: 1976 Century Arabian - Mercruiser 888 - Boat Restoration

Sorry for the double post. The second has been added to with a link to the other Arabian resto.
 

jones01m

Petty Officer 1st Class
Joined
May 23, 2011
Messages
252
Re: 1976 Century Arabian - Mercruiser 888 - Boat Restoration

Thanks for the info 4Winns.

Carrying on with the rebuild. I had only a couple of hours Sunday afternoon to get a little accomplished. Just a little is better than none though.

Come to find out my 1/2 Arauco plywood is no longer sold at Lowes or HD so I had to settle for the standard exterior grade. It sucks in way more epoxy than the Arauco and even more than the marine grade plywood, but I didn't want to wait for a special delivery product and it is difficult for me to get to the lumber store during the week when they are open.

Another photo I added was the relocation of my top transom holes. This was due to upgrading the transom plate assembly, and I never came back and dressed up the holes. They method I used this time was to oversize the hole then insert 1/2 pvc sleeves. The link to the transom assembly upgrade is attached

Transom Plate Interchangeability
http://forums.iboats.com/mercruiser...lpha-1977-1982-interchangeability-543268.html


Pictures

1) Ski locker cover and gas tank box cut and set into place. Still need to cut the hole for ski locker access
2) Epoxied gas tank box - 1st coat
3) Relocation of top transom plate holes. It came out nicer than it looks in the pictures as you are seeing mix of sanded surface, some fairing material, and dripped epoxy all at the same time.


chconger

Petty Officer 1st Class
Joined
Jul 3, 2012
Messages
315
Re: 1976 Century Arabian - Mercruiser 888 - Boat Restoration

Hi Jones

Coming along nice here.

Question regarding your holes around the keyhole. Is that white material in the upper holes epoxy, or some kind of insert?

Thanks
Chris
 

jones01m

Petty Officer 1st Class
Joined
May 23, 2011
Messages
252
Re: 1976 Century Arabian - Mercruiser 888 - Boat Restoration

Chris, the top repair holes have a 1/2" pvc pipe sleeve. The lower and original holes were oversized drilled, filled with epoxy peanut butter, and subsequently redrilled on center to the correct size - so the bottom four holes look very similar to the top. I think the top holes required a 1" upward shift and I was starting to get concerned about the wood wall thickness of the transom next to the center opening. Additionally, the other 4 holes are drilled perfect with a jig and drill press and will be used for locating the inner and outer plate in correct position. The top holes now have slop, which is good since I know by hand I cannot get drill perpendicular.

Process:

1) precut pvc sleeve and sand thoroughly with 80 grit on OD
2) precoat 7/8" drilled hole with epoxy
3) use thickened epoxy on hole and apply to OD of sleeve
4) twist sleeve in and apply more epoxy while inserting

Long answer to a short question I guess...
 

jones01m

Petty Officer 1st Class
Joined
May 23, 2011
Messages
252
Re: 1976 Century Arabian - Mercruiser 888 - Boat Restoration

Help my iBoats brothers and sisters - veterans and newbies alike

I am at a point to definitively decide the seating arangement in my boat. My preference is two bench seats. What I would like to do is fold the front seat back down to provide an area for lounging once stopped.

Does anyone know of references either in this form or elsewhere where a fold down bench seat has been implemented?

Thank you in advance for your help:)


Please see attached


jones01m

Petty Officer 1st Class
Joined
May 23, 2011
Messages
252
Re: 1976 Century Arabian - Mercruiser 888 - Boat Restoration

So... moving on.

Per previous post it was time for me to paint the ski locker area because this needs to be covered with additional ply and it would be near impossible to reach areas once the ply is on. Additionally, we spoke about ventilation from bow to stern so I added some port for flow through the bulkhead. I routed the edged to ensure the best possible flow through this area. In the engine compartment the PVC inserts extend past the bulkhead for a cap in the future if I chose to block this section off.

The paint is a 2-part polyurethane, which is phenomenal to work with. It is my first time with this type of paint.

Picture:

Ski locker painted with vent holes through bulkhead.


Stringerot

Cadet
Joined
Sep 5, 2013
Messages
6
Re: 1976 Century Arabian - Mercruiser 888 - Boat Restoration

SANDED!!!!!!!!

12 full hours of sanding Saturday! I have a whole new appreciation for this project!

Now I need to start heading the other direction and actually start to build. I am really excited.

IMG_1992.jpg

As far as the sanding goes...Sand it until it doesn''t have a shine to it. Do I need to do the entire hull or just where I will be glassing in the new stringers?

Is it one of those you'll know once you start doing it and see where it takes you?
 

jones01m

Petty Officer 1st Class
Joined
May 23, 2011
Messages
252
Re: 1976 Century Arabian - Mercruiser 888 - Boat Restoration

Stringerot, I sanded anywhere I wanted the epoxy to stick. The gunwales were sanded because they had a gooey mess of residual carpet adhesive.
 

jones01m

Petty Officer 1st Class
Joined
May 23, 2011
Messages
252
Re: 1976 Century Arabian - Mercruiser 888 - Boat Restoration

After much discussion my family and I came up with an interior design for the boat. The interior drives everything in the construction going forward. Unlike a car, the hard part about thinking through a boat seating arrangement is that it serves two purposes: comfort during motion and long term comfort while just chilling out on the water. Storage is a big issue too. So, I think with this small boat we came up with a design that will work well in all aspects. Storage will be under all seating surfaces. Next step is to lay all of this out in the boat to ensure the sketch feature sizing reflects reality... I think it does.


Trooper82

Commander
Joined
Nov 21, 2011
Messages
2,648
Re: 1976 Century Arabian - Mercruiser 888 - Boat Restoration

Cool design! Your work is very good, love the attention to details...
 

jones01m

Petty Officer 1st Class
Joined
May 23, 2011
Messages
252
Re: 1976 Century Arabian - Mercruiser 888 - Boat Restoration

Thank you Trooper. I have to say I have been watching your thread as you have progressed through your many projects (I probably don't comment on others projects as much as I should). I like the approach you take by posting the work you are doing even aside from the boat. You show the reality of of the journey and the things that interfere with the build along the road.

It is quite the journey, isn't it?
 

jones01m

Petty Officer 1st Class
Joined
May 23, 2011
Messages
252
Re: 1976 Century Arabian - Mercruiser 888 - Boat Restoration

I had a few hours on Saturday with the build. Primarily the day was spent with the new layout to ensure that the sketch (previous post) aligns with reality - It did. The parlor seating in back works out real nice and leaves about 42" of seating surface per back bench and leg room. Two chairs from the dining room fit side-by-side very well. The front bench is quite roomy. With the layout complete, I then centered my ski locker door. Fairing material was also applied to the engine compartment to tidy up the surface finish for paint as the appearance of the engine compartment is important to me.

I do have a small concern with the insert of the engine with this new layout, so once I move a little further on I will have to perform a small test.

Pictures:

1) Profile layout of the bench seats. This helped establish the plan view. In the background you can also see the fairing material in engine compartment.

2) Cutting the ski locker entry. Using a precut hole to make a jig I found is the best way to be sure that a round corner perfectly aligns with the saw cuts. Steel toed shoes are a must when working in this environment:)

3) Ski locker entry.


jones01m

Petty Officer 1st Class
Joined
May 23, 2011
Messages
252
Re: 1976 Century Arabian - Mercruiser 888 - Boat Restoration

It has been a while since my last post. I have not been completely slackin' but pretty busy apart from the boat. It seems too that the process steps at this point require a little extra time: primer drying, paint drying, epoxy drying, sanding, etc.

Pictures:

1) I hate driving a screw in this boat so a don't. It requires a little more imagination though. Jack was used to secure ski locker cover with thickened epoxy

2) Photo taken inside finished locker. You can see the epoxy seam - I wish that was white too, but i suppose that is a bit obsessive compulsive!

3) Bow view with one sheet of glass where the area looks wet.

4) Stern view. I consider the engine compartment done with the exception of some final sanding and paint.

Next Steps:

A couple more sheets of glass to cover the entire sole, then frame out the seat bases.


jones01m

Petty Officer 1st Class
Joined
May 23, 2011
Messages
252
So... it has been a while
two years ago I picked up this thunderbird that barely ran and have dedicated my "free" time to it. There is never a good stopping point, but my family kindly encouraged me to stop working on the bird and work on the boat, or get rid of the boat. Well that's the history until now.


anyway hope the photo shows up.
 

jones01m

Petty Officer 1st Class
Joined
May 23, 2011
Messages
252
Making some progress. Engine compartment parts are all epoxied and just adding finishing touches. Need to glass over the foam that forms the corners. Stainless steel hardware bolting things up.


jones01m

Petty Officer 1st Class
Joined
May 23, 2011
Messages
252
A little more progress. Primarily it is the permanent bolting that I am doing. My biggest obsticle right now is figuring out how I want to finish the front seating area as it gets a little more complicated with the throttle and shift levers. The thickness of the future upholstry must narrow down and it needs to look right.


Bayou Dave

Lieutenant Commander
Joined
Dec 13, 2012
Messages
1,780
She will look fantastic when you get her done! Have you considered an opening between the front seats and rear seats and access to the front of the engine compartment? Trying to get to spark plugs, belts or pulleys will be difficult with only the top of the engine area opening.
 

jones01m

Petty Officer 1st Class
Joined
May 23, 2011
Messages
252
DRS4146, thank you for your comments. I agonized over the walkthrough to the front prior to settling on the final configuration. What finally won during this mental battle was the additional space under the front seat - a built-in icooler will be in the center. For the access to the engine compartment I stuggled for some time on this one also, as working on it was an absolute pain back when the boat was previously alive. May approach will be to remove the entire back section which I can do in about 15 minutes. It is held on by ten 1/4-20 bolts and eight of of them are phillips head for ease of disassembly with a drill. On the sides the middle panels can be removed and the whole section moved forward. I hope the reality of the disassembly when all is upholstered is as easy as I think it is. Your point is very well taken.
 
Top