80's sylvan splashwell removal &transom rebuild

sublauxation

Lieutenant
Joined
Oct 13, 2008
Messages
1,317
Hoping to run this by you guys to see if there is anything I've missed. The old splashwell took up 32 inches of the boat and it didn't seem to have much structural value so I made a smaller splashwell and will add a casting deck. Replaced the transom, with 2 pieces of 3/4 BCX ply and added an extra 1/16 inch aluminum plate inside and out. To help keep water from coming over the back I changed the shape of the transom, everything above the weld line is new, it's about 8 inches taller before dropping down to where the motor attaches. I have a 90 etec, the boat was rated for a 135, so mine is both lighter and smaller than what it was intended to carry. Should I have any structural concerns? Any thing I should add to make sure all is well?
Thanks for any help and advice. I'll try to figure out how to add pics.
 

Attachments

  • BACK OF BOAT.jpg
    BACK OF BOAT.jpg
    84.8 KB · Views: 19
  • 100_3306.jpg
    100_3306.jpg
    146.8 KB · Views: 19
  • sylvan back.jpg
    sylvan back.jpg
    42.2 KB · Views: 19

ezmobee

Supreme Mariner
Joined
Mar 26, 2007
Messages
23,767
Re: 80's sylvan splashwell removal &transom rebuild

Awesome work! I would have loved to do that. It's how all the new ones are. I don't think you'll have any structural issues.
 

mikastorm

Petty Officer 2nd Class
Joined
Aug 16, 2009
Messages
164
Re: 80's sylvan splashwell removal &transom rebuild

Very nice work. Thought of doing the same to mine but wasn,t sure how to start. Keep us posted on this please. Your help will greatly be appreciated.
More pixs. :)
 

sublauxation

Lieutenant
Joined
Oct 13, 2008
Messages
1,317
Re: 80's sylvan splashwell removal &transom rebuild

I actually got the idea for removing the splashwell from a post Ezombee had for another boat. Nice work on the Starcraft, your thread has helped a lot. We just started by taking out screws from the splashwell, had to be 3-4 dozen little ones which I still contend weren't structural. Biggest mistake I made so far is not doing the deck frame in AL, but I had limited access to a welder, and limited money to pay them. We made the new splashwell from the old one, in hindsight somebody with a metal break could have done it quickly with just 3 pieces of 1/16 aluminum, then rivot them and use 3M 5200. I have the rest of the ply cut and sealed, hope to get it on this weekend, I'll post a couple pics.

Couple questions?
1) I'm using 2 portable gas cans because when the boat sits on the water it's easier to take them out to refill. Is there a benefit to me moving them under the bow and using the back for storage? I originally designed it for gas cans in back but am questioning weight distribution

2) Right now I have the gas, battery and control wires coming out through the side of the splashwell right now along with the steering. Looking at some other boats, they have the steering come out the side and the rest come out from the front of the splaswell going straight to the motor. Not sure if that would lead to less rubbing as the motor turns, or if I'm over thinking it.

Thanks for your help
 

sublauxation

Lieutenant
Joined
Oct 13, 2008
Messages
1,317
Re: 80's sylvan splashwell removal &transom rebuild

New pics! I was going to screw down the new casting deck tonight but am having problems with the throttle control, wont go forward. I think I have to much angle on the linkage. Hope I didn't kink it. I should hade separate holes for the steering and the throttle linkage. I've learned a lot about what not to do on this project. The red carpet was a mistake, but wasn't returnable. Never send a color blind person to buy your carpet!
 

Attachments

  • deckframe.jpg
    deckframe.jpg
    145.5 KB · Views: 8

ezmobee

Supreme Mariner
Joined
Mar 26, 2007
Messages
23,767
Re: 80's sylvan splashwell removal &transom rebuild

Yeah those shift cables pretty much have to come at the motor from the front. Funny, I would have thought an E-tec was drive-by-wire?
 

Bob_VT

Moderator & Unofficial iBoats Historian
Staff member
Joined
May 19, 2001
Messages
26,022
Re: 80's sylvan splashwell removal &transom rebuild

Great work!! I am not sure about the newer motors (since Ezmobee and I have antiques :))but the engine control cables (old school since I am an old fart) were supposed to make a complete loop prior to entering the motor.

My cables come into the splashwell and make a complete loop inside the splashwell

I just changed mine on my latest project but my motor is old.... give a dealer a call and ask that question.
 

Attachments

  • DSCN4619.JPG
    DSCN4619.JPG
    68.5 KB · Views: 4

sublauxation

Lieutenant
Joined
Oct 13, 2008
Messages
1,317
Re: 80's sylvan splashwell removal &transom rebuild

How easy is it to remove the cables from the control box? Going to re-route things tonight and hope it works, going to try coming from the front but things are getting tight for space and my deck framing is pretty well set in place. Have 9 kids waiting to tube this weekend so it may be a long night. I set the casting deck on last night but didn't screw it down. Just stood on it for a while dreaming of fishing. The boat looks huge without the old splashwell!
 

ezmobee

Supreme Mariner
Joined
Mar 26, 2007
Messages
23,767
Re: 80's sylvan splashwell removal &transom rebuild

I have found it much easier to remove from the motor than from the control box. But that was my limited experience with a 70's J/E box.
 

sublauxation

Lieutenant
Joined
Oct 13, 2008
Messages
1,317
Re: 80's sylvan splashwell removal &transom rebuild

Got the casting deck on. Had to make it in 2 parts otherwise it was a bear to get in place. One piece of carpet is slightly newer, didn't notice until it was to late, but should fade to match pretty quick. Lots of finish work to do but had to make it work temporarily to do some tubing this weekend. The goal is to put a flip up bench seat on it with removable cushions. Shift cables are working now, turned the prop and loosened up one bend in the cables... added a bigger loop in front. One of the two worked.
 

Attachments

  • casting deck.jpg
    casting deck.jpg
    148.2 KB · Views: 7

sublauxation

Lieutenant
Joined
Oct 13, 2008
Messages
1,317
Re: 80's sylvan splashwell removal &transom rebuild

I just remembered this, thought I'd add it in case anybody does a similar project. My steering arm just touches the edge of the new platform when turned fully to the left, I never thought to take that into account, had I made the splashwell 1/2 inch narrower or had the deck overhung another 1/2 inch I would have had problems. As it is I'm sure it will indent the carpet a bit and I'll have full steering.
 

I Fish

Petty Officer 2nd Class
Joined
Jan 28, 2011
Messages
100
Re: 80's sylvan splashwell removal &transom rebuild

sublauxation, I'm going to do the same modification. I don't have time for the splashwell removal this winter, but really need to replace the transom. I'm going to build it up like you have done, then tackle the splashwell removal next winter. I was wondering if you've noticed any less rigidity, due to removing the cross piece that was the front of your splashwell. Also, is there anything you wished you had done differently?
 

sublauxation

Lieutenant
Joined
Oct 13, 2008
Messages
1,317
Re: 80's sylvan splashwell removal &transom rebuild

Give me some time to think about this one as to thing I'd do different. I'll write them down as I remember them and post here. What kind of boat are you doing and can you throw in a picture?

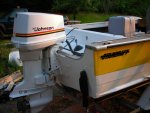
As for rigidity, I haven't noticed any problems at all. Some may disagree but it's just crap metal that really wasn't attached all that well to anything solid anyways. mostly screws into the wood transom and a couple rivets int the gunnels. I layed a bead of 5200 calk between the new splashwell and the transom and it's still holding. If there was any flex I'd assume that caulk would have pulled out. If you're going to remove the splashwell for sure I'd seriously consider doing it when you do the transom as taking the screws out of the transom was the hardest part of getting out the splashwell.

Here's a short list of things I'd do different, like I said, I'll add more.

1) I'd consider doing an all metal frame if I knew somebody who could do cheap welding. The wood was easier to work with but I think Aluminum would have been a cleaner look.

2) I had new AL bent and welded to form the new cap over the transom. We used 1/8 inch which may have been overkill. My dad took off the metal top corner brackets on the gunnels and cut them because the new cap wouldn't fit under them. I wasn't there when he did it unfortunately. It would have been wiser and prettier to make sure those corners would fit over top of the new transom cap.....we should have just trimmed 1/4 inch off the transom height . (I hope that makes sense).

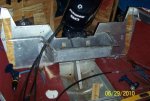
3) I built the new transom with 2 layers of 3/4 plywood and an outer layer of 1/16 aluminum. I glued them all together and then had that outer aluminum welded along the original transom line. I'm not sure that was the right way, but it did work and looks decent. I wanted to do a complete inner skin of aluminum on the wood transom but it was too thick to fit into the boat transom brackets.

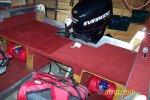
4) I think the top of my rear deck is 16 or 18 inches off the floor. I plan to add a flip up bench seat to it at some point. One thing to consider when setting the height is to make sure your steering arm can move freely. Mine comes out right at the very top of the splashwell right under the plywood deck. I wish I had gone another 1/2 inch higher with the deck because it would be easier to get the steering arm in and out. I really had to fight with it.

5) Make sure your new splashwell area is wide enough! The bottom of my steering arm just touches the plywood deck on the other side. I got lucky that it doesn't restrict steering but had I gone any narrower it would be a problem.

6) I re-routed the linkage, gas and electrical to enter all from the side. My shifting/throttle cables are wound pretty tight, almost to the point where I wouldn't be able to shift. As others have pointed out, there needs to be a loop of those cables before they enter the motor, and they really should enter from the front, not the side. I plan to change that this spring.

7)I have a pic of a splashwell somebody made and I'll post it when I find it. I made mine by re-bending the old one. That was a lot of work and it isn't as pretty as it could have been had I just found somebody to bend new metal. It would have been pretty easy to use 3 pieces and just rivet them together and run a bead of 5200 on the seam.

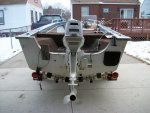
8) I wish I had welded over the old transom drain hole and raised it up and inch or two and made the splashwell a bit more shallow. It's still above the water line but when a couple of us are on the back deck like when helping a skier got out of the water that drain gets pretty close to the waterline. No big deal really but I will do that if I ever make changes.

Overall I'm glad i did it. The boat is so much better for fishing, tubing and skiing. I haven't been out in any waves over 2 feet yet but I'm not too worried about the lower splashwell height overall, since it used to come to the top of the gunnels. I have a 750 gph bilge pump and I'm adding a second 1000gph pump this spring. With the young kids though my wife gets nervous about them falling out the back, that's part of the reason I want to add the flip up bench seat.

I hope this made sense, any questions feel free to ask and I'll add more as I think of it.
 

I Fish

Petty Officer 2nd Class
Joined
Jan 28, 2011
Messages
100
Re: 80's sylvan splashwell removal &transom rebuild

Thanks for the reply. Everything you said made sense. I have an '86 Sylvan Rodmaster 180, which looks pretty much the same hull as yours in the pictures. I would really like to do it all at once, but I have a center console, and need to pull it and the floor to build in the gas tank when I do the splashwell. I thought about using tanks like yours, but I never really spend any time docked, so a built in tank is the best space saver for me. As it is, I need to get the transom done, and I'm afraid I'll barely have time for that, but, by building it up now, it'll be ready when I get the time to delete the splashwell. The drain hole height is something I'll look into. I won't be able to get pictures until this weekend, as I'm working in a garage at our other home.
 

clb

Seaman Apprentice
Joined
Jul 11, 2009
Messages
44
Nice mod, I may do one on the 16' ss I just found up the street.
Right after I got done building up a new transom for the jupiteršŸ˜”
Thanks for the link!
 
Top