1980 mastercraft stringer replacement

shikard

Seaman Apprentice
Joined
May 28, 2010
Messages
39
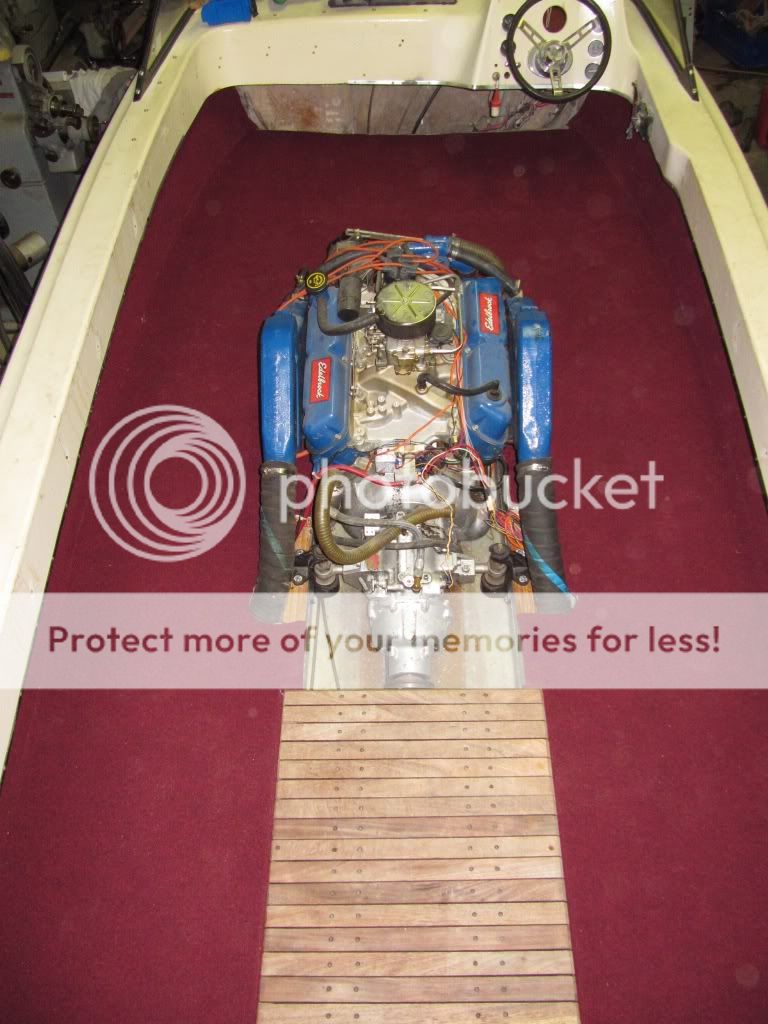
I am currently restoring a 1980 mastercraft that I grew up skiing behind. When my wife and I moved to Colorado my father put the boat in storage where it sat unused for about 8 years. Upon moving back home to Michigan, my plan was to redo this boat two winters ago since we knew the floor had to be replaced, but work got in the way last year. During the middle of last summer I couldn't stand seeing the boat just sit there waiting to be redone before it could be used again. So one day my dad and I decided we'd just see if she would start. After draining the gas and putting in a new fuel filter I gave her a try and she started up within 30 seconds. I had forgotten how beautiful these engines sound. We decided to use her "ugly" last year since there were only a few weeks of summer left before the kids activities started. We had a great time, but she definitely seemed to vibrate more than I remembered.

Well, the early warm weather this spring allowed me to get a head start on some of my projects around the house clearing the way for me to finally replace the floor on the boat. Once I removed the floor it was apparent that I was in for a lot more work since the stringers seemed to be a fiberglass shell with no support from the core material. I debated sistering in new stringers along the old ones, or putting multiple layers of new glass over the old stringers, but in the end I knew that I loved this boat too much and that I had to do it right by cutting out and replacing the stringers. Luckily there was a wealth of information on this forum that I could use to start this project.

So I started by removing one stringer. I figured that I would replace the two outside stringers first leaving the two inside stringers for hull support. Once I had the two stringers removed I got to experience the joy of hours of sanding, grinding, covering myself in fiberglass dust, and itching.

I made my new stringers out of pieces of 3/4" MDO laminated together with west systems epoxy thickened to a mayo consistency. Once the lamination was complete I cut the stringers to shape and bedded them to the hull in a bed of epoxy thickened to a peanut butter consistency and I filleted the corners.

Once the two outer stringers were set up, I made a quick jig that laid across the new stringers to mark the location of the cut outs in the middle stringer where the motor mounts rest (in retrospect, this saved me an unbelievable amount of time later on).

Then I proceeded to cut out the middle stringers. You can see from the pictures that once the fiberglass was cut, i could just lift the stringer out without having to cut the wood core since it was so rotted.
 

Attachments

  • 5-20-10 123.jpg
    5-20-10 123.jpg
    102.6 KB · Views: 5
  • 5-20-10 130.jpg
    5-20-10 130.jpg
    142.7 KB · Views: 3
  • 5-20-10 129.jpg
    5-20-10 129.jpg
    152.6 KB · Views: 3

shikard

Seaman Apprentice
Joined
May 28, 2010
Messages
39
Re: 1980 mastercraft stringer replacement

I laminated the middle stringers, cut out for the motor mounts and bedded them in thickened epoxy. I left one inch tabs glass from the old stringers sticking out from the transom so my spacing would stay correct. For the front spacing I put the center pylon in along with it's support and used that for a spacer and brace in the front when bedding the stringers. This also allowed me to keep them square to one another.

Once they set, I started glassing them in. I used 12' biax with a 6 ounce mat. I got a good price on it but I don't know if it offset the amount of resin I had to use to wet it out. I used one layer on each side followed by a second 6 inch layer.
 

Attachments

  • 5-20-10 133.jpg
    5-20-10 133.jpg
    85 KB · Views: 3
  • 5-20-10 135.jpg
    5-20-10 135.jpg
    98.1 KB · Views: 3
  • 5-20-10 140.jpg
    5-20-10 140.jpg
    97.1 KB · Views: 3
  • 5-30-10 197.jpg
    5-30-10 197.jpg
    95.4 KB · Views: 3
  • 5-30-10 204.jpg
    5-30-10 204.jpg
    114.2 KB · Views: 3

shikard

Seaman Apprentice
Joined
May 28, 2010
Messages
39
Re: 1980 mastercraft stringer replacement

Once all of the stringers were in place I started cutting plywood for the floor. I mad templates of the curve of the floor using a thin strip of mdf and some scrap pieces of wood and a hot glue gun. This worked really well for me and was quick as well.
 

Attachments

  • 5-20-10 141.jpg
    5-20-10 141.jpg
    142.1 KB · Views: 1
  • 5-20-10 145.jpg
    5-20-10 145.jpg
    120.1 KB · Views: 2
  • 5-20-10 146.jpg
    5-20-10 146.jpg
    118.4 KB · Views: 2
  • 5-20-10 147.jpg
    5-20-10 147.jpg
    136.6 KB · Views: 1
  • 5-20-10 149.jpg
    5-20-10 149.jpg
    124.1 KB · Views: 2

proshadetree

Lieutenant Commander
Joined
Jul 19, 2008
Messages
1,887
Re: 1980 mastercraft stringer replacement

Nice pattern. Great work just keep plugging at it and you will be floating with pride of a job well done.
 

shikard

Seaman Apprentice
Joined
May 28, 2010
Messages
39
Re: 1980 mastercraft stringer replacement

Thanks, I'm getting eager to get her on the water. The water temps were near 80 last weekend! I got the all the plywood cut to shape. I had to install the engine so I could figure out where the exhaust tubes were located so I could make cut outs for them. I decided to use pressure treat (3/4 in.) for the floors so save a little money. The last one lasted about ten years and that seems to be about how long the carpet usually lasts before it has to be replaced. I'll start screwing down the floor today as well as re-running the wiring, steering, and fuel line. I'm gonna go down and check on carpet this afternoon.
 

Attachments

  • 5-20-10 159.jpg
    5-20-10 159.jpg
    129.6 KB · Views: 5
  • 5-20-10 162.jpg
    5-20-10 162.jpg
    103.2 KB · Views: 1
  • 5-20-10 163.jpg
    5-20-10 163.jpg
    130 KB · Views: 2
  • 5-20-10 164.jpg
    5-20-10 164.jpg
    111.4 KB · Views: 1
  • 5-20-10 150.jpg
    5-20-10 150.jpg
    108.7 KB · Views: 2

shikard

Seaman Apprentice
Joined
May 28, 2010
Messages
39
Re: 1980 mastercraft stringer replacement

Well, I had great intentions today, but I forgot about soccer and a birthday party...hopefully I can get the floor attached tomorrow...
 

system-f

Senior Chief Petty Officer
Joined
Dec 3, 2008
Messages
667
Re: 1980 mastercraft stringer replacement

WOO HOO another inboard boat rebuild. Don't be afraid to go into specs and detail of the transmission and engine!
 

proshadetree

Lieutenant Commander
Joined
Jul 19, 2008
Messages
1,887
Re: 1980 mastercraft stringer replacement

I got my carpet from home depot on line couldn't beat the price anywhere else
They have the glue also. Worked out well and looks awesome
 

shikard

Seaman Apprentice
Joined
May 28, 2010
Messages
39
Re: 1980 mastercraft stringer replacement

I picked up some carpet at Lowe's yesterday, I got it cut and half is glued down...I'll finish tonight and take some pics...The carpet was a lot cheaper than the stuff at the marine supply store.

I'm not a huge engine guy, I normally do just enough to make more work for myself and cost me more $$$$. With that said the engine is a 351 windsor, aluminum intake and holley carb (if I remember correctly). It has the power slot transmission and will beat almost any newer mastercraft out of the hole.

Hopefully some pics to follow tonight...
 

proshadetree

Lieutenant Commander
Joined
Jul 19, 2008
Messages
1,887
Re: 1980 mastercraft stringer replacement

Ok post pics you mentioned ford post pics.
 

SDSeville

Lieutenant
Joined
Mar 19, 2010
Messages
1,481
Re: 1980 mastercraft stringer replacement

Looks great! Dumb question though -- shouldn't the top of the stringers be glassed in also?
 

clockwatcher

Petty Officer 1st Class
Joined
Nov 8, 2009
Messages
289
Re: 1980 mastercraft stringer replacement

Once all of the stringers were in place I started cutting plywood for the floor. I mad templates of the curve of the floor using a thin strip of mdf and some scrap pieces of wood and a hot glue gun. This worked really well for me and was quick as well.

Cool technique. It's like a flexible French curve from drafting class. Do you have patent pending? I may do the same.
 

bamafutbal

Petty Officer 1st Class
Joined
Sep 15, 2007
Messages
228
Re: 1980 mastercraft stringer replacement

80 degree water temp is michigan????
 

shikard

Seaman Apprentice
Joined
May 28, 2010
Messages
39
Re: 1980 mastercraft stringer replacement

Looks great! Dumb question though -- shouldn't the top of the stringers be glassed in also?

They are, I just used 2 layers of cloth instead of bi-ax and mat which is why it looks clear...I'm assuming that this should be sufficient. I don't know how structural the cap on the stringer is since I screwed the 3 layers of ply together when laminating them with thick end epoxy.
 

shikard

Seaman Apprentice
Joined
May 28, 2010
Messages
39
Re: 1980 mastercraft stringer replacement

80 degree water temp is michigan????

Our inland lakes warm up really quick here in SW Michigan. All you need is a week of 85 degree weather and sunshine (and warm nights). We had that the week before memorial weekend...now with all the rain and 60 degree nights the small lakes are back to about 68-70. I don't swim in cold water any more!, I need at least 78 water temp to jump in for no reason...:eek:
 

shikard

Seaman Apprentice
Joined
May 28, 2010
Messages
39
Re: 1980 mastercraft stringer replacement

here's the pics of the carpet and of two teak pieces I made for the floor in the rear and for the piece that covers the gas tank. I made these so that they each would be easily removable for future service so we can easily get to the drive shaft, bilge pump, battery, blower, and gas tank. Plus they add extra ventilation and make it easier to drain water from the deck when a skier gets in the boat...
6-8-10031.jpg

6-8-10030.jpg

6-8-10032.jpg
 

proshadetree

Lieutenant Commander
Joined
Jul 19, 2008
Messages
1,887
Re: 1980 mastercraft stringer replacement

Ford Power. Sorry old Ford guy here. Looks great keep up the good work and post some more pics of this babby
 
Top