77 Starcraft Holiday 18 i/o - rebuild with pics galore

sprintst

Commander
Joined
Apr 18, 2009
Messages
2,066
Pictures you say... I'll try to pollute with pictures of my total gut and redo of this boat along with details on materials used.

Here's the first pics of the boat as I picked it up in Minnesota... There was some flooding there a couple of months ago so the hull is a bit dirty. Dirty never stopped me before though :)
 

Attachments

  • Holiday 1.jpg
    Holiday 1.jpg
    34.1 KB · Views: 7
  • Holiday 2.jpg
    Holiday 2.jpg
    37.9 KB · Views: 7
  • Holiday 3.jpg
    Holiday 3.jpg
    28.9 KB · Views: 7
  • Holiday 4.jpg
    Holiday 4.jpg
    39.7 KB · Views: 8
  • Holiday 5.jpg
    Holiday 5.jpg
    35.5 KB · Views: 8

sprintst

Commander
Joined
Apr 18, 2009
Messages
2,066
Re: 77 Starcraft Holiday 18 i/o - rebuild with pics galore

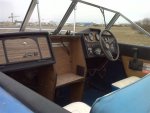
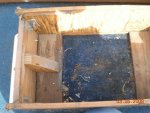
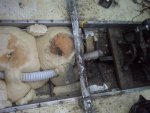
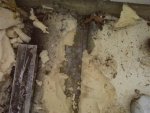
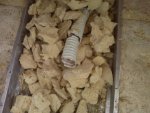
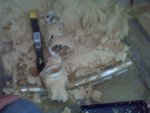
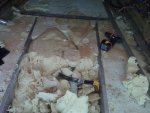
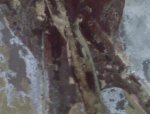
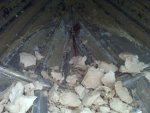
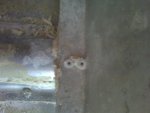
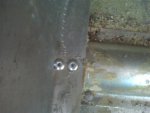
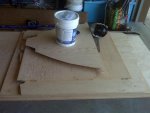
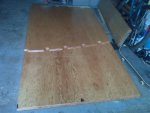
My overall goal is to totally gut the interior, pull out all the decking, remove all pour in foam from the stringers and ribs, scrub the hull, wire brush and Gluvit the rivets and seams (interior), drill out and replace any loose rivets attaching the stringers, 3/4 marine plywood decking (glassed and Interdeck paint with the non slip aluminum powder added).

I'll let my skinned knuckles heal for a week or two so I can forget all the work that just went into the boat then...

I'll have the engine pulled along with anything else hanging off the back of the boat to replace the transom, replace water pump, impeller, all assorted gaskets and hoses and try to reassemble without to many pieces left over.

I'll totally strip the paint with aircraft stripper, wash and sand the hull, apply Vinyl-Lux zinc chromate primer without mutating, roll and tip the rest of the boat with Interlux paint.

I have a 15, 11 and 9 year old boys who one day may want to keep this old boat so I'm looking at redoing it to last.

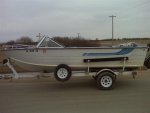
The boat sits on a 77 Snow Company trailer that looks like it could transport a tank so I'll strip and repaint that with POR15 paint. The stuff is indestructable and cannot be removed by even most most body shops. It really binds to even rusted metal, seems reasonably priced, and is also used to do oil field equipment, vehicle chassis's so it good enough for me.

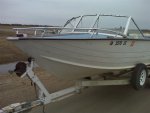
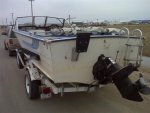
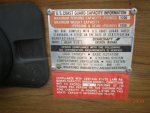
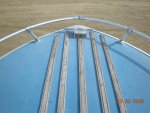
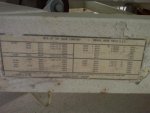
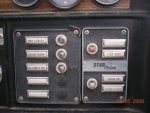
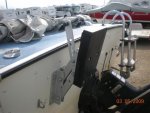
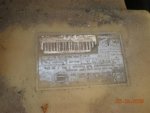
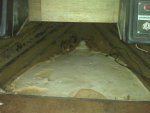
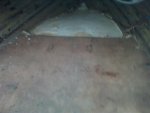
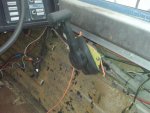
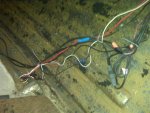
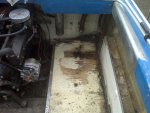
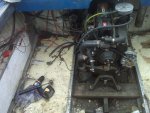
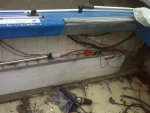
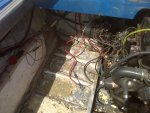
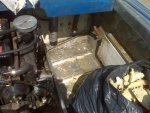
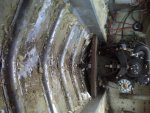
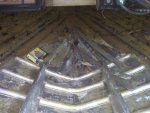
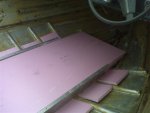
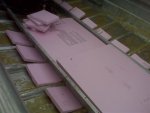
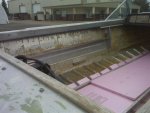
Here's a couple more all round pics before I get started.
 

Attachments

  • Holiday 6.jpg
    Holiday 6.jpg
    52.3 KB · Views: 6
  • Holiday 7.jpg
    Holiday 7.jpg
    45.6 KB · Views: 4
  • Holiday 8.jpg
    Holiday 8.jpg
    32.6 KB · Views: 5
  • Holiday 9.jpg
    Holiday 9.jpg
    50.6 KB · Views: 5
  • Holiday 10.jpg
    Holiday 10.jpg
    46.5 KB · Views: 5

sprintst

Commander
Joined
Apr 18, 2009
Messages
2,066
Re: 77 Starcraft Holiday 18 i/o - rebuild with pics galore

Some disassembly required. Use voids warranty some restrictions may apply.

The task looks daunting but how bad can it be :)

Here are the first pics of the pulling of the interior. Some good 3/16 in drill bits to drill out the rivets holding the half inch decking are a must as well as a mask as I'm sure there is anthrax or some other form of death living in that ratty carpet and foam. 2 pry bars, a 6 in 1 tool, hammer, and beer are also required as well. Don't forget the drill as well or the drill bits are pretty much useless. I found that it's better to drill the whole rivet out in one shot rather than just pop the heads off as the wood acts as a guide to get to the bottom of the rivets. If you pop just the heads off you are left with a mis-shaped nub of a rivet left sitting out of the stringers, etc that is harder to drill out.

All in the interior and anything attached to it must go including the gas tank with 10 gallons of gas in it. I syphoned the gas out into gas cans and poured it into my old Ford Explorer...which is going to get recycled into pop cans in a month or two.

Here are some pics of stuff screwed to the decking like seat boxes, supports for the dash including the cheesy ladder to walk through the windshield, etc.
 

Attachments

  • Holiday 11.jpg
    Holiday 11.jpg
    52.3 KB · Views: 4
  • Holiday 12.jpg
    Holiday 12.jpg
    47.2 KB · Views: 4
  • Holiday 13.jpg
    Holiday 13.jpg
    62.2 KB · Views: 5
  • Holiday 14.jpg
    Holiday 14.jpg
    39.2 KB · Views: 5
  • Holiday 15.jpg
    Holiday 15.jpg
    33.5 KB · Views: 10

sprintst

Commander
Joined
Apr 18, 2009
Messages
2,066
Re: 77 Starcraft Holiday 18 i/o - rebuild with pics galore

I'll reorganize all my pics and post again tomorrow as I have more pictures in another folder.

I'll post updated pics of the deck removal as well as foam removal.

I removed the gunwhale supports after drilling out the rivets, removing the bolts holding it in as well, removed the shifter and tied it off so it's off the floor, etc. The round center cover pops off the shifter exposing a big nut and bolt that you can remove to pull the shifter handle off to expose the nuts and bolts holding it to the plywood on the yellow metal bracket.

I used 2 pry bars (a slim one and a longer one) and a hammer to pull the plywood off the stringers and support strips. I started prying and walked along once a got a small section up untill the whole sheet popped off the foam. I pryed mainly against the stringers to keep the support strips of aluminum from deforming.

In the meantime I envy those who don't have the pour in foam is all I can say. Sure it stiffens the hull but was holding water from the 70's, added about 200 pounds or more to the boat, was time consuming to pull up (10 garbage bags). Hopefully the 3/4 inch decking will add the same stiffness. The pink or blue styrofoam sheets will go in in it's place for floatation in the unlikely event it gets swamped.
 

Attachments

  • Holiday 16.jpg
    Holiday 16.jpg
    22.7 KB · Views: 5
  • Holiday 17.jpg
    Holiday 17.jpg
    41.8 KB · Views: 5
  • Holiday 18.jpg
    Holiday 18.jpg
    46.3 KB · Views: 5
  • Holiday 19.jpg
    Holiday 19.jpg
    46.1 KB · Views: 5
  • Holiday 20.jpg
    Holiday 20.jpg
    50.9 KB · Views: 10

sprintst

Commander
Joined
Apr 18, 2009
Messages
2,066
Re: 77 Starcraft Holiday 18 i/o - rebuild with pics galore

Here are some of the items I've picked up so far.

I ordered a 5 gallon pail of environmentally friendly aircraft stripper online that actually works. I split the order with another dude (2 galloons for him). The cost was $300 including shipping minus the $120 I sold him but with this stuff I can clean up with just a pressure washer (no solvents and not have to scrub the hull like a jacka**.

The paint falls off in sheets and leaves the rivets and seams clean. Check out the pics of them stripping planes in the link. http://www.m-tc.com/efs2500_home.htm

A semi decent (not the cheapest) pop riveter made of metal $35 from fastening supplier, 3/6 inch rivets (1 inch or so grip range) closed end blind pop rivets for the 3/4 deck (Fastenal). 100 3/16 1/2 inch grip aluminum pop rivets (Home depot) to re-rivet the stringer supports that were corroded. Some of the heads were outright missing or loose on the existing rivets. 3M 5200 waterproof adhesive to dip and seal the rivets as I pop them in. Boat supply shops sell them in big tubes that fit a caulking gun. The internet is your friend when it comes to shopping if you don't live in a big city.

2 quarts of Gluvit to coat seams and rivets and 5 sheets for now of 3/4 inch marine grade fir plywood. I'll seal and glass over the fir to keep it from checking. 2 gallons of Bondo brand resin to seal the underside and sides of the decking along with a host of cheap brushes that will be hard as a rock when I'm done. PS Mix in small batches as this stuff sets really fast...mix it up for 20 seconds, pour it on, spread it on with a body filler spreader or paint or roll it on fast like hell as you don't have much time at all. The sun is the devil to this stuff so work in the shade or on a cool cloudy day.
 

Attachments

  • Holiday 21.jpg
    Holiday 21.jpg
    32.1 KB · Views: 1

halas

Petty Officer 1st Class
Joined
Jan 27, 2009
Messages
347
Re: 77 Starcraft Holiday 18 i/o - rebuild with pics galore

Awesome plan. It seams like you are doing everything right and efficiently.
I was going to ask: where do you get that POR15 paint for the trailer?

Like I said it seams like you have done this before or you are reading the posts on these forum a lot.;)

Looking forward to see your boat's development as it unfolds
 

Bob_VT

Moderator & Unofficial iBoats Historian
Staff member
Joined
May 19, 2001
Messages
26,022
Re: 77 Starcraft Holiday 18 i/o - rebuild with pics galore

Starcraft restoration :)

We love these!!!!
 

Rickairmedic

Commander
Joined
Apr 24, 2009
Messages
2,576
Re: 77 Starcraft Holiday 18 i/o - rebuild with pics galore

Your resto sounds pretty complete and a great boat to do it on . I will only point out one thing for you the POR15 has to be topcoated ( they actually sell a topcoat) or it will become chalky very quickly as POR15 doesnt like direct sunlight being used on a car or truck chassis it doesnt need a topcoat since it will be covered by the car or truck but a boat trailer is pretty much out in the open and exposed to direct sunlight . The paint on that boat looks pretty good in the pics . I dont know that I would strip it to bare metal I think I would just scuff it to give the fresh paint some bite and apply the new paint ( stripping gets quite messy and nasty and yours doesnt look like it needs to go that drastic .


Rick
 

gunner1

Petty Officer 1st Class
Joined
May 13, 2006
Messages
375
Re: 77 Starcraft Holiday 18 i/o - rebuild with pics galore

Looks like you have everything under control. I like the new alternator! When the time comes to really jump into the project, remember these words: Plan your work and work your plan. You can't go wrong.
 

sprintst

Commander
Joined
Apr 18, 2009
Messages
2,066
Re: 77 Starcraft Holiday 18 i/o - rebuild with pics galore

Hey guys...

First total boat restore other than a 12 foot Lund waaay back. Not sure if that even counts.

I've just read a lot and will be standing on the shoulders of giants that have done all this many times before. This forum saves tons of time and energy from having to do things twice.

I'll be top coating the POR15 with either their Whitecote product or even the Metal mask to make it look like raw metal. There is a NAPA paint supply shop locally that can get it in half a day but it was also available online pretty readily.

The paint itself looks decent in spots but in others you can see where someone just painted over top with no prep and it's peeling and flaking. The alternator was just before I picked the boat up by the previous owner and it's a marine part as I checked :)
 

sprintst

Commander
Joined
Apr 18, 2009
Messages
2,066
Re: 77 Starcraft Holiday 18 i/o - rebuild with pics galore

Here's some pics of the boat with the floor up and the gas tank out. I stared at it for awhile and wondered how the f**k I was going to get all that foam out.

One I got down to it and used the skinny pry bar to get deep into the foam it popped off in bigger chunks. I cleaned up against the edges of the stringers and ribs to get it to pop off the floor as well. The 6 and 1 tool acted as a scraper to get in tight against seams and rivets.

I'm glad I pulled the floor up as rivet heads were corroded holding the stringers to the ribs....almost half were missing. You can also see there some battery acid lightly got at the hull in spots. I'll be using 2 Walmart Energizer batteries in battery boxes so this never happens again. I've had good experiences with many other Energizer batteries so hopefully the marine batteries are the same. They are dual starting/deep cycle.
 

Attachments

  • Holiday 22.jpg
    Holiday 22.jpg
    53.5 KB · Views: 8
  • Holiday 23.jpg
    Holiday 23.jpg
    46.3 KB · Views: 7
  • Holiday 24.jpg
    Holiday 24.jpg
    48.8 KB · Views: 7
  • Holiday 25.jpg
    Holiday 25.jpg
    45.5 KB · Views: 7
  • Holiday 26.jpg
    Holiday 26.jpg
    33.4 KB · Views: 7

sprintst

Commander
Joined
Apr 18, 2009
Messages
2,066
Re: 77 Starcraft Holiday 18 i/o - rebuild with pics galore

Progressing along now and discovered some water in the foam. It seems that it came through the deck holes where they poured the foam in. I cleaned out the holes where the water runs though the ribs at the bottom of the hulls for the 70's water to run out of there.

There was still a lot of swearing going on at this point. Wear work gloves so you can keep the skin on your knuckles.

The boat is kept in an rv storage yard about 5 miles away so whenever I had spare time I would pull a garbage bag or two out of there.
 

Attachments

  • Holiday 27.jpg
    Holiday 27.jpg
    45.7 KB · Views: 5
  • Holiday 28.jpg
    Holiday 28.jpg
    35.8 KB · Views: 5
  • Holiday 29.jpg
    Holiday 29.jpg
    45.3 KB · Views: 5
  • Holiday 30.jpg
    Holiday 30.jpg
    55.7 KB · Views: 5
  • Holiday 31.jpg
    Holiday 31.jpg
    54.5 KB · Views: 5

sprintst

Commander
Joined
Apr 18, 2009
Messages
2,066
Re: 77 Starcraft Holiday 18 i/o - rebuild with pics galore

The end of this crap foam is almost in sight now...

Here's a pic of the before and after on a stringer pop rivet replacement as well.
 

Attachments

  • Holiday 32.jpg
    Holiday 32.jpg
    54.5 KB · Views: 7
  • Holiday 33.jpg
    Holiday 33.jpg
    45.3 KB · Views: 7
  • Holiday 34.jpg
    Holiday 34.jpg
    45.3 KB · Views: 6
  • Holiday 35.jpg
    Holiday 35.jpg
    25.9 KB · Views: 7
  • Holiday 36.jpg
    Holiday 36.jpg
    28.1 KB · Views: 7

halas

Petty Officer 1st Class
Joined
Jan 27, 2009
Messages
347
Re: 77 Starcraft Holiday 18 i/o - rebuild with pics galore

That was though work. A pressure washer soon would come handy and dawn for cutting the grease, bleach to kill mold.
 

sprintst

Commander
Joined
Apr 18, 2009
Messages
2,066
Re: 77 Starcraft Holiday 18 i/o - rebuild with pics galore

I'll get in there tomorrow with some degreaser and scrub the rest of the foam and grease out. I'll hit with a pressure washer to blast out any crud left in the crannies after a good vacuuming.

I've also got some contact cement remover to clean up the interior sides of the boat as I may paint them as well.

I'll be going with an epoxy resin to lay down the fiberglass on the deck hopefully within a week or so.
 

sprintst

Commander
Joined
Apr 18, 2009
Messages
2,066
Re: 77 Starcraft Holiday 18 i/o - rebuild with pics galore

I may strip the paint on the interior and top section first later this week so I can get to work laying the floor in.

How easy did the transom come out on your i/o boats. Did it stick to the hull or lift right out after everything was unbolted to the transom? I may take a crack at it in about a week or so after I drop it off to have the engine, etc pulled from the boat.
 

North Beach

Commander
Joined
Sep 29, 2008
Messages
2,022
Re: 77 Starcraft Holiday 18 i/o - rebuild with pics galore

Man, I sure am glad I didn't have that poured in place foam to deal with. Looks way to much like work! It's gonna be a sweet boat when you're done:D
 

wrfalpacas

Chief Petty Officer
Joined
May 1, 2009
Messages
486
Re: 77 Starcraft Holiday 18 i/o - rebuild with pics galore

My transom came out with a lille help from an overhead hoist, picked the gutted boats stern off the trailer, and had to get in to pry it out of the bottom slot to get it to release. Make sure you remove the little lip of aluminum extending over the top edge of the wood transom at each side, and there were 3 screws securing the side gunwale under it that a sawzall had to take care of.
 

sprintst

Commander
Joined
Apr 18, 2009
Messages
2,066
Re: 77 Starcraft Holiday 18 i/o - rebuild with pics galore

Not having to do pull that foam on yours North Beach is a real blessing. I hate foam... Foam on beer is not even exceptable. Did I mention that I hate foam?

I was looking at using an eye bolt screwed into the top of the transom and pulling with a hoist once everything is free and clear.

I'll remove some contact cement from the inside of the hull this week for a break...and the fumes before I take a crack at the transom.

I'll have some updated hull pics by Friday with any luck...
 

sprintst

Commander
Joined
Apr 18, 2009
Messages
2,066
Re: 77 Starcraft Holiday 18 i/o - rebuild with pics galore

The floor is finally cut and test fitted using the old floor as a template. I coated the underside and sides with resin for some waterproofing. I also picked up the fiberglass cloth and one more quart of Gluvit.

I'll pickup the epoxy resin this week and maybe glass it in if I'm really lucky this weekend. Odds are I'll get to the floor if I can finish stripping it this weekend.

I also test fitted some of the pink styrofoam insulation in the hull recesses to see how much I'll need. So far I'm at 6-1 inch thick 2X8 sheets. I'll probably cut some small triangular pieces for under the bow deck plywood.
 

Attachments

  • Holiday 37.jpg
    Holiday 37.jpg
    35.4 KB · Views: 6
  • Holiday 38.jpg
    Holiday 38.jpg
    35.1 KB · Views: 6
  • Holiday 39.jpg
    Holiday 39.jpg
    28.2 KB · Views: 6
  • Holiday 40.jpg
    Holiday 40.jpg
    29.5 KB · Views: 6
  • Holiday 41.jpg
    Holiday 41.jpg
    41.2 KB · Views: 6
Top