1988 Marlin Ski Magnum overhaul

J. Mark

Petty Officer 1st Class
Joined
Sep 3, 2008
Messages
303
In an effort to keep the number of threads down I am editing this one to be the only thread on my restore from this point forward. I'm way overdue to post some updates so stay tuned :D

With a few nice days here in Nashville, I decided to get some work done on the boat.

I got the stringers cut out and the hull prepped (though I am sure more sanding and grinding is in order) I am at least ready to put in the transom and hopefully the stringers in the next few weeks.

When grinding i found a lot of grey stuff that looked like JB weld or some such epoxy on the sides of the stringers. That and the gelcoat in the bilge made for a fun day of sanding.

Anyway, I know y'all love pictures so here we go!
 

Attachments

  • IMG_1076.JPG
    IMG_1076.JPG
    39.3 KB · Views: 3
  • IMG_1077.JPG
    IMG_1077.JPG
    46.6 KB · Views: 3
  • IMG_1078.JPG
    IMG_1078.JPG
    47 KB · Views: 3
  • IMG_1080.JPG
    IMG_1080.JPG
    47.4 KB · Views: 3
Last edited:

J. Mark

Petty Officer 1st Class
Joined
Sep 3, 2008
Messages
303
Re: Back to work on sanding and grinding

Re: Back to work on sanding and grinding

And some other pictures of work remaining
 

Attachments

  • IMG_1073.JPG
    IMG_1073.JPG
    26.7 KB · Views: 3
  • IMG_1074.JPG
    IMG_1074.JPG
    22 KB · Views: 3
  • IMG_1081.JPG
    IMG_1081.JPG
    61.4 KB · Views: 3
  • IMG_1082.JPG
    IMG_1082.JPG
    51.4 KB · Views: 3

ridesapaint

Seaman Apprentice
Joined
Nov 30, 2008
Messages
40
Re: Back to work on sanding and grinding

Re: Back to work on sanding and grinding

I don't envy you grinding, but at least it isnt 105 with high humidity. What a great boat to restore! If you need any ideas as far as fiberglassing and stuff give me a shout. It's been a few years but I was a marine carpenter/damage controlman in the coast guard and have years experience with glass.
one suggestion if you havent figured it out yet is to use a big fan and blow the glass away from you/towards your least favored neighbor while you grind.
have fun.
Jerry
 

J. Mark

Petty Officer 1st Class
Joined
Sep 3, 2008
Messages
303
Re: Back to work on sanding and grinding

Re: Back to work on sanding and grinding

Thank you Jerry. I have been working in open air with a nice breeze. I only grind for about 2 hours at a time before I wash the hull down and take a long cool shower. I am keeping covered up and using a respirator and goggles. The biggest obstacle I have is that the goggles need to be cleaned every few minutes to even come close to seeing what I am doing.

I have ground out 6 inches or more from each side of the center stringers. I am thinking that is going to be enough,

On the outer edges of the hull, the deck is supported by what I have come to call "false stringers". It is a bit of a guessing game as they were totally rotted away when I got the boat, but it appears that they were never wrapped in glass and were not glued to the hull at all. They turn in such a way (about 8 feet from the stern) that I think they were two pieces per side.

My current plan is to either reproduce what I believe was there, fill each outer section with 4 pound closed cell expanding foam, add a bulkhead across the front on each side and seal off these areas. My "false stringers" wouldl be glued down with PL Premium and covered with a wrap of Fiberglas and epoxy resin. I'd have to cut the remaining lip off the floor and the side and do a bunch more sanding to do this.

The other alternative is to simply eliminate the false stringers completely, mount the floor to the center stringers and under the small lip I left and fill with expanding foam, then tab the floor to the sides of the hull. I like this alternative better, but am unsure if it will work properly.

The drivetrain is mostly ready to go back in the boat with only 4-5 hours of work to get it all back in place and ready to go, The wiring will take me a bit longer to sort through unfortunately, but I've muddled through a car restoration and a boat rewire on a Checkmate (outboard though)

One interesting thing I removed from under the bow was a boat heater (even labeled as such) I'm too old to be a hard core early morning skier anymore, so I am probably going to leave it out for simplicity sake.
 

J. Mark

Petty Officer 1st Class
Joined
Sep 3, 2008
Messages
303
Re: Back to work on sanding and grinding

Re: Back to work on sanding and grinding

Update (and I'll add some pictures this evening)

Stringers and transom are epoxy coated and glued into place. Sanding and grinding is done for now, though I may find a need to do a bit more here and there when I put the floor down.


There is one bulkhead to add to bring it back to the stock configuration (as best I can tell) and probably four more small cross members to add for supporting floor joints.

Wood for the floor is in the house and has been drying for 3 weeks now. I decided on exterior grade 5/8ths ply.

Saturday I have 2 friends coming over and we hope to get the glass down on the transom and stringers, as well as hopefully get most of the floor cut to fit and coated with epoxy.

Next weekend my brother and a friend are coming to help with getting the motor and velvet drive back in the boat. If we are lucky enough to finish everything I may be able to do the break in run on the engine.

I decided to use the loose 2" pink insulation foam but I am going to build a few "stand offs" to sit under it and keep the water free to drain.

I added 2 large drain holes to the center stringers.

The brace for the ski Pylon was replaced with a piece my neighbpor and I fabbed up and built out of channel and 1/4 plate. Prior one was bent and rusted so it got a good coating of marine paint.

Motor mount plates were also heavily rusted so we built two new ones that are beefier and built backing plates for the off side, rather than just washers.
They are drying in the paint booth for another day or so, so I'll get you some pictures.

Found some more rotted wood in the sides of the hull. I think the wood was mostly there to mount the balance tubes for the speedometers, but I imagine it has some structural value so I'll replace it once the floor is back in.

I have used more PL adhesive than I ever imagined I'm up to 9 of the mega tubes and expect to use at least three more. If you are buying go ahead and get it by the case!

I've located a wakeboard tower that I can get for $250.00 that was custom made but had some scratches and the builder just put it off to the side and won't sell it to his dealer/customers so I am getting a deal. It was built for a ski nautique but the dimensions will be perfect for my boat.

I started back in September and though time and weather has caused a lot of delays, I may actually make my target date of having the boat ready for the water by Memorial day weekend. It won't be perfect at that point, but it should be far enough along that I can use it and fine tune things over the summer.

There is yet another piece of rotten wood in the cap across the back section where the rear seats will mount. I don't really want to have to lay upside down using a grinder before I get the floor in (Even if just temporarily) so it will be one of those things I have to get back to.

One thing I consider myself lucky on is all the stringers and floor supports stop just at the dash. Everything forward was in good shape. Floor is sound, foam is dry. I did core samples as described on this site.

While working on this boat I have been reading here most every day. I've learned a lot and been humbled at the expertise here. Sorry for the long update post, but as atonement I'll start adding more pictures ASAP

one before and after photo
 

Attachments

  • IMG_1078.JPG
    IMG_1078.JPG
    47 KB · Views: 2
  • IMG_1087.JPG
    IMG_1087.JPG
    50.7 KB · Views: 2

ridesapaint

Seaman Apprentice
Joined
Nov 30, 2008
Messages
40
Re: Back to work on sanding and grinding

Re: Back to work on sanding and grinding

It really sounds like you have been busting your butt on the boat. The tower sounds like a wonderful addition to the boat, too. I look forward to seeing the pics! Isn't it amazing how deep we get into these projects? If you can get all the glass work done now you will be glad. I know you don't want to grind anymore, but it will get put off forever if you don't do it now. Pay a kid to do it for you!
I have been tinkering with a 1949 GMC one-ton dually, and finally got the fenders off and engine out so I can tackle the serious metal work needed in the cab floor/firewall. I have been afraid to get into it deep because once I go, I can't stop until it is ready for the next step. After the metalwork I can pull the cab and prep the frame for paint. I would rather go for a ride in my boat.
Luckily my boat only needs some cool pin striping and apply the registration numbers...and of course some fuel, warmer weather, and the water to put it in. I'm planning a camping trip to Lake Apache, Arizona in two or three weeks.
 

J. Mark

Petty Officer 1st Class
Joined
Sep 3, 2008
Messages
303
Marlin Restore under way

Marlin Restore under way

Thanks for commenting and keeping this thread alive.

I finished all the grinding and got the stringers wrapped in 3 layers of 10 Oz cloth and the transom tabbed in and glassed.

I want to do a few small areas like the underside of the drain openings and another layer at the front of the stringers and the stringer to transom joints, but as is it looks really good.

I took a few pictures but haven't uploaded them yet. You can't tell much as the glass is pretty clear (That is a good sign in my book!) I'll upload tonight.

I got part of the deck cut (8 foot sections in the center on either side of the motor)

I even got ahead of myself and did a couple of little marine tex repairs. Wet sanding and polishing the gelcoat is going to make this thing shine, but it is going to need a major clean up when I finally get done.

I made a list of all I feel I need to get done to be ready to start the engine this weekend and my conclusion is . . . it is a longshot at best.

On the plus side I took advantage of Boater's World's going out of business sale and picked up a 7" keel guard for less than anywhere on the net and even got additional epoxy at prices that only made me cry, not s*** my pants LOL.

I could spend another weekend getting ready for the engine if I had the time, but I may have to drop it in place and work around it for a week or two before I try and start it.

After work I usually get about 1 1/2 to 2 hours work time in at best, but the high today is going to be 42-43 so tonight I guess I do my taxes :
 

proshadetree

Lieutenant Commander
Joined
Jul 19, 2008
Messages
1,887
Re: Back to work on sanding and grinding

Re: Back to work on sanding and grinding

Good to see a Tennessean on here.Killer looking ride.Im in cookeville wirking on a bayliner Ill race you when you get it done if you push mine.Keep it up man youll be floating soon.
 

new boat guy

Seaman
Joined
Mar 31, 2009
Messages
56
Re: Back to work on sanding and grinding

Re: Back to work on sanding and grinding

the boaters world here is going out of business too. i guess there experiencing lots of problems with money
 

J. Mark

Petty Officer 1st Class
Joined
Sep 3, 2008
Messages
303
Re: Back to work on sanding and grinding

Re: Back to work on sanding and grinding

Proshadetree

Cookeville is a bit of a haul, but if you need a hand with something give me a shout and if I can help out I'd be happy to. Plan is to be on the water in June, but I imagine I'll do detail work for a long time after that!

As to the racing . . . no thanks bit I'll toss back a cold one and tell lies on a lake to be determined.

Just a few more shots here
 

Attachments

  • IMG_1089.JPG
    IMG_1089.JPG
    39.2 KB · Views: 2
  • IMG_1086.JPG
    IMG_1086.JPG
    45.7 KB · Views: 2
  • IMG_1088.JPG
    IMG_1088.JPG
    48.7 KB · Views: 2

J. Mark

Petty Officer 1st Class
Joined
Sep 3, 2008
Messages
303
Re: Back to work on sanding and grinding

Re: Back to work on sanding and grinding

Update

Engine is in the boat! Will post a picture tonight.

It is wrapped up and sitting on a piece of plywood, but it is "in" the boat nonetheless

Hope to get a lot done between now and Monday, but don't think I'll get far enough to run the engine . . . but hope springs eternal. I think I am about 3 weeks behind my self imposed schedule, but maybe a day off from work will get me a little caught up.
 

lowkee

Lieutenant Commander
Joined
Dec 13, 2008
Messages
1,890
Re: Back to work on sanding and grinding

Re: Back to work on sanding and grinding

Man, you're making great time with this restore! The stringers look great! It seems inevitable to fall behind onthe estimated completion time. The same rules must apply as with budgeting ;)
 

Vikesfan

Seaman
Joined
May 5, 2007
Messages
65
Re: Back to work on sanding and grinding

Re: Back to work on sanding and grinding

Here's another Tennessean working on a boat. I'm in Hermitage and I'm helping a friend restore his boat. The link to his progress is below. We're not doing anything as ambitious as you, just trying to get it back on the water. We're sanding and hopefully painting the transom this weekend. It should be good weather for it on Saturday.

http://forums.iboats.com/showthread.php?t=296693
 

ridesapaint

Seaman Apprentice
Joined
Nov 30, 2008
Messages
40
Re: Back to work on sanding and grinding

Re: Back to work on sanding and grinding

Those stringers look really, really good. Keep it up!
I took my boat out Tuesday. Me and the doggie drove up to Navajo Lake in northern New Mexico, put in midday, cruised to the Colorado State Park and fueled up, then hit all the canyons and tributaries. It is a nice lake, was 65 degrees and sunny. I enjoyed a couple fine cigars putt-putting along and enjoying to scenery. Of course I opened it up a few times, but I think it is over 8000 feet above sea level so she would only top out at 42 according to the GPS. It was fun and my face is still sunburned. Of course I am trying to motivate you to get your boat finished by deadline.
 

J. Mark

Petty Officer 1st Class
Joined
Sep 3, 2008
Messages
303
Re: Back to work on sanding and grinding

Re: Back to work on sanding and grinding

Well I had hoped to get a few hours in last night, but my neighbor who has been such a big help had a couple of outboards he was working on so I got sidetracked helping him. Hopefully if the weather cooperates, I'll get a few things done tonight and a bunch done tomorrow and Sunday.

Thanks for the motivation. Right now my house looks like a storage facility with the velvet drive, water pump, alternator, starter, exhaust manifolds, seats, plywood for floors etc overflowing the laundry room and the playroom and the dining room table etc. I really want to get as much done as possible to get all this stuff back in the boat and out of my way!
 

ravej50

Seaman Apprentice
Joined
Sep 23, 2008
Messages
30
Re: Back to work on sanding and grinding

Re: Back to work on sanding and grinding

Did you get hit by the bad weather today? I was going to finish painting the inside of my boat but we got rained on hard. luckily, no hail or tornado...
 

J. Mark

Petty Officer 1st Class
Joined
Sep 3, 2008
Messages
303
Re: Back to work on sanding and grinding

Re: Back to work on sanding and grinding

rain and lots of it, but nothing else. I should be out working, but it is friday and I am tired. Of course I am also waiting on the zinc chromate paint to dry on the trim plate so I can flip it over and paint the other side. I guess I am only 99% worthless today. :D Motivation is lagging and I guess the morning will be my real starting point as I don't want to pull the boat out of the carport and hoist the engine just to do an hours worth of work. Wish I had a big enclosed and heated garage!
 

J. Mark

Petty Officer 1st Class
Joined
Sep 3, 2008
Messages
303
Re: Back to work on sanding and grinding

Re: Back to work on sanding and grinding

Well a quick update with pictures to follow.

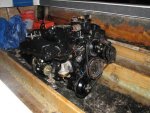
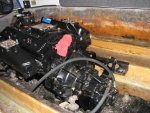
Flywheel, dampener and velvet drive is on engine and they are on the engine mounts and sitting in place.

Harmonic balancer, circulating water pump, pulley and exhaust manifolds are installed.

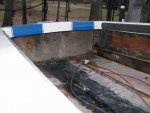
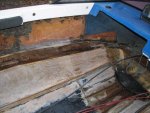
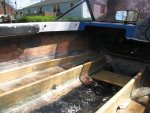
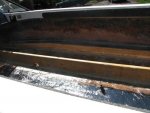
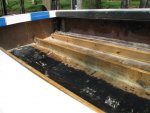
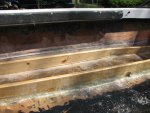
New shaft log is installed and the rudder stuffing box, shaft strut (With new cutlass bearings) and trim plate are all reinstalled and sealed up with 5200.

Picked up some of my hoses, my rebuilt prop (ouch!) thermostat, a new impeller and various bits of hardware.

Thunderstorms are predicted tonight and cooler weather tomorrow, so I'll have the kids before I can get much more done, but maybe I can at least put the raw water pump together and install it, the alternator and the thermostat and housing. Riser gaskets should be here by thursday so I should get the exhaust put together by Sunday.

Carb install and dropping the distributor are on hold til I get the engine lifted out and put back in one more time as I need to put my prop shaft in from the topside and it interferes. Once all that is together and aligned I can mark the stringers and pull the engine one last time, attach the mounts, lock tabs and lock washers and drop it in for the final time

(I'll probably lift that engine out a half dozen times more before I get it to my satisfaction)

Free beer offer still stands!

For the weekend fiascos

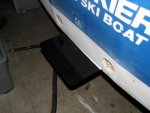
Repainted trim plate with Zinc Chromate and then Mercury Black. Flipped it over for the final coat and instead of hanging it just did it on some waxed cardboard-it stuck. Let it dry and sanded it out and repainted it.

Well we all screw up from time to time.

Went to install the transmission cooler-it is in primer-damn! cleaned and painted it. Looks good except I missed the underside of the fitting bosses. Time for more painting. Install is still waiting.

I'm not looking to bright am I?

Velvet drive mounts were installed upside down by the Borg Warner certified tech that went through it. On initial install engine pointed down instead of up at the bow. I should have taken pictures.

I am lucky I don't have to do this for a living.

hoist the engine and try again.

Neighbor built me new engine mounts. to give more bearing surface he made them out of deeper channel on the theory it would help spread the load-but He welded the plates the mounts bolt to to the bottom of the channel making them sit and inch and a half too low. I put it together without checking his works. I just might be a dumbass.

hoist the engine and try again

getting closer on this try, the transmission sat on the hull. Decided that left and right were not my strong suite in life. I am a dumb ***.

hoist the engine and try again

Reversed the mounts and dropped it back down. Getting closer. Shimmed the rear mounts. Looks like I have it! Realized I didn't install the oil drain hose and now I can't reach it. I can't put the prop shaft in without lifting the engine again.

I am a complete dumb ***.

Now you all know why I just bought a cherry picker instead of renting one.

Now for the dumb *** stunt of the weekend I tried to change the disc on my grinder to clean up the old engine mounts and managed to bump the trigger while my right hand was twisting the nut off with a pair of channel locks and my left was holding the grinder. Got away with just a couple of small scrapes.

I am a lucky dumb ***!

Got a lot done, but still a long ways to go. Hopefully I'll survive the restoration.
 

88BLiner

Petty Officer 2nd Class
Joined
Mar 22, 2009
Messages
172
Re: Back to work on sanding and grinding

Re: Back to work on sanding and grinding

Man I did the same thing of hitting the trigger by accident changing a wheel. You better believe I unplug that thing every time now. Good looking boat, Keep up the good work.
 

J. Mark

Petty Officer 1st Class
Joined
Sep 3, 2008
Messages
303
Re: Back to work on sanding and grinding

Re: Back to work on sanding and grinding

Never get complacent. I got an easy reminder-much better than losing a finger etc.

Here are the promised pictures

I got a little more done than I thought and prepped the mounts and support for the swim platform for painting. I'll need to do a little more, but I am tired.
 

Attachments

  • IMG_1095.JPG
    IMG_1095.JPG
    42 KB · Views: 1
  • IMG_1092.JPG
    IMG_1092.JPG
    38.1 KB · Views: 0
  • IMG_1098.JPG
    IMG_1098.JPG
    27.3 KB · Views: 1
Top