My tri-hull transom replacement w/ pics

Status
Not open for further replies.

drewpster

Commander
Joined
Oct 17, 2006
Messages
2,059
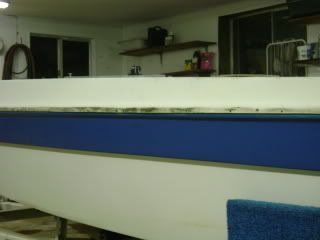
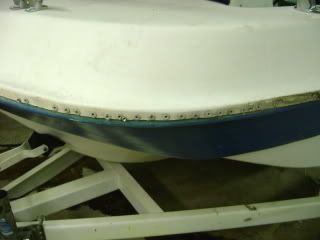
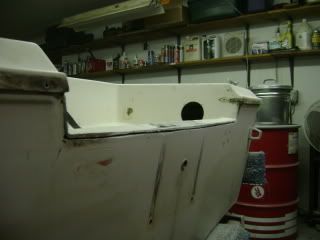
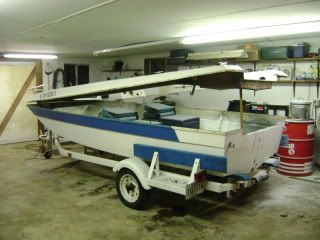
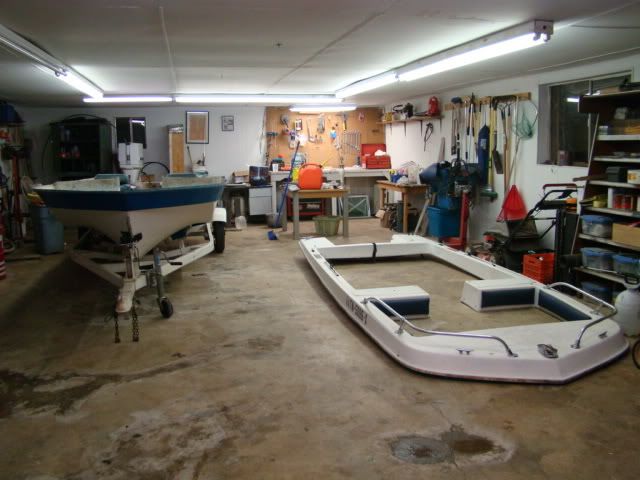
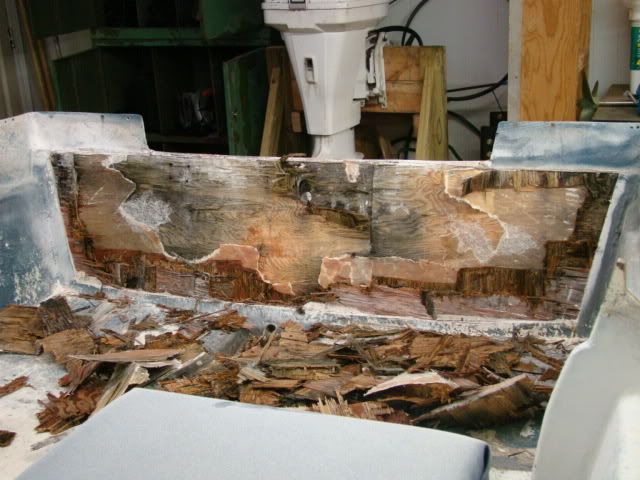
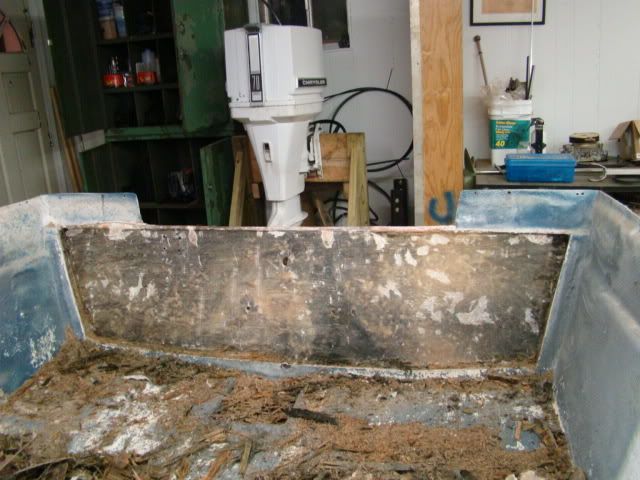
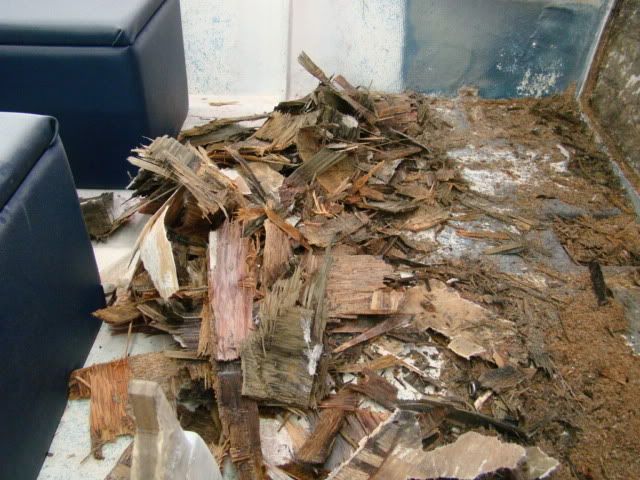
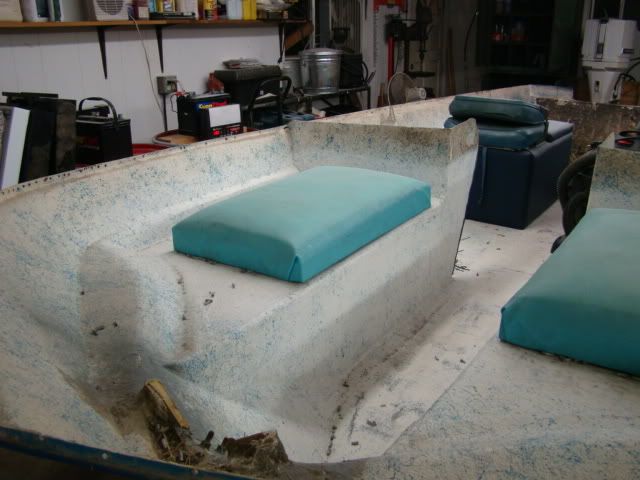
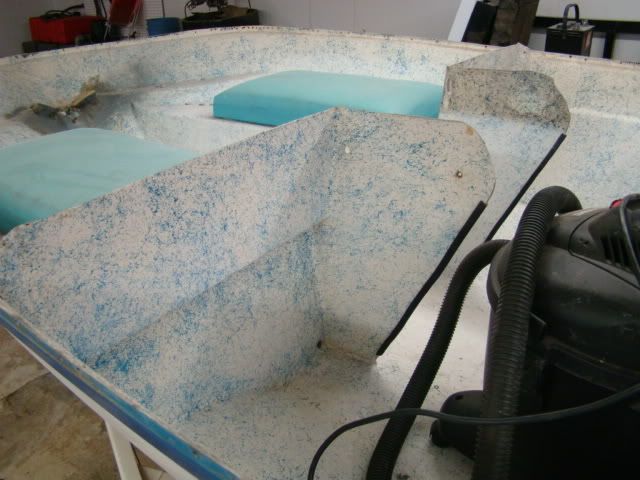
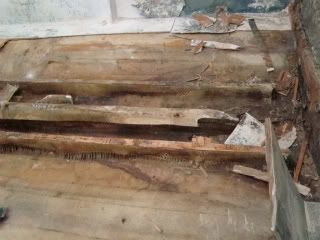
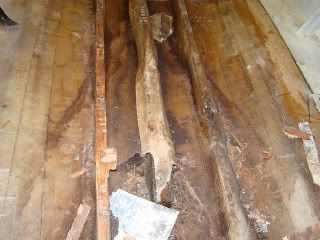
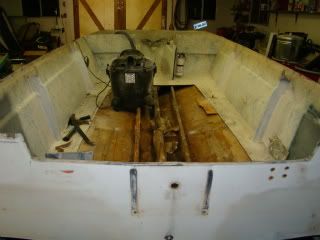
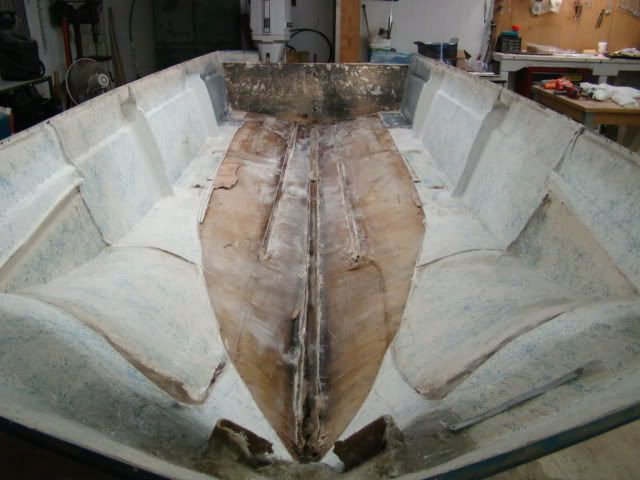
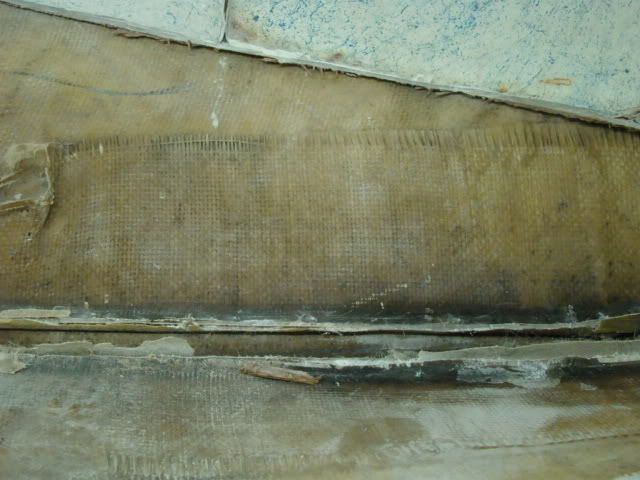
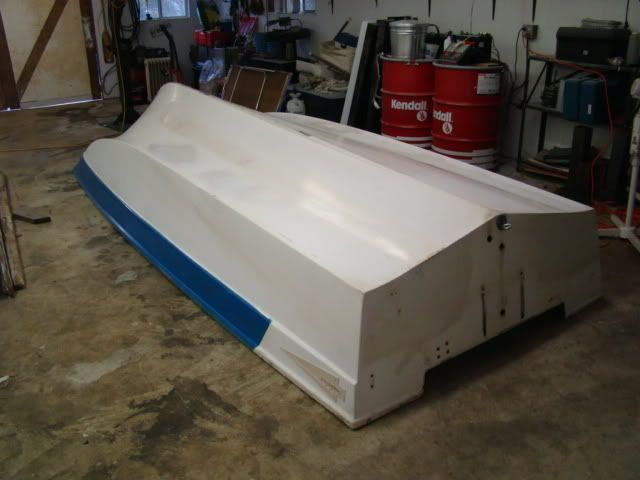
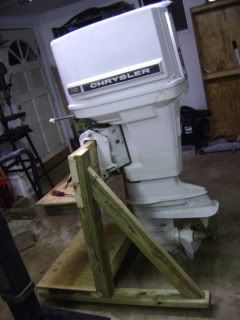
Ok folks I am joining the ranks of the unfortunate. The tri-hull needs a transom and here's how it goes so far. After getting over the shock and dismay of realizing the transom finally had to go I started by de-rigging. The engine was first to come off. She's old, but she's a runner.
DSC00698.jpg

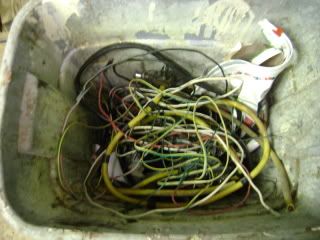
Next I went about pulling the cables and wiring out. I removed the mounting screws of the engine controls and its cables came with it. There was corrosion everywhere in the wiring so it went to the heap.
DSC00718.jpg

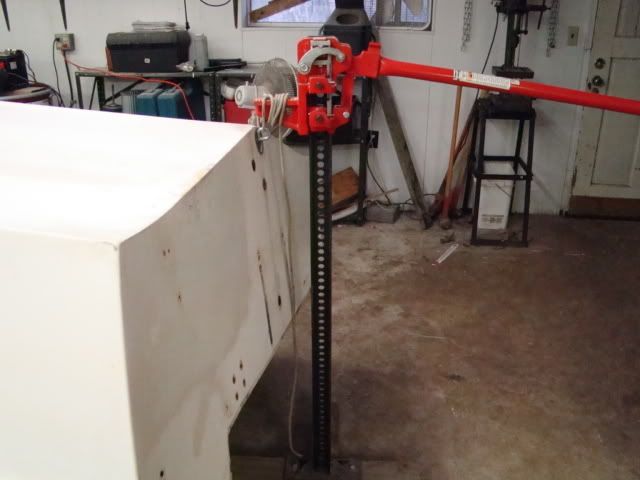
I left the steering cable for last because it was the largest and most difficult to maneuver. I was going to leave the steering wheel and helm in place. But I was concerned about the weight of it pulling down on the dash boxes. I removed the helm and the windshield to shed a little more weight.
DSC00715.jpg
 
Last edited:

drewpster

Commander
Joined
Oct 17, 2006
Messages
2,059
Re: My tri-hull transom replacement

Re: My tri-hull transom replacement

I had to drill out rivets holding the trim around the splash tray. There were also rivets holding the rubrail insert and caps in place. The insert came out with a little persistence it was hard as a rock. The aluminum rubrail was riveted to the hull side so those had to be drilled and the pieces fell away from the side of the hull. I was careful to use the correct size bit to avoid over sizing the holes.
DSC00719.jpg

The cap was attached to the hull with rivets around its perimeter. To borrow my buddie's term, there was about a gozillion of them. Again, I was careful not to oversize the holes.
DSC00713.jpg

Once all the rives were drilled and popped out I removed the through-bolts securing the dash boxes to there supports. I had to get the grinder out and cut the transom cap away from the transom at the aft end of the splash tray.
I used an abrasive cutting disc on my grinder to do this. Of course I wore a respirator and safety glasses while cutting.
DSC00720.jpg

After the transom cap was free a few pops with a hammer and a block of wood knocked the cap away from the hull.
DSC00721.jpg

Judging by the weight my son and I should be able to lift it completely off and out of the way tomorrow.
 
Last edited:

oops!

Supreme Mariner
Joined
Oct 18, 2007
Messages
12,932
Re: My tri-hull transom replacement w/ pics

hi drewp......!

welcome back to the dry dock ! :eek:

heh heh heh...you just gotta love grinding eh? :D

mmaaaan talk about rivits....:confused: :confused: :confused:...thats crazy !


but i know.......your gonna make this one for the compleated projects forum!

cheers drewp
ward
 

jcsercsa

Captain
Joined
May 21, 2007
Messages
3,401
Re: My tri-hull transom replacement w/ pics

Hay Drewpster

Man that was a lot of rivets !!
If your going this far are you going to do the stringers ?? That way you wont have to get in there for the next 30 years ???

Ok have fun and keep them pics comming !! John
 

drewpster

Commander
Joined
Oct 17, 2006
Messages
2,059
Re: My tri-hull transom replacement w/ pics

We got the cap lifted off yesterday evening. The transom is much thinner than I imagined. Looks like a single piece of 3/4 plywood under heavy roving. It seemed much thicker, but a piece of bare plywood was scabbed with nails, yes nails (!) to the top of the transom making it thicker at the top. You think it would be worth building a thicker one to go back in? I do.
I would like to do the deck and stringers as well. I know as well as you do that there is wet wood/ foam under there. But the floor is really solid! I sounded the bottom of the hull with a dead blow hammer a little. That told me nothing, it was just loud. I guess I will know more when the transom skin gets peeled off. more to follow. Geez I was hoping to get this done by March!? My wife is getting me/us a trolling motor for Christmas.:(
 
D

DJ

Guest
Re: My tri-hull transom replacement w/ pics

It looks like you have a great place to work. Take your time, it will all come together.

Keep us posted.
 

drewpster

Commander
Joined
Oct 17, 2006
Messages
2,059
Re: My tri-hull transom replacement w/ pics

Thanks DJ. We are very blessed to live where we do. I told my wife back when we started to look for our next home that I was not moving unless the new place had a shop. We are very fortunate we found this place. I have been working with my hands, both as a career and for fun all my life. It sure beats the gravel driveway I had to work in years ago. My wife appreciates it as much as I do. Keeps me out of her hair and our marriage happier. (my doghouse has a shop around it;))
 

WizeOne

Commander
Joined
Mar 23, 2008
Messages
2,097
Re: My tri-hull transom replacement w/ pics

It's about time you got a substantial project going drewpster, instead of just hanging around getting in everybodies hair.:p;):D

btw, I am real jealous re your shop.
 

drewpster

Commander
Joined
Oct 17, 2006
Messages
2,059
Re: My tri-hull transom replacement w/ pics

Ok Christmas got over with so I had some time to get back in the shop.

I spent some time cleaning up so I felt I could post this shot.
DSC00910.jpg


I used a die grinder and a side cutting bit to cut the transom skin to get to the wood for removal. I was hoping that it would fall off the wood because it was delaminated. No such luck. The glass was still bonded to the wood pretty good even though it was wet to the touch. It took a good bit of work to get it to this point.
DSC00911.jpg


At first I thought I was making a big mistake. The wood, while obviously wet. was not rotten and fairly solid. However after taking more wood out I started finding softer wood toward the bottom of the core. I know, I know, even more reason to do the stringers!
DSC00913.jpg


What a mess! This was not easy, but it was better than I expected it to be.
DSC00914.jpg
 

drewpster

Commander
Joined
Oct 17, 2006
Messages
2,059
Re: My tri-hull transom replacement w/ pics

I intend to cut the floor and the sides of the transom skins back further to access and remove the rest of the core completely. I just ran out of time, and I have to work (for money) tomorrow.

One question I have is how I am going to deal with the seat boxes in the bow? Their lower portions cover part of the floor and they will need to be out of the way to access the floor. I considered simply cutting them completely out. You think I could work under them and leave them in place?
DSC00915.jpg


Here you can see where the seat box meets the floor.
DSC00919.jpg


The seat boxes and foot wells are made in one unit. I think I can get them completely out by cutting around their perimeters where the factory glassed them in. I will have to be careful to maintain the proper height if I remove them. The upper part of the foot well supports the dash boxes on the cap.
DSC00916.jpg
 

tmcalavy

Rear Admiral
Joined
Aug 29, 2001
Messages
4,005
Re: My tri-hull transom replacement w/ pics

Nice work, nice shop...you lucky pup. Have you seen Jason J's thread about refitting the Skanky Beast? He refitted a trihull bowrider into quite a rig. That thread's at least two years old now, but very informative. I think I remember that he cut the bow seat boxes completely out. Might check it out for some ideas anyway. Nice boat too. Should make a good rig when you're through...but are we ever really through re-rigging?
 

drewpster

Commander
Joined
Oct 17, 2006
Messages
2,059
Re: My tri-hull transom replacement w/ pics

Thank you for reminding me of the Skanky beast! I knew I had read that thread but I could not remember the name. Jason did a ton of work on that boat. His bow seats are made into the cap. He left those intact. He removed the dash boxes and supported that section of the hull with an added bulkhead. The seat boxes were covered with hatches and used as storage. That is exactly what I would like to do with my casting deck. I want to leave the helm where it is. I went back and re-read Jason's post when you brought it back to mind. It gave me some good ideas for my boat. Thanks again.
 

drewpster

Commander
Joined
Oct 17, 2006
Messages
2,059
Re: My tri-hull transom replacement w/ pics

We have finally completed the holiday festivities and I found some time to get back in the shop. Originally I had planned to do all the cutting outdoors to prevent filling the shop with dust. I hate dust. I noticed in one of oops's "Hull extension" pics that he was using a shop vac to draw off dust while he was sanding. I do not have an adapter on my grinder so I simply held the nozzle of my shop vac close to the cutting wheel while I was cutting. I used a filter bag in the shop vac to collect the dust. I killed a previous shop vac collecting dust while sanding the deck on my other boat.
So I put on all the necessary safety gear and started hacking away.
The first floor section to go was just forward of the transom.
DSC01041.jpg


As usual in other projects I have looked at the stringers are not connected to the transom. The ends of the timbers are not sealed and very wet.
DSC01042.jpg


There is delaminated fiberglass everywhere. Much of the weave of the roving used to cover the stringers is open. It is as if the factory was saving resin the day the stringers were glassed in.
DSC01046.jpg


You can see in this pic that the stringer on the left is the only one that remained bonded to the underside of the deck. The deck was not sealed on its underside. Once the glass was cut away the deck pulled up easily.
DSC01039.jpg
 

drewpster

Commander
Joined
Oct 17, 2006
Messages
2,059
Re: My tri-hull transom replacement w/ pics

There are three stringers in the bottom supporting the deck. I cut the deck out up to the dash supports and foot boxes. I was surprised to find that there is No foam under the deck. Do i need to put foam under here?

DSC01038.jpg


I cut the deck out as far as I could go. I had just enough time to get started cutting the seat boxes and dash supports out. I really hate doing this part. It must be a psychological thing. I am really committed now.
I started by carefully cutting around the perimeter of the boxes.
DSC01043.jpg


I continued cutting until the majority of the box is free. They look as if they were made and then tabbed into the hull. I will refit and reinstall them after the deck is down and glassed back in.
DSC01044.jpg


I had to stop at this point to attend to other duties. Tomorrow I hope to complete removal of the boxes and the rest of the deck. Things are going slow, but they are going. The Skanky Beast build has been a real inspiration. If my little tri-hull comes out half as good I will be happy.....until the next project.
 
Last edited:

tashasdaddy

Honorary Moderator Emeritus
Joined
Nov 11, 2005
Messages
51,019
Re: My tri-hull transom replacement w/ pics

looking good, i worked hard to get that Skanky Beast thread, so we could post it. i knew it would help a lot of people.
 

oops!

Supreme Mariner
Joined
Oct 18, 2007
Messages
12,932
Re: My tri-hull transom replacement w/ pics

yeah.....thanks for fighting for us to get that one back td.......awesome tutorial.


drewp......first of all.....the shop........i hate you i hate you i hate you :D:D

if they dont waterproof the end of the stringers....HUGE amounts of water get in there....its as bad as improperly screwed deck holes.


the foam......unless its structural.....its your choice bud.
but to quote our buddy coors....."there aint gonna be any of that water sucking foam in my boat"

wish i could be there to help ya bud.....yer doin a great job.

cheers
oops
 

drewpster

Commander
Joined
Oct 17, 2006
Messages
2,059
Re: My tri-hull transom replacement w/ pics

Today was fairly productive. I spent the afternoon finishing the removal of the bulk of all the wood cores. The stringers came out easily after I cut along the bases of the stringers.
DSC01068.jpg


The factory did not bother to fillet the bottoms of the stringers. The roving they used to cover them bridged the lower corners of the stringers where they contacted the hull. Lucky for me, all it took was cutting through the bridged roving to get them loose. They came out in single pieces. I will use them as patterns to cut the new stringers.
DSC01070.jpg


Here are all the tools I used to get the hull to this point.
DSC01063.jpg
 

drewpster

Commander
Joined
Oct 17, 2006
Messages
2,059
Re: My tri-hull transom replacement w/ pics

I bought the grinder I used and the cutout tool from Harbor Freight. Both have held up well and were both necessary to do the job in a reasonable amount of time.
DSC01066.jpg


The cutout tool has proved very useful.
DSC01064.jpg


The side cutting bits that came with the unit, and the 1/4 inch bits I bought with it, are basically junk. I thought at first it was a mistake to use the cutout tool. Then I remembered I had a spiral burr I used for another project. The spiral bit was the real ticket. It cut like butter. I was able to make precise cuts as deep as a 1/2 inch using this bit.
DSC01065.jpg


The spiral bit was $30.00 off the tool truck we use at work and worth every penny. In fact the bit cost as much as the cutout tool. But it is worth the cost. Some of the cutting was very close to the skin of the hull. The cheap side cutting bits tended to vibrate and were difficult to control. I was worried about cutting through the hull's skin making more work for me. The spiral bit cut cleanly and made the tool easier to control. I recommend if you buy this tool buy a good spiral burr. It is worth the cost.
 

drewpster

Commander
Joined
Oct 17, 2006
Messages
2,059
Re: My tri-hull transom replacement w/ pics

After getting all the wood removed I decided the hull was light enough to flip so that any repairs needed on the bottom could be done. At this point the hull only weighs around 300 lbs. If I had the help flipping it would be a simple matter of getting a couple of guys together to do it by hand. Not being the patient type, waiting on that to happen was not an option. I had to figure out a way to do it alone. With the cap and all the cores removed the hull sides are a little flimsy. The trick was to do the flipping without cracking or damaging anything. Here is what I came up with.

DSC01109.jpg


First I slid the hull off its trailer. I used mats to protect the hull while sliding it off the trailer and on to the floor. I positioned a boat jack at the bow end of the hull and a farm jack at the transom end of the hull. I used these because I knew they would provide enough height to rotate the hull. These special jacks are not necessary to do the job. You can make a simple frame out of wood or suspend it from the ceiling.

DSC01110.jpg

I used rope to secure the jack to the bow eye.

DSC01111.jpg
I used an eye bolt passed through the lower garboard drain and a rope to raise the transom end.
 

drewpster

Commander
Joined
Oct 17, 2006
Messages
2,059
Re: My tri-hull transom replacement w/ pics

I raised both ends of the hull just high enough to clear the hull side and rotated the hull up side down.
As long as the supports are stable and the hull sides can clear the hull can be turned with one finger. If you have a heavier boat build sturdy supports that can handle a little dynamic loading as the weight shifts.

DSC01113.jpg

Walla! flipped boat, one guy. After getting the boat up ended it was simple matter of lower it to the floor. Now I have to start sanding again. :(

I have a good bit of damage to look after. There are scrapes, crazing and old repairs to deal with on the bottom. More than I planned for or, intended to get into. But we all knew that would happen...right?
 
Status
Not open for further replies.
Top