Fiberglass layup part project***March 29-Doghouse primered!****

Boomyal

Supreme Mariner
Joined
Aug 16, 2003
Messages
12,072
I thought that this would be of general interest. I am imbarking on my second fiberglass part making project. Ya'll might remember my first ever project which was a water deflecter shield for the gas tank bay of my Gulfstream.

1446.jpg


My current project is a drink holder for the front of the engine cover on my new BeachCraft. It is actually a coverup for a mistake I made in trying to cut down what I considered the excessive length of the doghouse.(more on that later) I was wanting to get more floor space in this boat as it is 2 ft shorter than my Gulfstream. Both boats have the same engine so the motor used up more of the cockpit area in the shorter BeachCraft. Additionally, I felt that they made the bilge and motor cover to accomodate a six cylinder as well as the shorter V8.

So I undertook to cut off the rear of the doghouse to move the engine cover back, giving me six more inches of floorspace. I will have to scab in a piece of plywood to cover the now exposed opening in the bilge, forward of the front of the cut down doghouse. Good idea but I goofed and cut off too much. So I had to cut a hole in the front of the doghouse so the waterpump pulley would clear it. Now I am attempting to build a clever part to cover the mistake. I'll show pictures of the doghouse later.

For right now I wanted to chronicle the manufacture process of the part.

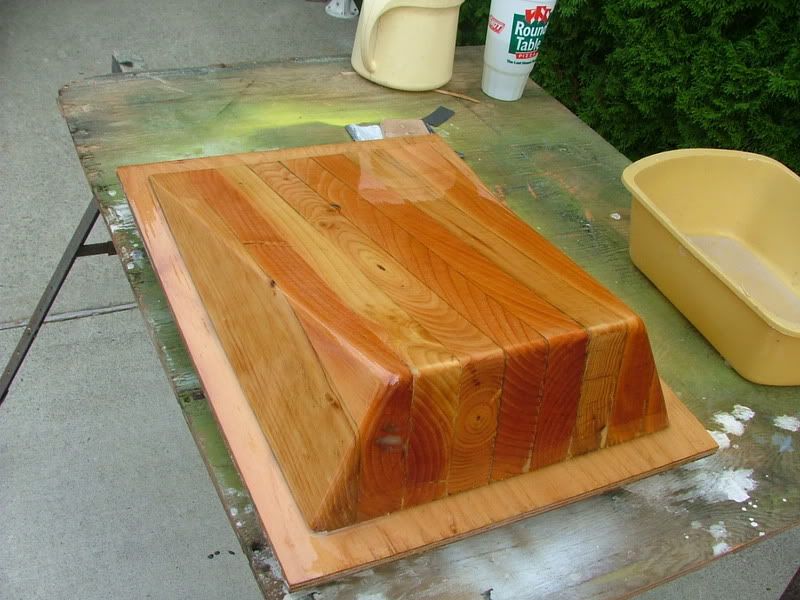
I started by making a male plug for the part: I would spray on a mold release and build the part, a layer at a time, over the top of the plug.

DSCF0401.jpg


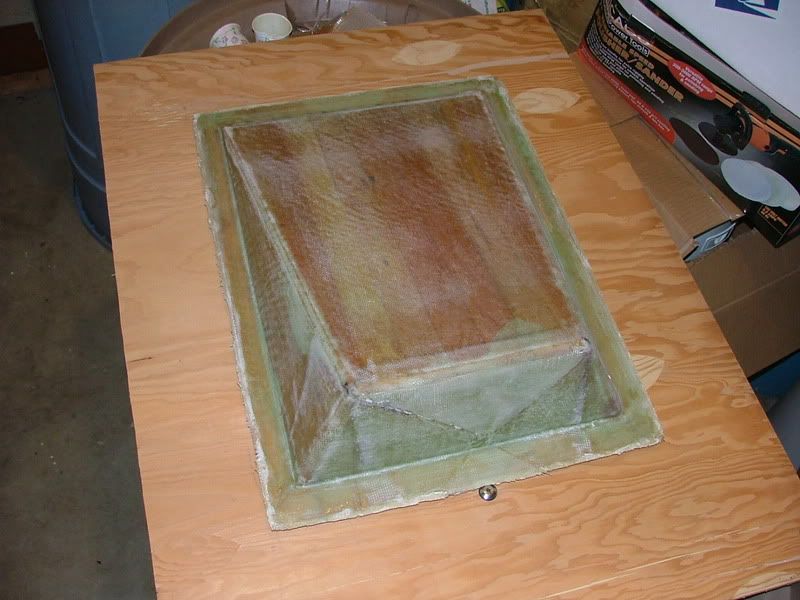
I started to lay up the glass cloth (picture has two layers) but was finding that the shape was making it difficult to wrap the glass and keep it well adhered to the previous application. You can also see on the forward wall where I had pieced remnants in to keep the thickness constant.

DSCF0444.jpg


In my internet boating career I remembered seeing information about vacuum bagging and figured that would be the answer to my problem. Question was how to accomplish that without any experience and without costing an arm and a leg. I vowed that this Beachcraft project was going to be an economy project.

I now have the answer to those issues. I have obtained 66 sq yds of very slightly irregular 10oz Eglass off of ebay for about 2 bucks a yard shipped (you cannot use the dollar sign in this forum. It shows up as you type it but does not show once you post) US Composite sell the same glass for 6.70 a yard.

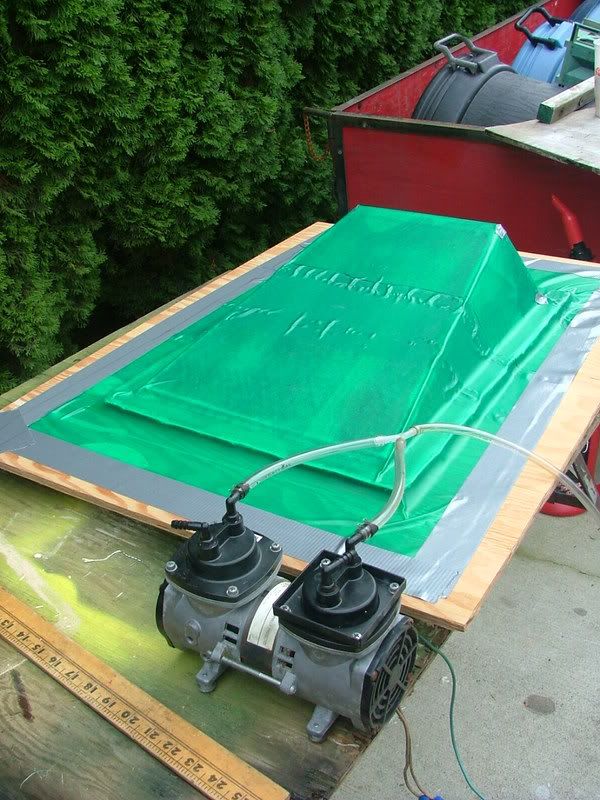
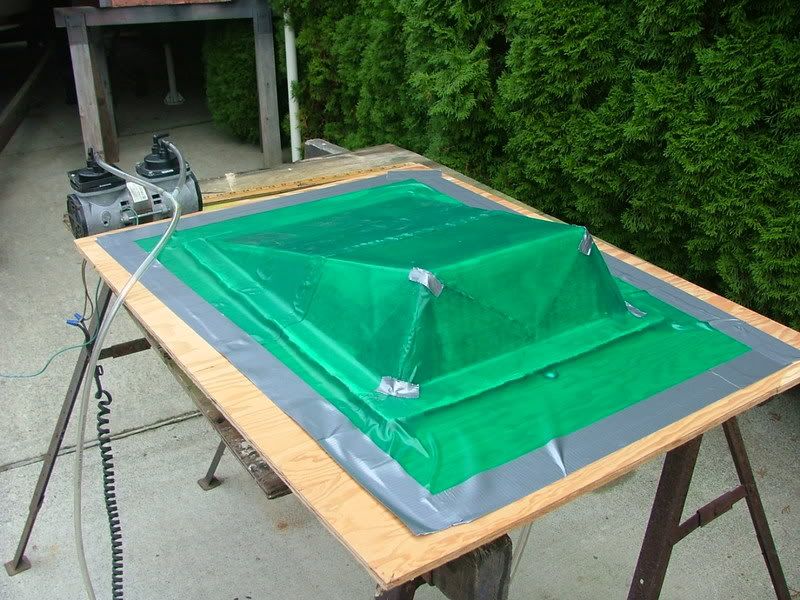
I also scavanged two different vacuum pumps. (an extra just in case) I have the plastic wrap material (old roll of plastic sheet from the garage) and this weekend I will attempt the process. The large board you see my part sitting on is the first step. Note the little bud coming up thru the board at the front end of the glassed part. That is my vacuum port. (a metal tire valve with rubber washers) I will post pictures as I set the rest of the process up and begin the bagging.
 

tashasdaddy

Honorary Moderator Emeritus
Joined
Nov 11, 2005
Messages
51,019
Re: Fiberglass layup part project.

Re: Fiberglass layup part project.

were watching, so we can learn from you.
 

i386

Captain
Joined
Aug 24, 2004
Messages
3,548
Re: Fiberglass layup part project.

Re: Fiberglass layup part project.

I have seen that fabric on eBay too. It's really a good price. Let me know what you think about it since you have some now.
 

Paul Moir

Admiral
Joined
Nov 5, 2002
Messages
6,847
Re: Fiberglass layup part project.

Re: Fiberglass layup part project.

What are you using to seal the bag?
 

Boomyal

Supreme Mariner
Joined
Aug 16, 2003
Messages
12,072
Re: Fiberglass layup part project.

Re: Fiberglass layup part project.

Paul said:
What are you using to seal the bag?

I will simply duct tape the plastic sheeting down to the plywood sheet, connect the vacuum pump to the fitting on the underside of the board and suck away. My first line pump came out of an auto diagnostic system. It's a Thomas pump and develops about 16 inches of vacuum. That should be enough. If I need more, I will have to dismantle the free window airconditioner I got off of Craigslist and use the freon pump which will pull 29 inches.

Shortly I am going to set the project up for bagging and give it a whirl before I add cloth and resin to the part. A test run if you will.
 

dhatcher

Petty Officer 3rd Class
Joined
Sep 7, 2006
Messages
80
Re: Fiberglass layup part project.

Re: Fiberglass layup part project.

wow nice work. keep it up i am learning so much from this
 

Boomyal

Supreme Mariner
Joined
Aug 16, 2003
Messages
12,072
Re: Fiberglass layup part project.

Re: Fiberglass layup part project.

i386 said:
I have seen that fabric on eBay too. It's really a good price. Let me know what you think about it since you have some now.

First class goods i386. Just exactly as advertised. A rare bargain ideed. It calculated out at two dollars and 12 cents a sq. yard, shipped. The only thing I did not verify was the claimed 50+ lineal yards.(66.67 sq yds) It would take a lot of work to unroll and measure it.

I think before too long, every thing I own is going to be wrapped in 10oz fiberglass cloth.8) At minimum my 'new' BeachCraft is going to get another layer of fiberglass on the floor before I lay down the Nautolex flooring.

As an aside, I hate carpet, I have scooped shovels full of sand out of that boat that was trapped by the carpet.

ps, still trying to get to the bagging project. We are having an unusual burst of clear dry weather here and everything else keeps getting my attention.
 

i386

Captain
Joined
Aug 24, 2004
Messages
3,548
Re: Fiberglass layup part project.

Re: Fiberglass layup part project.

Thanks for the info. I better get a roll of that stuff before I loose my chance! I could probably do my whole project boat with 25 yards and still have some left over. If that's the case I may be fabricating a few parts of my own.
 

Boomyal

Supreme Mariner
Joined
Aug 16, 2003
Messages
12,072
Re: Fiberglass layup part project***PHASE 2, MOCKUP***

Re: Fiberglass layup part project***PHASE 2, MOCKUP***

Finally got a spare block of time to go to the next step. I needed to make a boot wrap by cutting, folding and gluing a bag that would reasonably follow the contours of the plug. The object here was to see how that would work out both in the cutting a gluing and the final suck. It seemed to work ok. I'll have a few different techniques once I epoxy the part. This would be a lot easier if it was a flat part but the fact it is not is the reason I need to do this.

Once I embark on the final act, I need to have a heat chamber ready to speed the cure of the epoxy. I don't want to have to leave that poor little pump running till the epoxy takes a set. I'll show the heat chamber once I go for the final act. (final act will need to be repeated numerous times to get the final thickness)

Ideally I would let the epoxy cure just to the point that I could immediately apply the next layer. However, I suspect that my surface will not be smooth enough to go right to the next coat. So at least for the first time, I will let it do a full cure before I unwrap it.

DSCF0497.jpg


DSCF0498.jpg
 

Bob_VT

Moderator & Unofficial iBoats Historian
Staff member
Joined
May 19, 2001
Messages
26,018
Re: Fiberglass layup part project***PHASE 2, MOCKUP***

Re: Fiberglass layup part project***PHASE 2, MOCKUP***

How much cloth are you using on the first coat? Single layer... double? Have you considered gel caot experments with that rig?

Looks great. Paying very close attention.
 

ondarvr

Supreme Mariner
Joined
Apr 6, 2005
Messages
11,527
Re: Fiberglass layup part project***PHASE 2, MOCKUP***

Re: Fiberglass layup part project***PHASE 2, MOCKUP***

Why are you only going to do one layer at a time, in most bagging and/or infusion type methods all of the layup is done in one shot.
 

andy6374

Lieutenant Commander
Joined
Aug 4, 2005
Messages
1,617
Re: Fiberglass layup part project***PHASE 2, MOCKUP***

Re: Fiberglass layup part project***PHASE 2, MOCKUP***

ondarvr said:
Why are you only going to do one layer at a time, in most bagging and/or infusion type methods all of the layup is done in one shot.

Yup. That's the beauty of it, especially if start talking about the cure times of epoxy.
 

Boomyal

Supreme Mariner
Joined
Aug 16, 2003
Messages
12,072
Re: Fiberglass layup part project***PHASE 2, MOCKUP***

Re: Fiberglass layup part project***PHASE 2, MOCKUP***

I hadn't thought about a multiple layer layup. That makes a whole lot of sense. I hope that it would not get too messy with the epoxy.

I guess I could just use one of my little 4" rollers to roll on the resin, apply a layer of cloth, then carefully roll on another coat of resin over the first layer of cloth and apply the second. Repeat this for 5 layers. Do ya'll think that would work?

I'd probably want to do another five layers after the first set cured. That'd give me a total of twelve layers for the finished part.

As to the gel coat suggestion. I would think that would only apply if I was laying up in a female mold. As it is, this part will be glued to the dog house which needs to be painted anyway.
 

willamettejeff

Chief Petty Officer
Joined
Nov 15, 2004
Messages
550
Re: Fiberglass layup part project***PHASE 2, MOCKUP***

Re: Fiberglass layup part project***PHASE 2, MOCKUP***

Another benefit of multiple layers is faster curing time from the additional heat build up of the layers.

Seems like a lot of extra work your going through using a vacuum pump. I've laid up much more complicated and sharper edged shapes than you doing just be waiting for the previous layer to cure to the point of being almost done, but still very tacky and then just sticking the next layer on.

Could have made yourself a nice negative mold by applying molding making material over your very nice positive mold. Could have then put gel coat as your first layer and then laid up the cloth. Would not have needed any sanding in the end either. Just a thought.
 

stevieray

Lieutenant Junior Grade
Joined
Jul 18, 2006
Messages
1,135
Re: Fiberglass layup part project***PHASE 2, MOCKUP***

Re: Fiberglass layup part project***PHASE 2, MOCKUP***

Boomer - you might want to put some sealer on the plywood so the duct tape sticks better & you dont get a vacuum leak.
 

ondarvr

Supreme Mariner
Joined
Apr 6, 2005
Messages
11,527
Re: Fiberglass layup part project***PHASE 2, MOCKUP***

Re: Fiberglass layup part project***PHASE 2, MOCKUP***

An old piece of window glass will work very well under the mold. Too much air will be drawn through the plywood to get a great vacuum, that little pump will be able to keep up better.
 

Boomyal

Supreme Mariner
Joined
Aug 16, 2003
Messages
12,072
Re: Fiberglass layup part project***PHASE 2, MOCKUP***

Re: Fiberglass layup part project***PHASE 2, MOCKUP***

stevieray said:
Boomer - you might want to put some sealer on the plywood so the duct tape sticks better & you dont get a vacuum leak.

Yeah stevieray. Figured that out after my mockup. I plan on rolling on a coat of resin.

I actually like the glass idea too. If I drip any resin on it it would be less likely to stick. I think I'll put waxed paper under my part.

I thought about doing a female mold but I didn't know where to get the mold material and I didn't want to spend a bunch of bux.

As far as the vacuum pump WJ, I had already applied two layers and could tell that I wasn't getting a firm laydown everywhere on the mold. This way I can make alternating butt seams in the difficult areas and have them tight.
 

Dunaruna

Admiral
Joined
May 2, 2003
Messages
6,027
Re: Fiberglass layup part project***PHASE 2, MOCKUP***

Re: Fiberglass layup part project***PHASE 2, MOCKUP***

[colour=blue]
willamettejeff said:
Another benefit of multiple layers is faster curing time from the additional heat build up of the layers.

Wouldn't that cure TOO fast (considering the amount of resin required to bed 5 layers)? I thought that 'too fast' would cause cracking.

Is the 10oz too heavy for this project?

Sorry in advance for the stupid questions.
 

Boomyal

Supreme Mariner
Joined
Aug 16, 2003
Messages
12,072
Re: Fiberglass layup part project***PHASE 2, MOCKUP***

Re: Fiberglass layup part project***PHASE 2, MOCKUP***

Dunaruna said:
[colour=blue]
willamettejeff said:
Another benefit of multiple layers is faster curing time from the additional heat build up of the layers.

Wouldn't that cure TOO fast (considering the amount of resin required to bed 5 layers)? I thought that 'too fast' would cause cracking.

Is the 10oz too heavy for this project?

Sorry in advance for the stupid questions.

Wouldn't at all think them stupid Aldo. All valid considerations. My answer to your queries is I DUNNO!

However, considering the desired thickness of my part (about 3/16 th inch) anything less than 10 oz would seem to require too many layers to achieve. As for the heat generated, I'm using a 3 to 1 epoxy that does not seem to be too quick to set up, if done in single layers. A bit more speed might not be too bad.

It's still all experimental so if I mess up I can always try the female mold technique. My biggest fear is with all those layers is that I will have resin dripping all over the place. That could make it harder to extract the part from the mold if resin has dripped down the sides of the plywood plug.

Tonight, I just gave my plywood base a coat of resin to insure that the tape creates a good seal. This weekend I will go for the Gold.

I may have to reduce the number of layers due to my remaining supply of epoxy. Additional supplies are a continent away and I don't want to wait for them to arrive before I take the next step.
 

Dunaruna

Admiral
Joined
May 2, 2003
Messages
6,027
Re: Fiberglass layup part project***PHASE 2, MOCKUP***

Re: Fiberglass layup part project***PHASE 2, MOCKUP***

[colour=blue]I watch in anticipation..................................

I am about to begin a major hull repair which includes some tight angles. I'm thinking 2 ounce chopped mat. I noted that you used cloth, easy to use on flat surfaces, not so easy on bends - no?
 
Top