bpounds1991
Petty Officer 1st Class
- Joined
- Nov 3, 2017
- Messages
- 321
1993 Chaparral Gemini 190: Chronicles of a New Boat Owner (Deck Rebuild) [SPLASHED June 2018]
Hey everyone, I'm new here to posting but not to these forums... I've been searching high and low in terms of how to do the rebuild of the deck, and by searching I mean EVERYWHERE. A lot of my inspiration has come from FriscoBoater and his series on YouTube, and a ton of other "How-To's" along with the forum guides.
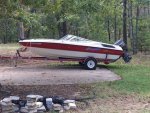
Figured I'd give a little backstory. My wife Chelsea and I (Brandon) were on the market looking to purchase a boat under 5,000$ back in October (she wanted to wait until after the New Year, but I wanted to purchase early to work out any kinks and have it ready for the spring). I started searching on Craigslist and other used boating sites, and stumbled upon a good condition 1993 Chap Gemini 190. We decided to go look at it and I knew it had a small soft spot upon inspection, which the owner had said was repaired.
At the time I didn’t know about the horror stories or what soft spots really meant, we’re quite new to boating, and sadly I have to admit I’m not the most technically savvy person. We decided to purchase the boat for $3,700 after haggling the price down. My aunt’s boyfriend who is a Master Mechanic and used to work on I/Os came with me when I went to pick it up, and said the outboard on this thing is superb.
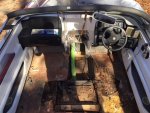
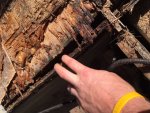
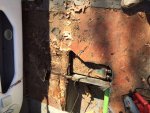
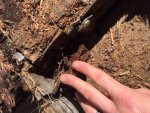
We’ve taken the boat out 5 times and, other than a couple idling issues (seems due to the carbs needing a rebuild), it didn't give us a single issue. I will note however there is a small sound during 20-30mph briefly that sounds like loose change or something rattling, but I have yet to get to the bottom of it. On our last trip out for her birthday before winterizing it, the chair mounting plate screws ripped out of the deck as I was sitting on it when we went over a wave, and that's when I knew I'd have to truly replace the deck.
I’m planning on redoing the transom, stringers, and deck. I’ve already purchased large sheets of Seadek on a huge Black Friday sale, and plan on gel coating instead of adding carpet again. It’s a large task that I wouldn’t wish upon anyone, but the support from this website has been tremendous already and I can’t wait to go document it going forward.
Hey everyone, I'm new here to posting but not to these forums... I've been searching high and low in terms of how to do the rebuild of the deck, and by searching I mean EVERYWHERE. A lot of my inspiration has come from FriscoBoater and his series on YouTube, and a ton of other "How-To's" along with the forum guides.
Figured I'd give a little backstory. My wife Chelsea and I (Brandon) were on the market looking to purchase a boat under 5,000$ back in October (she wanted to wait until after the New Year, but I wanted to purchase early to work out any kinks and have it ready for the spring). I started searching on Craigslist and other used boating sites, and stumbled upon a good condition 1993 Chap Gemini 190. We decided to go look at it and I knew it had a small soft spot upon inspection, which the owner had said was repaired.
At the time I didn’t know about the horror stories or what soft spots really meant, we’re quite new to boating, and sadly I have to admit I’m not the most technically savvy person. We decided to purchase the boat for $3,700 after haggling the price down. My aunt’s boyfriend who is a Master Mechanic and used to work on I/Os came with me when I went to pick it up, and said the outboard on this thing is superb.
We’ve taken the boat out 5 times and, other than a couple idling issues (seems due to the carbs needing a rebuild), it didn't give us a single issue. I will note however there is a small sound during 20-30mph briefly that sounds like loose change or something rattling, but I have yet to get to the bottom of it. On our last trip out for her birthday before winterizing it, the chair mounting plate screws ripped out of the deck as I was sitting on it when we went over a wave, and that's when I knew I'd have to truly replace the deck.
I’m planning on redoing the transom, stringers, and deck. I’ve already purchased large sheets of Seadek on a huge Black Friday sale, and plan on gel coating instead of adding carpet again. It’s a large task that I wouldn’t wish upon anyone, but the support from this website has been tremendous already and I can’t wait to go document it going forward.
Last edited by a moderator: