99 Larson 186 SEI Ski-n-Fish Re-Deck Project

QuickPuppy

Petty Officer 1st Class
Joined
Oct 18, 2017
Messages
230
Hello all, bought my first boat last week having owned PWC's for the past 25 years. Found this 1999 Larson 186 SEI SF with a Johnson 115 OB on Craigslist. For the year and price, I thought it looked decent enough that I decided that whatever gotchas popped up would still be in my budget.

Took it home and scrubbed everything down and it really is cleaning up beautifully. Looks like the gel coat will shine again. The rough running engine the owner had mentioned in the ad actuallly sounded fine and I figured any issues with it were likely fuel related after sitting for the past year. Dumped a can of Seafoam in the tank and I'll pump it out and fresh fill before I try running it again. It will need a steering cable as well.

The PO had done some decent re-upholstery on most of the seat cushions. He had also laid a new carpeted wood floor over top of what he said were a "couple of soft spots around the captain's chairs". I planned to take that up and fix it right as it was surely continuing to rot now that it couldn't breathe anymore.

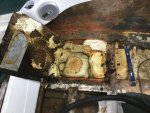
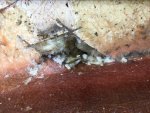
It was very wet under the floor in the ski locker and in the stern area (prior to me washing it) so I opened everything up and let it air out for a week. Today I decided to start taking up the deck overlay. Well, the "couple of soft spots" was the understatement of the year as about 80-90 % of the original deck was mush... From under the pass through all the way to the bilge. Even some of the foam had begun to hold water. My original thought was that I was going to be able to reuse the overlaided deck as the new floor but I'm going to be replacing more than that it appears.

One of the guys at Larson told me that the stringers on this boat were wood. So far, all I seem to be finding is foam and fiberglass. There are some wood braces over the fuel tank. Anyone know if there is wood under some of this fiber? Hoping no as it would be great if I didn't have to replace stringers too!

Any recommendations for where to get pressure treated plywood that fiberglass resin will stick too? I'm guessing the green "wet" stuff at HD isn't going to work well.

Trying to figure out how to get more pics to upload... more as I progress. Any tips are welcome!
 

tpenfield

Moderator
Staff member
Joined
Jul 18, 2011
Messages
17,695
Your story is a common one. Wet floor, soft spots, wet foam. The stringers are most likely wood, if the floor is wood. After you have a few more posts under your belt, you will be able to post some pictures. You will have to reduce the size of the pictures in order for them to upload.

I believe Larson was one of the boat manufacturers who used an automated process for their manufacturing for their smaller boats called "VEC", but I'm not sure of what models years that started with, etc.

Pictures of the structure will help with responses and advice.
 

kcassells

Fleet Admiral
Joined
Oct 16, 2012
Messages
8,596
Oh yea... do not use pressure treated wood. ACX, bcx or cdx exterior grade ply.
 

JASinIL2006

Vice Admiral
Joined
Feb 10, 2012
Messages
5,539
My boat is a '97 186 SEI, and it did NOT have wood stringers. It did, however, have a rotten transom core (which is wood) that started where the ladder was mounted. The stringers, bulkheads and engine mounts appeared to be one piece of fiberglass that was tabbed/fiberglassed into the hull and then filled with foam. The stringers were about 4" wide and were gelcoated just like all the other finished surfaces.

I also found that the floor of my ski locker (which was carpeted) was a little lower than the drain tube in the aft bulkhead. As a result, the locker would never completely drain of water and the carpet was always soggy. During my rebuild, I tore out the carpet and built up the floor with some layers of fiberglass so all the water could drain out and not be trapped in there.

I'm not sure how much models and manufacturing processes might have changed between '97 and '99, but if you check out my restoration thread (in my signature below), you might see some stuff that is helpful to you. I'll be following your work, too, and will chime in if I think I have something helpful to offer.
 
Last edited:

QuickPuppy

Petty Officer 1st Class
Joined
Oct 18, 2017
Messages
230
Thanks everyone. Looking forward to getting into this more as time allows. I could see this being a full time job for a couple of weeks.
 

QuickPuppy

Petty Officer 1st Class
Joined
Oct 18, 2017
Messages
230
My boat is a '97 186 SEI, and it did NOT have wood stringers. It did, however, have a rotten transom core (which is wood) that started where the ladder was mounted. The stringers, bulkheads and engine mounts appeared to be one piece of fiberglass that was tabbed/fiberglassed into the hull and then filled with foam. The stringers were about 4" wide and were gelcoated just like all the other finished surfaces.

I also found that the floor of my ski locker (which was carpeted) was a little lower than the drain tube in the aft bulkhead. As a result, the locker would never completely drain of water and the carpet was always soggy. During my rebuild, I tore out the carpet and built up the floor with some layers of fiberglass so all the water could drain out and not be trapped in there./QUOTE]

Mine has the same issue... drainhole is 1/2"+ higher than the bottom of the locker.

John at Larson was the one who told me that the stringers were wood. You are not the only one that has said that theirs were fiberglass/foam. Guess I could always drill a few core sample to find out for sure.

Kcassells--- are you saying TO USE acx, bcx, or cdx?
 

JASinIL2006

Vice Admiral
Joined
Feb 10, 2012
Messages
5,539
Look thru my resto thread. If your stringers are 3-4? wide and gelcoated, they most likely are not wood.
 

QuickPuppy

Petty Officer 1st Class
Joined
Oct 18, 2017
Messages
230
Found that at least one of the stringers that runs along the port side of the fuel tank appears to be waterlogged. I pulled all the foam out of the cavity above it and it was fairly dry (wet on, but not inside the foam). When I got down to where the hull meets the stringer I noticed that there were two rectangular holes cut into the base of that stringer. I could see the foam inside was saturated. I'm guessing this could be a bigger problem now...
 

QuickPuppy

Petty Officer 1st Class
Joined
Oct 18, 2017
Messages
230
No Title
 

Attachments

  • photo280271.jpg
    photo280271.jpg
    222.1 KB · Views: 13
  • photo280272.jpg
    photo280272.jpg
    231.1 KB · Views: 12
  • photo280273.jpg
    photo280273.jpg
    203.8 KB · Views: 12

QuickPuppy

Petty Officer 1st Class
Joined
Oct 18, 2017
Messages
230
There has got to be an easier way to resize pictures to post in here. Sending to Flickr (the links didn't seem to want to work), downloaded them back to my computer then posted them directly.
 

tpenfield

Moderator
Staff member
Joined
Jul 18, 2011
Messages
17,695
There has got to be an easier way to resize pictures to post in here. Sending to Flickr (the links didn't seem to want to work), downloaded them back to my computer then posted them directly.

Depending on if you have Windoze or Mac . . . Here is what I do . . .

Mac:

- Transfer pictures from my iPhone to the Mac using 'Photos' app.
- Export the pics using Photos and have the export options set to size 'medium' - they automatically resize to about 200-400KB upon the export.
- I export them to a folder on my desktop so they are easy to find.
- Within posts I use the 'paper clip' icon and upload the pics that I want to the post and place them where I want them in the post.

Windoze:
- Transfer pictures from iPhone to the PC using the typical drag & drop.
- Open each picture that I want using 'Paint' app (there may be other apps that can be used as well)
- Click the 'resize' link/button and choose about 40% or even 33% to get the photo down from 2-3MB to about 200-400KB
- Save . . .
- Then use the pics in posts via the 'paper clip' icon, etc.

The Mac is a bit quicker, because the 'export' feature on photos can do batch resizing of many pics all at once. I have not found the same sort of feature on the PC, so those are one-at-a-time.

The only time my photos hit the Internet is when I put them in the posts. . . . unless I have previously posted them to one of my web sites :)
 

tpenfield

Moderator
Staff member
Joined
Jul 18, 2011
Messages
17,695
An interesting find . . . If this cut-out was already there, then it is reasonable to assume that a previous owner has already been investigating and perhaps trying to remedy the water retention issue.
image_280273.jpg
 

QuickPuppy

Petty Officer 1st Class
Joined
Oct 18, 2017
Messages
230
Thanks Ted, I'm on a mac so I'll give that a try.
Interesting thought on a PO... that could perhaps explain why the foam didn't fill the cavities completely if someone beside the factory re-did it at some point. I'm curious to see if the same holes exist on the starboard side on the tank stringer.
 

QuickPuppy

Petty Officer 1st Class
Joined
Oct 18, 2017
Messages
230
Initial cleanup
IMG_4999.jpg

Initial cleanup
IMG_5002.jpg

Under rear bench seat... flooring soft under brace bar
IMG_0966.jpg


This is the back of that panel.
IMG_0969.jpg


Back of rear bench seat... port side
IMG_0976.jpg


PO overlaid this deck and carpet. Looked nice and was solid but I knew that he had not pulled the original floor that had to have gotten much worse after trapping the moisture under this.
IMG_0986.jpg


Carpet pulled back...
IMG_0993.jpg


The original floor... a quarter inch piece of ply was over the tank section carpet.
IMG_0994.jpg


1/4" removed... Carpet was damp but not soaked.
IMG_0995.jpg


Pulled back tank section carpet and found another piece of ply...
IMG_0996.jpg


Pulled that piece up...not sure what has happened here... looks maybe like very old fuel or oil. Will be checking all hose connections in here. hopefully the stuff in the tank doesn't look like this! (Although the engine did run on what is in there.)
IMG_0999.jpg


Carpet pulled on main area... starboard side under helm was all crumbly mush, the rest was in various states of decay.
IMG_1003.jpg


Under the starboard side. The foam did not fill the void completely under the steering wheel. Water was sitting in here. I'm sure that's part of why the floor was so bad here.
IMG_1012.jpg

Starboard side under wheel... foam removed. Appears to be fiberglass over foam stringers. Will be core sampling when I get a chance.
IMG_1013.jpg


Port side in front of rear bench seat...
IMG_1028.jpg


Once again, the foam is not filling the cavity. Good bit of standing water here...
IMG_1029.jpg
 
Last edited:

QuickPuppy

Petty Officer 1st Class
Joined
Oct 18, 2017
Messages
230
Port side in front of rear bench, foam removed. This is where I found the two holes cut into the bottom edge of the stringer. (Vertical one in front of my foot)
IMG_1035.jpg


Inch of water sitting in here...
IMG_1033.jpg


Closeup of one of the two holes in the stringer. Looks like slush in there.
IMG_1034.jpg
 

QuickPuppy

Petty Officer 1st Class
Joined
Oct 18, 2017
Messages
230
For those that have re-decked their boats, did you cut/grind the original tabs all the way back so that the sides of the boat were all smooth or did you leave part of the original tab there on fiberglass the new floor into that?
 
Top