Opinions Please 1969 Ouachita Convincer 14

oldrem

Commander
Joined
Nov 7, 2013
Messages
2,002
front2.jpg 
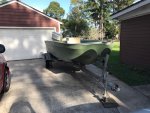
Decided I needed a new project for the spring. Picked this one up with trailer, 7.5hp motor, electric motor, new marine battery plus accessories all for $300 so not much into it at this point.

The carpet is sitting directly over badly water soaked foam which needs to come out and replaced. The transom has stress cracks - not due to rot, but because someone in the past thought 4 layers of 1/2" cement board would be a good material for a transom. It has since been reinforced with some perforated steel channel and bolts, but it all needs to be cut out and replaced. I'm planning on cutting out the whole transom and replacing with 1-1/2 to 2 inches of marine plywood, (3-4 layers of 1/2" epoxied together and well coated with epoxy). Then glass it all in.

The wiring for the lights has been cut, so I'll fix that too as well as redoing the bilge pump and possibly re-rigging the live well.

Just at the planning stage since I won't be able to due much on it this fall or winter. Any comments or advice would be helpful.

Was going to include photos, but it won't let me.
 
Last edited:

sphelps

Supreme Mariner
Joined
Nov 16, 2011
Messages
11,435
I think you need 3 post before you can post pics ..
Welcome aboard !!
 

oldrem

Commander
Joined
Nov 7, 2013
Messages
2,002
Messed up my title - the correct spelling for the boat is Quachita, so did an edit
 

oldrem

Commander
Joined
Nov 7, 2013
Messages
2,002
image_279348.jpg This is the mess they made of the transom
 
Last edited:

kcon

Petty Officer 1st Class
Joined
Dec 10, 2016
Messages
303
Found out the cap is glued to the hull - any suggestions on the best way to separate them??

Mine was glued together in some spots, not as much as yours, but what I did was cut a piece of wood the width of the inside of the top cap, and from inside the boat pump it up with a motorcycle jack to put some pressure between the hull and the top cap. Worked great. You might need to grind a bit though.
 

oldrem

Commander
Joined
Nov 7, 2013
Messages
2,002
Added some photos instead of links. Worked awhile last night on separating the cap - looks like it will be a very long job.
 

oldrem

Commander
Joined
Nov 7, 2013
Messages
2,002
After working on it again tonight, I've come to the realization that I may do more damage than good trying to remove this cap. After taking a better look at it, it's not only glued, but fiberglassed in all the way around from underneath. My thoughts are to just cut off the rear sections of the cap to replace the transom, then fiberglass them back in afterward.

Any good reason not to do this??
 

oldrem

Commander
Joined
Nov 7, 2013
Messages
2,002
My idea is to cut the cap about 6 to 8 inches forward of the transom. Please excuse the blurry photo, it was 40 degrees this morning. cap1.jpg
 

ondarvr

Supreme Mariner
Joined
Apr 6, 2005
Messages
11,527
It can be cut anywhere you want to make it easier, just look for the easiest spot to glass it all back together.
 

oldrem

Commander
Joined
Nov 7, 2013
Messages
2,002
Started my morning by cutting the stern ends off the cap to get access to the transom and start digging out the old foam. port cap.jpg starboard cap.jpg
 

oldrem

Commander
Joined
Nov 7, 2013
Messages
2,002
Took me almost all day, but managed to get all the foam out of the outer port compartment. With all the water in it, I would guess around 40 lbs worth. 3 sections left, but not sure how much time I'll have anymore this fall. At least I have a good idea of what I'm up against. So far the stringers are looking unfazed. That would be an amazing blessing. foam 1.jpg foam 2.jpg
 
Last edited:

Woodonglass

Supreme Mariner
Joined
Dec 29, 2009
Messages
25,924
Until you drill core samples you Can't KNOW the condition of the stringers.
 

oldrem

Commander
Joined
Nov 7, 2013
Messages
2,002
Had a little daylight when I got home last night, so started on the next section of foam. This time I decided to bag and weight the first 3 foot section. It weighed in at 27 lbs. Considering it's the deepest section, my guesstimate is the average will run about 5 to 6 lbs per linear ft, or over 200lbs total that I'm removing. foam 3.jpg
 

Isa4325

Petty Officer 2nd Class
Joined
Oct 7, 2017
Messages
121
No Title

I'm not having to do near as much work on my Ouachita U16.. Did a float test with two 160# men within the boat moving all around and found no water within the transom well. The boat does have some keel scratches and some even show the boat hull scraped off and raw hull showing. I will be sanding the keel and added Resin, Hardener, and glass cloth to complete the keel. Paint White. Changing console to aft center position and controls mounted on side of console.
 

Attachments

  • photo279801.jpg
    photo279801.jpg
    114.7 KB · Views: 1

oldrem

Commander
Joined
Nov 7, 2013
Messages
2,002
I'm not having to do near as much work on my Ouachita U16.. Did a float test with two 160# men within the boat moving all around and found no water within the transom well. The boat does have some keel scratches and some even show the boat hull scraped off and raw hull showing. I will be sanding the keel and added Resin, Hardener, and glass cloth to complete the keel. Paint White. Changing console to aft center position and controls mounted on side of console.

Nice to see another Convincer being worked on. Just finished the half way point on foam removal a few minutes ago.
 

oldrem

Commander
Joined
Nov 7, 2013
Messages
2,002
Almost 3/4 of the foam is out. The good news is no rot in the stringers. They were replaced at some point with a composite material that is definitely impervious to water.
 

oldrem

Commander
Joined
Nov 7, 2013
Messages
2,002
Almost there with getting all the old foam out. It was 38F degrees when I got home from work today, but once I got the old bones going it felt like 70. After 3-1/2 hours I started cramping pretty bad so had to quit before dark. On the last rebuild they cut most of the original FG floor out, but left some areas where there's still some foam underneath - so I'll be cutting that away as well. Still deciding how I'm going to attack the foam under the forward seat supports. Can't find my old keyhole saw, so may try slowly cutting it out with the sawzall.
 
Top