1991 Cheetah 350 XLS

BRL2307

Cadet
Joined
Oct 3, 2017
Messages
29
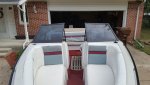
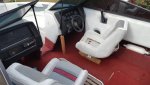
I bought this boat earlier this summer to cruise around the lake on the weekends with the wife. It is a 19 foot bowrider (according to the registration and a tape measure). The HIN indicates a 1991. I tried looking this boat up on NADA, but the 350 XLS was not an option for 1991, but it was available for 1990. iBoats doesn?t seem to have it listed as a 91 either. NADA also shows it was a 20 foot boat in 1990. So who knows what it actually is? Very strange.

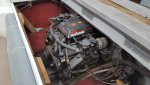
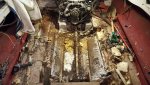
Apparently, the boat?s model number comes from the stock engine of the boat, a 350 Merc. The previous owner said the original motor was not properly winterized at some point, and cracked the block. It is now powered by a Mercruiser 4.3lx v6. We have had it on the lake a few times already, and seems to have no engine or drive issues. Steering is stiff, and will likely need a new cable.

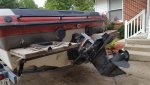
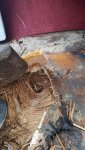
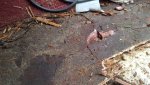
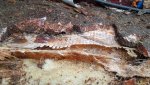
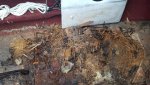
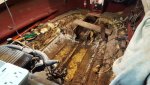
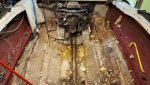
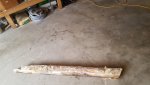
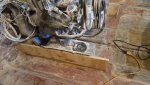
However, there is some significant rot that needs addressed this winter. The floor is rotten, and some of the visible stringers are also in bad shape. I suspect the transom is rotten too; had a swim platform screw trying to back itself out.

Once I make a few more posts, I will add some pictures.
 

BRL2307

Cadet
Joined
Oct 3, 2017
Messages
29
Last weekend I started to remove the old deck. One half was saturated, and the other half was dry mulch. Stringers are quite rotten, especially around the gas tank. The whole gas tank area was filled with water. Cut a hole in the bulkhead to drain it all. Not sure if it was from the recent rains or not.
 

BRL2307

Cadet
Joined
Oct 3, 2017
Messages
29
Last night worked on pumping out the fuel tank. Thankfully my truck was almost empty so the 18 gallons had a place to go!
 

BRL2307

Cadet
Joined
Oct 3, 2017
Messages
29
No Title

Some pictures of the boat before demo work started.
 

Attachments

  • photo279157.jpg
    photo279157.jpg
    178.1 KB · Views: 1
  • photo279158.jpg
    photo279158.jpg
    328.5 KB · Views: 1
  • photo279159.jpg
    photo279159.jpg
    304 KB · Views: 1
  • photo279160.jpg
    photo279160.jpg
    211.7 KB · Views: 1
  • photo279161.jpg
    photo279161.jpg
    382.2 KB · Views: 1

Woodonglass

Supreme Mariner
Joined
Dec 29, 2009
Messages
25,924
She has very nice lines. I'm gunna "Come Aboard" and watch your progress. The links in my signature line below may hold some interest for you.
 

BRL2307

Cadet
Joined
Oct 3, 2017
Messages
29
No Title

Thanks WOG. I have been reading the resto forums for several months now. Been waiting patiently for the end of the season to tear her down.

As you can see, the deck was mulch, underneath swiss cheese fiberglass. Looks like there were several sets of captians chairs screwed to the deck over the years.

While cutting the deck with the circular saw, I noticed some strange spider cracking near the hull. Thankfully I decided not to cut through it. Turns out the plywood stopped just short of there, and it was filler material over the last chine. In the last picture, you can see the hull under the gap in fiberglass.
 

Attachments

  • photo279164.jpg
    photo279164.jpg
    200.1 KB · Views: 0
  • photo279165.jpg
    photo279165.jpg
    224.3 KB · Views: 0
  • photo279166.jpg
    photo279166.jpg
    222.5 KB · Views: 0
  • photo279167.jpg
    photo279167.jpg
    228.9 KB · Views: 0

BRL2307

Cadet
Joined
Oct 3, 2017
Messages
29
No Title

Another weekend gone. Got the gas tank removed fairly easily. Still looks to be in good shape.

Started to remove the starboard stringers. They seem to be rotted from the top down. The bottom half took some work to get out. A couple of pry bars did the trick. All of the wood was soaked. It would rather bend than snap off.

A bit of good news at this point! Drilling into the motor mounts showed dry, solid wood! It would seem that replacing the motor saved the mounts. The new mounts were glassed in seperate from the stringers, so they stayed dry.

I also drilled into the transom. The few locations I tested near the bottom of the bilge showed decent wood shavings. I have not noticed any flexing of the transom, even when standing on the swim platform, or bouncing on the outdrive. At this point, I am not planning to pull the motor and replace the entire transom. When the starboard stringers were removed, I could see the transom was glassed seperately. We plan to keep the boat about 5 years, and I am confident the transom will be solid for at least that long.

Next on the agenda is to remove the trim pump so that area of the floor can be removed. Then finish removing the port stringers.

The project will be put on hold this week. The wife and I are going to Ireland for a few days. Her parents are going too. We went in December last year, and she has been wanting to get her parents to travel more. So we are headed back.
 

Attachments

  • photo279342.jpg
    photo279342.jpg
    190.9 KB · Views: 0
  • photo279343.jpg
    photo279343.jpg
    212.9 KB · Views: 0

BRL2307

Cadet
Joined
Oct 3, 2017
Messages
29
No Title

Got a bit of time on the boat between jobs on the honey do list. The trim pump was removed sucessfully, and the rest of the floor removed.

About 95% of the bad wood has been removed. Still have a bit around the ski locker to cut out. Next step: finish clearing out the foam scraps, then grinding! Really looking forward to it...
 

Attachments

  • photo280130.jpg
    photo280130.jpg
    160.7 KB · Views: 0

BRL2307

Cadet
Joined
Oct 3, 2017
Messages
29
No Title

So I decided to start looking into my steering issue today. I disconnected the cable from the drive without much issue. The wheel was still difficult to turn. So clearly, time for a new steering cable!

Also found a little suprise when removing the steering wheel. A small hornets nest! Glad that is now gone.

I also have a picture of the largest peice of stringer that came out. About 3-4 feet long... all soaking wet.
 

Attachments

  • photo280265.jpg
    photo280265.jpg
    117.1 KB · Views: 0
  • photo280266.jpg
    photo280266.jpg
    91.3 KB · Views: 0

BRL2307

Cadet
Joined
Oct 3, 2017
Messages
29
No Title

Started grinding today. Woo!

There is a lot of resin starved woven roving that was used to encapsulate the stringers. Obviously I need to grind out those fibers. But do I need to grind all the roving off to the original hull? Or can I grind it enough to remove the texture, exposing clean resin? This is assuming the area has a good bond, and is not dry. In some places it seems like the roving is 1/4" thick or better...
 

Attachments

  • photo280288.jpg
    photo280288.jpg
    110.8 KB · Views: 0

BRL2307

Cadet
Joined
Oct 3, 2017
Messages
29
Thanks for the confirmation, WoG.

We worked on lots of grinding this week. I decided to try and figure out what was the best grinding wheel for the 4.5 in grinder. Started out with a couple Harbor Freight flap wheels ($4). The did the job okay. Started out grinding pretty good, but dulled fairly quickly. A little extra pressure on the grinder, and was able to force a little more life out of them. I used this as the base line. All wheels were 40 grit.

A couple days later, I was looking at Walmart. Found an agressive looking wheel and decided to try it and see what happened.
Resized pictures - 1.jpg
Turns out, this $6 wheel was not too useful. It looks like this one was designed to strip paint, and did not grind the fiberglass too well. I would not recommend this at all.

Next was a trip to Lowes. I found 2 different wheels to try.
Resized pictures - 1.jpg
I tried the one on the left first ($10). The ceramic abrasive lasted much longer than the HF special, so I didn't mind the higher price. It worked really well. It also laster for a couple hours of grinding before I threw in the towel.

Finally, the DeWalt flap wheel was up. This $9 wheel is my favorite right now.
Resized pictures - 1.jpg
The DeWalt has about double the surface area of each flap exposed. I feel like this allows more material to be cut faster. I have been abusing this wheel, grinding down areas I could probably be using a cutoff wheel, and still going strong.

After trying these 4 wheels, I would recommend the DeWalt flap wheel. I think it grinds the quickest, and lasts a long time. Buying 2 wheels from HF for each DeWalt still wouldn't make me want the HFs. I hope this may be useful for someone out there.
 

Woodonglass

Supreme Mariner
Joined
Dec 29, 2009
Messages
25,924
I'd HIGHLY recommend you look into using a 4 1/2" Rubber Backer and 24 grit Resin Coated sanding disks. All can be had at Harbor Freight for under $10.00


SandingDiscsandBackerPlate.jpg
 

BRL2307

Cadet
Joined
Oct 3, 2017
Messages
29
So, its been a while since my last update. We have not given up yet! Just had some personal stuff come up that I haven’t had a change to write an update. My wife had emergency surgery to get an ovarian cyst removed. A 10 cm cyst was pulled out of a 2 cm hole. So that was fun… Did I mention we are expecting our first kid in April? Really excited! But one heck of a deadline to get as much done on the boat as possible.

Back to the boat. 95% of the grinding is done! Unfortunately, I didn’t get any pictures of that stage. However, I do have a picture of the first piece of wood to go back in! These pieces attached directly to the engine mounts. That was a good day. Resized pictures - 1.jpg

I got all the stringers PL’ed to the hull. Then dry fit the gas tank in to frame it in. All of the wood is now installed.
Resized pictures - 1.jpg
Due to the freezing temperatures, none of the fiberglassing has been started. Spent the weekend leveling out the stringers. As you can see, there was a lot of work to do to get everything evened out.
Resized pictures - 1.jpg

With everything level, the floor was cut and installed.
Resized pictures - 1.jpg

That brings us up to where the project is at. Once the weather warms up, the floor will be taken back up, and everything fiberglassed in. In the mean time, I’ll start redesigning the interior. Right now, I am leaning towards an L shaped lounge with an individual captain’s chair. I am using the old bench seat as a rough guide for the new lounge, and reusing one of the bucket seats.

Hopefully, it won't be another couple months before the next update. We are finally getting to the fun part.
 

Attachments

  • Resized pictures - 1.jpg
    Resized pictures - 1.jpg
    136.8 KB · Views: 0
  • Resized pictures - 1.jpg
    Resized pictures - 1.jpg
    136.8 KB · Views: 0

hvymtl939

Chief Petty Officer
Joined
Feb 6, 2017
Messages
495
Late to this one, but great progress so far! How does the v6 sound with the thru-hulls?
 

BRL2307

Cadet
Joined
Oct 3, 2017
Messages
29
Actually, the thru-hulls are just capped off on the inside. They are left over from the original Mercruiser 350 motor that a previous owner failed to winterize. Just a regular old boring v6, unfortunately.
 

Woodonglass

Supreme Mariner
Joined
Dec 29, 2009
Messages
25,924
IMHO, You'll need to do some cleanup on your stringers where the PL is smeared about. Resin and Glass will NOT stick to the PL and will cause a LOT of difficulties when trying to encapsulate them.
 
Top