1995 Crownline 202 BR refurb..

kcassells

Fleet Admiral
Joined
Oct 16, 2012
Messages
8,598
Really looks like the step up is a deck on a deck, the bottom being the structural component. Getting that furniture out intact will be a challenge. Have at it Hauger!
You'll be very happy knowing that all the bad and the ugly is gone. Better than new.
 

chevymaher

Commander
Joined
Mar 29, 2017
Messages
2,915
Guys, thanks for all the replies, really do appreciate the support and wisdom.

I have a "before I do something I wish I didn't" question to ask. The bow section is slightly raised. I have no idea what the history here is, but it seems the bow floor is all gelcoated. At some point, I'm assuming the endcap to the raised part was cut and never resealed. As such, it's rotted and soft at least 8 - 12 inches back.

Now, I don't want to cut into the gelcoat to replace this, but I can't seem to figure out any other way to properly do the job. Any tips/advice??

Pictures attached for some clarity. The gelcoat looks terrible, at some point someone glued new carpet overttop and the glue is still in place.

Thanks.
Mine is like yours and yea it is a nightmare. I cut the deck away in pieces under the dash. Cut the stringer out piece by piece. If your bow seat flip up for storage there is some access there. I used a whiz wheel on a dremel to cut stuff loose and pull it out. I got the stringers out then attacked the deck from underneath. It was time consuming and rough.

Once it is all out grinding is a pain but easier. It does go in a lot easier than it came out. On mine there was a small triangle piece of wood attached to the deck in the front. It for whatever reason was dry and solid. I guess the design of the cap kept that area dry. I left it because I was never going to tab in a new one in the very from except from underneath.
 

Hauger

Seaman
Joined
Jun 24, 2010
Messages
58
Thanks for all the replies, feeling like I've bitten off quite the large project.

As far as I can tell, the seats and that floor do form part of the top cap. I took some vinyl off the one side and verified it. Later tonight after the kids are in bed I'm going out with some work lights and doing some more seat removal. I'm going through a split though, and finding storage for the seats is getting trickier. I'm hoping as I peal back more layers, a logical way forward shows itself.

On a different note, anyone have any recommended resin/fiberglass suppliers/kits/etc?? Someone suggested West system, I'm looking at that now and it looks okay and beginner-friendly.
 

Hauger

Seaman
Joined
Jun 24, 2010
Messages
58
No Title

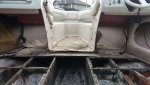
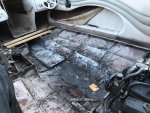
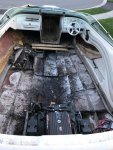
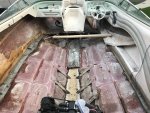
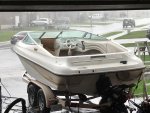
Okay, I took the advice of all here and took the rest of the seats/vinyl panels out today. Then, because I'm really not a fan of the original carpet (what with 22 years of moisture and mildew in it), I started ripping the last carpet out.

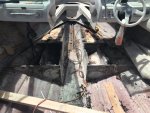
Then, the horror came over me.

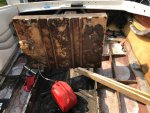
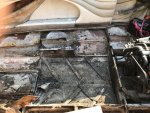
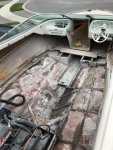
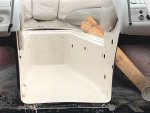
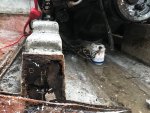
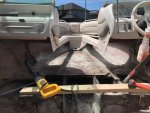
Clearly, the bow seats and floor are part of the top cap. Okay, I can deal with that. Every indication I have is the floor/stringers in the bow are okay. My original problem is still there though, that the "wood!" between the bow gel coat floor and the main deck is rotted out. Except, that's not really entirely true.

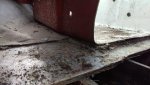
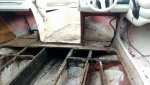
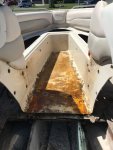
I don't know how well it'll come across in the pictures, but it looks like Crownline (guessing this based on the carpet being the original carpet and not the later re-done carpet....unless the boat was redone more than once), built the stringers/floor, then carpeted it before putting the top cap on. What that means is, the base below the center bow walkway is a layer of original floor-carpet-some kind of untreated plywood-glass.

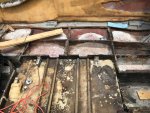
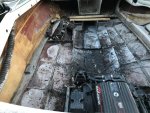
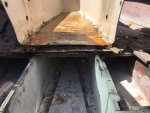
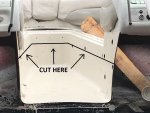
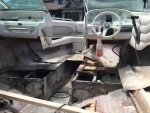
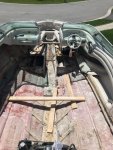
Now...I really don't want to take the top cap off. I also don't want to cut the floor and stringers from below (which all seems to be in good shape) just to access the rotted wood/remove the carpet under that walkway. In a perfect world, there'd be an easy-ish way to bore that material out, then inject some kind of structural foam/urethane to replace it underneath.

So, to the experts/experienced here....any work arounds, or am I screwed and need to cut the floor out from underneath?

Thanks.
 

Attachments

  • photo279715.jpg
    photo279715.jpg
    135 KB · Views: 6
  • photo279716.jpg
    photo279716.jpg
    172.6 KB · Views: 6
  • photo279717.jpg
    photo279717.jpg
    150.8 KB · Views: 6

52FordF2

Petty Officer 1st Class
Joined
May 31, 2013
Messages
372
I did mine by Belly crawling. First if the wood is rotten, it needs to come out. Then with a full face mask lay on your belly and grind everything even the underside if it has glue hanging from it.

Yours looks like it has more room around the front than mine did. Mock up everything before fiberglassing. Remember to fiberglass both side of the replacement sheet/ Wedge shape before permanently fiberglassing it in place.

You can put your stringers in before just remember to mock up everything. :facepalm: Things happen
 

Hauger

Seaman
Joined
Jun 24, 2010
Messages
58
Well, took it to a well known local pro to price it out. Looks like I'm in for DIY for sure now.

His solution was to cut out the gel coated glass, and use that to access the floor & stringers below, eventually repairing by patching in new glass and gel coat. I'm really hesitant to go that way, but it seems to be an "easy" solution and I think this is the way I'm going to go. So.....anyone have any really compelling reasons not to go that route??
 

kcassells

Fleet Admiral
Joined
Oct 16, 2012
Messages
8,598
Rip it out....My favorite saying I learned on this forum is......"Denial ain't just a river!"
So much is shot to assume there is any good left just isn't happening.
BTW what was the quote you got$$? Belly crawl or cap off. Up to you.
 

Hauger

Seaman
Joined
Jun 24, 2010
Messages
58
From the condition it's in to finished with a gel coat floor, around $8K.

Guy was really honest, I liked him a lot. He admitted that cost pays for his experience doing it right, and large time investment. I can agree with that. He offered Materials from him would only run about $1K, and said he was more that cool with offering tips/advice/whatever if I went DIY. I think the guys price was honest enough, I'd just rather have the money in my pocket, and truthfully, I like a project!
 
Last edited:

Baylinerchuck

Commander
Joined
Jul 29, 2016
Messages
2,726
And that price is why we go DIY. Good luck on your endeavor. Hope to see some progress on that boat.
 

Hauger

Seaman
Joined
Jun 24, 2010
Messages
58
So, time to update the progress on my project. I shelved it for the winter due to lacking any decent space to work on it, and with a job change I haven't had much free time until now. Having said that, I'm back at it now. To date I'm managed to finally get the fuel tank out, started cutting out the stringers (amazed at both how rotted the wood was, and how think the glass is), and some grinding when I get tired of cutting.

Here's the latest in the project photos....
 

Attachments

  • photo292396.jpg
    photo292396.jpg
    103.1 KB · Views: 6
  • photo292397.jpg
    photo292397.jpg
    173.5 KB · Views: 6
  • photo292398.jpg
    photo292398.jpg
    143.8 KB · Views: 6
  • photo292399.jpg
    photo292399.jpg
    177.3 KB · Views: 6
  • photo292400.jpg
    photo292400.jpg
    173 KB · Views: 6
  • photo292401.jpg
    photo292401.jpg
    191.7 KB · Views: 6
  • photo292402.jpg
    photo292402.jpg
    99.4 KB · Views: 6
  • photo292403.jpg
    photo292403.jpg
    103.3 KB · Views: 7

Friscoboater

Captain
Joined
Jul 3, 2009
Messages
3,095
Man I know the feeling! That looks alot like the Sea Ray I did. Just keep plugging and posting your progress so that we can all help.
 

Hauger

Seaman
Joined
Jun 24, 2010
Messages
58
Man I know the feeling! That looks alot like the Sea Ray I did. Just keep plugging and posting your progress so that we can all help.

Sir, I feel honoured. Your videos of the Sea Ray are what inspired me to tackle the job and I've watched them many, many times. Sincerely, thank you for putting them on YouTube, they're what have gotten me this far.
 

Friscoboater

Captain
Joined
Jul 3, 2009
Messages
3,095
Sir, I feel honoured. Your videos of the Sea Ray are what inspired me to tackle the job and I've watched them many, many times. Sincerely, thank you for putting them on YouTube, they're what have gotten me this far.

You are very welcome. I am following your progress.
 

Hauger

Seaman
Joined
Jun 24, 2010
Messages
58
It's been a bit slow going with uncooperative weather (hot and t-storms) and having to work for a living, but I did manage to cut out the stringers where the battery box lived (stringers were in okay shape, the floor and foam were soaked and rotted).

I also cut out part of a cross piece that was glassed to the engine mounts. Not overly thrilled with what I found as I don't have the equipment or the expertise to pull the engine if needed.

Last, I attacked the carpet glue in the bow hall with citrus degreaser and a pressure washer. Not completely clean but way better than it was. It also lets me see the condition of the gel coat which turned out to nobody's surprise to be cracked in a number of places thanks to being supported on rotted carpet for it's life. I'm not overly heart broken as my end goal is to paint it with kiwi grip or similar if and when I ever get to the finishing stages.
 

Attachments

  • photo293335.jpg
    photo293335.jpg
    69.1 KB · Views: 5
  • photo293336.jpg
    photo293336.jpg
    127.6 KB · Views: 5
  • photo293337.jpg
    photo293337.jpg
    76.7 KB · Views: 5
  • photo293338.jpg
    photo293338.jpg
    161.5 KB · Views: 5
  • photo293339.jpg
    photo293339.jpg
    169.1 KB · Views: 5

Hauger

Seaman
Joined
Jun 24, 2010
Messages
58
I have a question for you guys....I'm seriously considering cutting out the bow hall to make access to the nose easier. The attached picture shows where I'm thinking of cutting it. The idea would be to cut it along that line, remove it, then when the time's right, slide it back in, epoxy it together and rejoin on the back side (and possibly the front side) with new glass, using an upholstery piece to mask the seam.

Is this a terrible idea? I'd rather know if/why now than later when I go to put it back in and realise I made a terrible mistake.

Thanks
 

Attachments

  • photo293340.jpg
    photo293340.jpg
    126.9 KB · Views: 2

kcassells

Fleet Admiral
Joined
Oct 16, 2012
Messages
8,598
That will work! Then you can get to that stuff underneath . You can actually fair the pc. back so nothing shows.
 

Woodonglass

Supreme Mariner
Joined
Dec 29, 2009
Messages
25,924
Yup she's fiberglass. You'll be able to use cleats and resin to put her back together and No One will ever know you split it.
 

Hauger

Seaman
Joined
Jun 24, 2010
Messages
58
Okay, bit the bullet and cut it out. It didn't slide out as nicely as I thought it would in my mind so have to kind of take it out in two chunks. Not ideal, but I guess when you're in this deep.

Anyway, as expected, the floor under it was soaked and rotted. I actually think the stringers are okay, but the foam is saturated. I can't imagine the extra weight in soaked up rot-water this thing was carrying.

Anyway, after a bunch of grinding and cutting, I've had to call it quits for the next week, I need to head into work (I travel) so it'll be shelved for the next week at least.

Enjoy the pictures.
 

Attachments

  • photo293551.jpg
    photo293551.jpg
    166.5 KB · Views: 5
  • photo293552.jpg
    photo293552.jpg
    116.7 KB · Views: 5
  • photo293553.jpg
    photo293553.jpg
    118.3 KB · Views: 5
  • photo293554.jpg
    photo293554.jpg
    132.9 KB · Views: 5
  • photo293555.jpg
    photo293555.jpg
    95.9 KB · Views: 4
  • photo293556.jpg
    photo293556.jpg
    145.7 KB · Views: 5
Top