76 Sea Ray Restoration/Upgrade

76SeaRay

Lieutenant Junior Grade
Joined
Aug 24, 2017
Messages
1,047
Thanks for the details. I was concerned that if I cut the keyhole in the new plywood and then install the new plywood in the transom whether I could get the keyhole aligned correctly.
 

CrazyFinn

Petty Officer 1st Class
Joined
Dec 12, 2016
Messages
357
Thanks for the details. I was concerned that if I cut the keyhole in the new plywood and then install the new plywood in the transom whether I could get the keyhole aligned correctly.


You do have to be careful with the alignment - but leaving the existing hole in transom of the boat until you get the wood glued in allows you to measure/mark your template through the hole. If you want to be extra cautious, cut your plywood for the transom without the keyhole, and then when you are test fitting it, make some alignment marks and measure/mark the keyhole location, pull it out, cut the hole, then glue it in. Having the keyhole in the plywood makes it much easier to clamp the transom in!
 

76SeaRay

Lieutenant Junior Grade
Joined
Aug 24, 2017
Messages
1,047
More to consider and think about before any of the power tools get lit up... The OMC block is coming out this weekend so getting excited about having the room to do some test drills in the wood and check the extent of rot damage... Not sure if I will be able to get the helm and galley out this weekend.. Those are the only interior items still in the boat.
 

76SeaRay

Lieutenant Junior Grade
Joined
Aug 24, 2017
Messages
1,047
So, the OMC engine is now out of the boat. Messy wet job as it decided to rain in the middle of pulling it out. Got it back to storage and got thoroughly drenched getting a tarp over it. Wasn't able to do any test drills but most of the lag bolts into the stringers were pretty tight. Plywood spacers between the motor mounts and the top of the stringers were rotted in the back. Weather is starting to turn in Denver so not sure how much I will be able to get done. Only have outdoors to work with it for now.
 
Last edited:

76SeaRay

Lieutenant Junior Grade
Joined
Aug 24, 2017
Messages
1,047
No Title

So, with rain setting in and it will be a while before I can get back to the transom, I need to do a little sealing work on the bow to prevent rain water from coming in through the forward hatches.

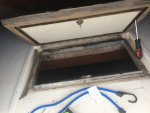
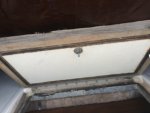
This boat has a hatch right at the bow that opens to a shelf inside the V Berth. Presumably for the anchor and/or anchor line. It also has a hatch at the base of the windshield where the center section of the windshield swings up to open. Both forward hatches appear original, are made from 3/4 inch plywood with some type of thin white covering. See my note above. Both hatches have a "routed" slot that when closed covers over a right angle piece of aluminum frame. The picture attached is of the "anchor" locker at the front.

So, it appears I have two options; 1) Cut new 3/4 marine plywood, seal the bare wood with resin, and cover the top and bottom with Formica, 2) Cut new 3/4 inch marine plywood, fiberglass it top and bottom, cover with gel coat, and paint it. The hatch at the base of the window is approximately 21 inches by 23 inches and the one at the front for the anchor is 13 inches by 22 inches.

I am thinking that option 2 is a better choice and probably would out live the boat. Since these hatches would likely get stepped on, do I need to stay with 3/4 inch plywood or, if I go with option 2 and fiberglass, could I reduce the plywood to 1/2 or 5/8 inch and have that be strong enough with fiberglass to support weight and not flex too much?

Thanks.
 

Attachments

  • photo278059.jpg
    photo278059.jpg
    209.8 KB · Views: 1
  • photo278060.jpg
    photo278060.jpg
    195.9 KB · Views: 1
Top