"It Happened!" Transom has to be replaced! (NOW W/PICS)

Jcris

Chief Petty Officer
Joined
Apr 23, 2016
Messages
466
No offense stump. But LX has maintained his "just do it" tack from the beginning. I'm just trying to accept that and offer what little help I can.
Jcris
 

Stumpalump

Chief Petty Officer
Joined
Dec 5, 2013
Messages
413
No offense stump. But LX has maintained his "just do it" tack from the beginning. I'm just trying to accept that and offer what little help I can.
Jcris

We all are. But when you get "Your not here to Bla Bla bla" you feel a little burn. I'm just so glad he had a cold when I was stuck in Tampa for three days while the wife was on buisness. Wanted to help him move that carport and would have run that grinder or sander for a couple of days just for somthing to do. Now it's sounding like we are just helping a craigslist flip.
 

jbcurt00

Moderator
Staff member
Joined
Oct 25, 2011
Messages
24,871
Agree to disagree fellas, or refrain from posting further

Safety/reliability concerns have been raised

The OP admitted he knew he'd get that flak for it and proceeded as he saw fit.

Just a reminder: it is a public forum, not all advice will be what you want to hear and not all advice will be heeded.
 

LX Kid

Ensign
Joined
Sep 5, 2008
Messages
993
Whats the haps?

Hey! Been raining and cool weather moved in. Wifey got sick when took GS Troop camping last weekend. Tomorrow will be around 73 and so I'll be back at it tomorrow. Old farts gotta be careful.

Smiley Bad Wx.jpeg
 

LX Kid

Ensign
Joined
Sep 5, 2008
Messages
993
No Title

With the help of a friend, I was able to mount the gimbal assembly to the gimbal mounting plate. As the pic shows, I used the gimbal plate with fender washers to mount it to the two lower studs instead of just using fender washers over the holes.. No I did not have it welded up! Anyway I'm making some headway.
 

Attachments

  • photo282215.jpg
    photo282215.jpg
    99 KB · Views: 0
  • photo282216.jpg
    photo282216.jpg
    108 KB · Views: 0
  • photo282217.jpg
    photo282217.jpg
    141.8 KB · Views: 0

LX Kid

Ensign
Joined
Sep 5, 2008
Messages
993
Could have, should have, would have already cut off the old motor mounts, while it on the engine stand, but "I" didn't so I guess that will be the next task. I want to get the engine back in the boat before I start putting new seals in the outdrive. Then there is still the electrical wire mess to deal with. So much time and so little motivation! LoL

Thinking I might name the boat "Cash Drain Hole".
 

LX Kid

Ensign
Joined
Sep 5, 2008
Messages
993
I put my trim pump back together just to find out that the screen on the pick-up tube is no good. Does anyone have an idea where I could get some super fine screen to make a new one. If I could find some I could put it over the pick-up and secure it with some safety wire. I know lawn mover carbs have similar screens but don't think it would be large enough.

"Oh WoW!" The "Working" warning seems to be fixed. Thanks iBoats programers!
 

Attachments

  • 20171220_191733_resized.jpg
    20171220_191733_resized.jpg
    738.4 KB · Views: 0

LX Kid

Ensign
Joined
Sep 5, 2008
Messages
993
Pretty sure I found something that will work. "Hope wifey doesn't look for it." Found this strainer in the kitchen and all I have to do is cut the screen out of the frame.

Click image for larger version  Name:	strainer.jpeg Views:	1 Size:	2.6 KB ID:	10523567
 

Attachments

  • 20171221_091428_resized (1).jpg
    20171221_091428_resized (1).jpg
    504.9 KB · Views: 0
Last edited:

Jcris

Chief Petty Officer
Joined
Apr 23, 2016
Messages
466
Hey
Lost track of you with the new website changes. How's it going with the project?
 

redneck joe

Supreme Mariner
Joined
Mar 18, 2009
Messages
10,270
Pretty sure I found something that will work. "Hope wifey doesn't look for it." Found this strainer in the kitchen and all I have to do is cut the screen out of the frame.


that tool is one of the best things in my kitchen; i would definitely notice it missing.
 

chevymaher

Commander
Joined
Mar 29, 2017
Messages
2,915
LOL I learned years ago leave her kitchen stuff alone. If i see something I can use. I make a trip to the Goodwill. They got that stuff for 50 cents or so.
 

Baylinerchuck

Commander
Joined
Jul 29, 2016
Messages
2,726
If I had a nickel for every time my wife came into the garage and found a kitchen implement sitting on my work bench.....LOL!! :behindsofa:
 

LX Kid

Ensign
Joined
Sep 5, 2008
Messages
993
What can I say about progress on the boat? Xmas, food, visiting etc and now weird cold weather moved into Florida. Dang it 34degrees out there right now! Do you really think that I'm so hard core that I would get out there and do anything on the boat? "NOT ME!"

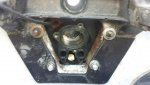
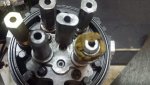
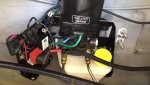
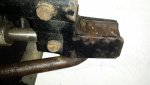
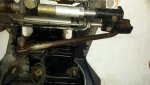
I did put the trim pump back together and tested it out. Found that one relay way bad. Ordered off ebay for $9 delivered and it seems to work great on the bench with no hydraulics on it yet. Speaking of hydraulics, what's recommended fluid used the in the SAE J1171 pump? Oil, trany fluid, etc? Not gonna use that expensive Quicksilver stuff.
 

Attachments

  • photo283164.jpg
    photo283164.jpg
    79 KB · Views: 0
Last edited:

chevymaher

Commander
Joined
Mar 29, 2017
Messages
2,915
Speaking of hydraulics, what's recommended fluid used the in the SAE J1171 pump? Oil, trany fluid, etc? Not gonna use that expensive Quicksilver stuff.

Same pump mine has. 30W engine oil is what I found they said to use. Seems to be what was in it when I got it.
 

LX Kid

Ensign
Joined
Sep 5, 2008
Messages
993
Being it was a nice day outside, I got motivated to work on the wiring. Took about 3.5 hours to get everything routed and sorted out.

Can someone tell me how the special bolt, collar and spring attach to the pilot arm? I didn't remove it so I can't figure out how it bolts on. Manuals don't really show anything. Also on the other end, of the long rod, where it attaches to the hydraulic ram is frozen or is it supposed to be that way, 3rd pic? I'm betting that it's supposed to rotate with the movement of the hydraulic ram.
 

Attachments

  • photo283537.jpg
    photo283537.jpg
    631.9 KB · Views: 0
  • photo283538.jpg
    photo283538.jpg
    617 KB · Views: 0
  • photo283539.jpg
    photo283539.jpg
    693.6 KB · Views: 0
  • photo283540.jpg
    photo283540.jpg
    782.4 KB · Views: 0
Last edited:

LX Kid

Ensign
Joined
Sep 5, 2008
Messages
993
Next is to torch the old motor mounts off and put the new ones on. The old ones are rusted beyond belief. They are almost one solid mass of metal. I'll need adjustable mounts when I start doing the gimbal assembly to the motor alignment. 20180116_135133_resized.jpg
 
Last edited:

LX Kid

Ensign
Joined
Sep 5, 2008
Messages
993
Being it was a nice day outside, I got motivated to work on the wiring. Took about 3.5 hours to get everything routed and sorted out.

Can someone tell me how the special bolt, collar and spring attach to the pilot arm? I didn't remove it so I can't figure out how it bolts on. Manuals don't really show anything. Also on the other end, of the long rod, where it attaches to the hydraulic ram is frozen or is it supposed to be that way, 3rd pic? I'm betting that it's supposed to rotate with the movement of the hydraulic ram.

I soaked the end with PB Blaster for a week and still doesn't budge. Gonna take a small ball peen hammer and tap it out of the hole and see what's to be done.
 

LX Kid

Ensign
Joined
Sep 5, 2008
Messages
993
Nobody knows what the correct assembly of this bolt and parts to the pilot arm??? There is a bolt, collar, spring,washer and nut that attaches to the gimbal pilot arm.

20180115_150946_resized.jpg
 
Top