"It Happened!" Transom has to be replaced! (NOW W/PICS)

kcassells

Fleet Admiral
Joined
Oct 16, 2012
Messages
8,598
oofa... that might be a tough weld on a caste fitting that takes all that torque. IDK. What made it crack like that in the first place? The soft transom I guess.
 

Jcris

Chief Petty Officer
Joined
Apr 23, 2016
Messages
466
I wonder if welding will be sufficient. I can't tell if the broken pieces are weight bearing but appear to be more to stabilize. I googled that drive and couldn't find anything that would give a better view. Is that aluminum? Just curious.....
Have a good holiday
 

LX Kid

Ensign
Joined
Sep 5, 2008
Messages
993
I wonder if welding will be sufficient. I can't tell if the broken pieces are weight bearing but appear to be more to stabilize. I googled that drive and couldn't find anything that would give a better view. Is that aluminum? Just curious.....
Have a good holiday

Yes it is an aluminum alloy of some sort. I was looking at the mateing surfaces and appears to have been broken a long time ago. It even looks like it may have been a casting flaw after viewing the surfaces. The bottom two holes are were the two aluminum bolts, for the anodes, go thru. I think it will weld up pretty good.
 

LX Kid

Ensign
Joined
Sep 5, 2008
Messages
993
In the mean time, before getting it welded up, I put a request to purchase one on Craigslist. You never know I just might get lucky. (Yeah, they should call me Mr. Lucky!)
 

LX Kid

Ensign
Joined
Sep 5, 2008
Messages
993
Been thinking about the gimbal plate and how to "work around" the broken piece. The bottom really has no support for the outdrive assembly. Seems it's purpose is to allow the "aluminum bolts" to pass thru the transom for the anode attachment. The four outdrive studs are what holds stress and weight of the outdrive. Thinking if I can't find a cheap plate I "might" screw the lower plate to the transom. The aluminum bolts will hold in place for proper alignment. Where it says "Here" is where I'd screw it to transom. "Ok guys go ahead and tell me how cheap I must be!"

Gimbal plate.jpg
 
Last edited:

Jcris

Chief Petty Officer
Joined
Apr 23, 2016
Messages
466
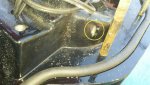
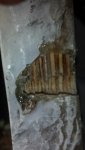
I'm hoping something will turn up on Craigslist. I can't agree that the broken area doesn't provide some support. Does the one pictured match the broken one you have? $80 seems ok, but it is used. Hmmm. If you choose to weld the original, can you add some pieces of flat bar to add support? I mean weld it (top and bottom), grind it smooth and then weld a piece of flat bar to the top? Or maybe a section of 1/8" sheet aluminum that covers the entire area of all 4 mounting points. Not sure if that will work or if I'm even making sense. lol But at $80 I'd prolly go for the used part
I looked up that NLA Marine place, looks kinda cool
You get that new phone yet?
 
Last edited:

LX Kid

Ensign
Joined
Sep 5, 2008
Messages
993
Probably wouldn't need to screw it to the transom. The break went right thru the middle of the two lower gimbal assembly stud holes. If I put large washers across the two holes it would grab top and bottom parts. The two aluminum bolts would hold at the bottom. The aluminum bolts have a low torque value so it tells me that it's only pulling in the bottom to "squish" the foam seal.
20171122_101601_resized_1.jpg th-11.jpeg
 

proshadetree

Lieutenant Commander
Joined
Jul 19, 2008
Messages
1,887
Most probably needs to be there for clamping force of the drive to the transom. Some engines don't even use inner plates like Volvo. I would replace if I could. But repair at least. The top four bolts will hold engine up.
 

LX Kid

Ensign
Joined
Sep 5, 2008
Messages
993
Think tomorrow I'll do a dry run on the assembly of the gimbal assembly & plate and to see how everything will mate up. I still, as of yet, have to remove and replace (R&R) shaft seal and gimbal bearing on the gimbal assembly before installation on the transom
 

LX Kid

Ensign
Joined
Sep 5, 2008
Messages
993
No Title

"And THEN TRAGEDY STRUCK!" R&R'd the Gimbal Assembly gimbal bearing and shaft seal as well as glued on the foam seal. Tried fitting it to the transom and just wouldn't go all the way in at the top. I assumed it was a slight adjustment of the transom holes so I ran a 9/16" drill bit thru them and "wouldn't you just know" Mr. Lucky Me cracked out the port side lower stud hole which I had repaired previously. I guess better now than later to find out it wasn't strong enough. AND as it turned out it wasn't the hole it was the keyhole rubbing on the port side of the gimbal assembly! After doing some grinding everything slid right on perfectly. Tomorrow I'll re-fiberglass the knocked out side of the hole and do a little better job this time.
 

Attachments

  • photo281371.jpg
    photo281371.jpg
    108.7 KB · Views: 0
  • photo281372.jpg
    photo281372.jpg
    148 KB · Views: 0

LX Kid

Ensign
Joined
Sep 5, 2008
Messages
993
The two upper studs, as shown above, are rusty and pitted but should hold up just the same. I sprayed INOX spray on them after sanding. Before installing on transom I'll coat them with marine grade grease.
 

LX Kid

Ensign
Joined
Sep 5, 2008
Messages
993
Good morning to whoever is watching today ! Ground down the area needing to be re-fiberglassed and added first layer of kitty hair. After hardening I'll add a second coat. Gonna try "not" replacing the gimbal plate by the method I explained earlier.
 
Last edited:

chevymaher

Commander
Joined
Mar 29, 2017
Messages
2,915
Good morning to whoever is watching today ! Ground down the area needing to be re-fiberglassed and added first layer of kitty hair. After hardening I'll add a second coat. Gonna try "not" replacing the gimbal plate by the method I explained earlier.


Afternoon to you to. I am always watching. I am just a quiet type most of the time.
 

Stumpalump

Chief Petty Officer
Joined
Dec 5, 2013
Messages
413
Why did it chip off the wood so clean? I would have thought the bond would have splintered the wood. Another vote to just weld that cracked part.
 

LX Kid

Ensign
Joined
Sep 5, 2008
Messages
993
Why did it chip off the wood so clean? I would have thought the bond would have splintered the wood.

Probably because of my lack of expertise with working fiberglass. If the gimbal plate doesn't work work out "all I would have to do is pull the whole gimbal assembly, engine, exhaust Y-tube and wiring!" "What could be more simple?"

The reason the side cracked off is because I used a 9/16" drill bit to make the hole a little larger than the 1/2" hole previously made. The drill bit bound at the end of the hole and thusly popped the repair off.
 
Last edited:

LX Kid

Ensign
Joined
Sep 5, 2008
Messages
993
Have some things to do tomorrow morning but am hoping to install the gimbal assembly to the gimbal plate. Also want to put the exhaust y-tube on after that. If things don't look stable and solid solid it will be decision time about getting the gimbal plate welded or replaced. Only had one offer from Craigslist and won't not willing to pay $100 for a used gimbal plate.
 

LX Kid

Ensign
Joined
Sep 5, 2008
Messages
993
If things go well this week, and I have help, I plan on putting the motor back in the boat. Found a nice tree limb in my front yard that will work perfectly. Need to borrow a chain hoist from the guy I borrowed it from to remove the engine. The electrical wiring is such a "patch work" of wires so I'll sort out the routing, length and solder on new connectors where needed.
 

Jcris

Chief Petty Officer
Joined
Apr 23, 2016
Messages
466
consider that a crimped connection without solder will last longer especially if you use a shrink tubing that has a sealant in it. They do make butt connectors that will shrink to seal the wire. The tool you use to crimp the butt connector is as important as anything else. You can buy good quality wire and connectors and use those crappy wire crimpers you find at most automotive parts stores only to end up with a connection that will be a problem over time. Especially in a saltwater environment.
 
Top