96 Bayliner 2050 - The Dirty Rotten Baystard

Mad Props

Lieutenant Commander
Joined
Jul 8, 2016
Messages
1,766
Thank you, and welcome aboard... there's another member on here that lives in mt wolf.

I'm no expert and I'm learning as I go but I do try and post all my findings and updates to keep it as informative as possible... I frequent others threads often to see how they did things.. this site is fantastic
 

Mad Props

Lieutenant Commander
Joined
Jul 8, 2016
Messages
1,766
No Title

Some more progress made today.. got the stringers cut to size and fitted to the hull... I used a 1/2" round over bit in the router to ease glassing over the top... I hope to get them PBed in tomorrow. Fyi, those horizontal pieces are just to set the correct spacing. They will be removed after the PB sets up. I also found some 1/4" thick weather stripping that I put on the bottoms to space them off the hull a bit.
 

Attachments

  • photo274933.jpg
    photo274933.jpg
    145.9 KB · Views: 19
  • photo274934.jpg
    photo274934.jpg
    137.8 KB · Views: 19
  • photo274935.jpg
    photo274935.jpg
    140.8 KB · Views: 19

Baylinerchuck

Commander
Joined
Jul 29, 2016
Messages
2,726
This is very informative, Thank you for sharing your restoration. I have a Regal Empress I'm thinking of restoring. This is funny because I live in MT Wolf PA and work In Dover PA.

Another south central pa restoration in the works? Awesome. Welcome aboard!!
 

Mad Props

Lieutenant Commander
Joined
Jul 8, 2016
Messages
1,766
No Title

I finally got the stringers PB'ed in... Man this took a lot of resin, plus I finally kicked my first 5 gallon bucket... Hopefully 10 more gallons is enough. I let it the PB kick off and then started grinding it smooth to try and eliminate the possibility of any air bubbles. Its really freakin hard to get into those areas with the grinder so i did the best I can, but I think what I'm going to end up doing is putting on another light coat of PB on top of what is there when I lay in my tabbing so it can fill in any of the low spots and hopefully reduce the chance of air bubbles. I'd like to do the whole stringer tabbing and capping in one session. I hope to get this done in the next couple days, then I can move on to cutting the bulkheads.

One question though... The boat was built with these two main stringers, and then forward of the gas tank was a second set made of 1/2" ply... These extra stringers ran to the front and went through the deck and formed the side walls of the bow seating area... I don't plan to do it this way.. I'm going to build the bow boxes on top of the deck.. That beind said, do you think its necessary to have these extra stringers that are only a couple inches away from the main stringers? I assume the answer is going to be yes, put them in, but just asking, cuz its going to be a huge pain tabbing in a pocket thats only a couple inches wide and 8 inches deep.
 

Attachments

  • photo275210.jpg
    photo275210.jpg
    155.3 KB · Views: 15

mickyryan

Rear Admiral
Joined
Apr 18, 2016
Messages
4,210
not sure about the extra stringers, because those two main ones look just like my well craft had them, id say you could probably go on top of plywood as long as it was thick plywood .
 

Mad Props

Lieutenant Commander
Joined
Jul 8, 2016
Messages
1,766
Well, I had a lazy night... I just didn't feel like glassing but I did get the hull vacuumed out and cut all the tabbing and caps for the stringers so everything should be ready to go...

And another question... I plan to do one layer of tabbing with 1708 and then one large up and over piece that extends beyond the first layer of tabbing... does this seem sufficient or do I need more strength.
 

mickyryan

Rear Admiral
Joined
Apr 18, 2016
Messages
4,210
might want a second tab extending 2 inches each way over first tab then do the last one 2 inches past the second and up and over :)
 

Mad Props

Lieutenant Commander
Joined
Jul 8, 2016
Messages
1,766
No Title

Just to be clear, this is what I'm proposing... sorry for the crappy phone sketch...
 

Attachments

  • photo275276.png
    photo275276.png
    125.4 KB · Views: 9

Slager

Petty Officer 2nd Class
Joined
Apr 30, 2014
Messages
189
I think it will be fine. That's very similar to what I did except I ran the first tabbing up to about 2" from the top of the stringer, then second tabbing up to but not over the top and then capped with csm. My first layer of tabbing extended roughly 3-4" onto the hull and 7-8" for the second layer.
 

mickyryan

Rear Admiral
Joined
Apr 18, 2016
Messages
4,210
i think with 1708 you would be fine but again i just like extra tabbing cause we grow em big here in florida :)
 

Baylinerchuck

Commander
Joined
Jul 29, 2016
Messages
2,726
I don't think you need to add the other stringers you mentioned above. If you look at my Chap rebuild, you'll see that what you are proposing to do is exactly how my Chap was built from the factory. Two long stringers, deck tabbed to the hull, bow seating built on top of the deck.

Two layers of 1708 tabbing is exactly what you want. I think if you go over the top of the stringer you may have a mess on your hands. Capping stringers is tough enough. It's really hard to keep the glass from bubbling up due to the sharp corners. I used plastic strips and spring clamps to hold it securely in place until the resin kicked.
 

Mad Props

Lieutenant Commander
Joined
Jul 8, 2016
Messages
1,766
No Title

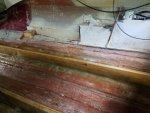
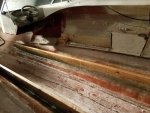
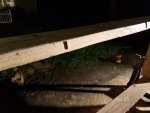
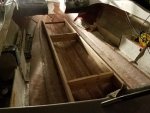
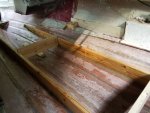
Been of lack of updates in the last few days as I've been all over the place, but I did get out last Thursday evening to get some work done. I got down the first layer of tabbing, and then I did the up and over against most better judgement lol. Overall, it went okay, but for some reason there were a lot of spots that just didn't seem to want to wet out. It kinda looks like the binder on the chop on the back of 1708 wasn't disolving. I wet out the areas before hand, and even wet out the backside of the 1708 before applying it and I still got spots that looked like that... Fortunately I didn't get many bubbles, however there are a few that are decent sizes, so I think I'm going to punture the tops with a syringe and inject resin until they are full... I'm not worried about strength here, just more a spot for water to get stuck.

So, I have what is equivalent to two layers of tabbing and that second layer is acting as a cap on the stringers, like I showed in my previous phone sketch picture. But because I ended up with some bubbles and dry looking spots I think I'm going to add a 3rd layer of tabbing just because its going to make me feel better.

I'm a little frustrated that it came out the way it did, but its my first time working with this stuff so I cant say I should have expected much better. I just don't know what I could have done differently to get the 1708 to wet out better, I literally poured resin on in these spots and couldn't get it to absorb anymore.
 

Attachments

  • photo275540.jpg
    photo275540.jpg
    160.7 KB · Views: 17
  • photo275541.jpg
    photo275541.jpg
    154.8 KB · Views: 17

kcassells

Fleet Admiral
Joined
Oct 16, 2012
Messages
8,598
So my question is did you put back the original 2 stringers you were debating about? Just wondering cause I did not read a response in that regard.
2x glass is all you need as long as it's properly installed. + tabbing x2.
 

Mad Props

Lieutenant Commander
Joined
Jul 8, 2016
Messages
1,766
I actually didn't decide yet... I was also throwing around the idea of making the bulkheads out of polyiso foam and glassing them... I'm probably going to end up doing them in wood though, just so I know they are strong enough...

The only reason I think I may put those inner stringers back in is because they make the deck span less distance where the ski locker is because it doesn't have any support under it.. Although, I guess I could just make some supports under that area instead... So many options lol
 

Mad Props

Lieutenant Commander
Joined
Jul 8, 2016
Messages
1,766
Well, last night was a little demoralizing... I spent all night grinding out bubbles, dry spots, etc... I'm still not entirely sure what went wrong.. I rolled resin on the hull and stringers, then I rolled resin on the mat side of the 1708 and then flipped it over and rolled more resin on top until it looked transparent. After pulling the boat out from under the tent yesterday into the sunlight, I didn't realize how many dry spots there were... There were a ton of spots where it looks like the binder didn't completely dissolve from the mat. I'm not sure what I did, but I know I used enough resin, I even had spots where it pooled up.

All I can say is, I'm going to try and remove all the spots that look no bueno and just go back and tab in and cap the stringers again, and just hope that I got out all the bad spots...

:facepalm:
 

kcassells

Fleet Admiral
Joined
Oct 16, 2012
Messages
8,598
Hey I hearya! boutdabubbles. I started using a flashlight while I'm working. Light shades can really play havoc. My light is minimal to say the least as I'm covered out with tarps.
KC
 

Grub54891

Vice Admiral
Joined
Jun 17, 2012
Messages
5,914
Z
are you sing a glass roller? also called a bubble buster.
 
Top