1963 Starcraft Jet restoration

Watermann

Starmada Splash of the Year 2014
Joined
Jan 12, 2013
Messages
13,753
Yeah or install an access hatch with a U shaped rigging hole for the cabling to pass through.
 

Coach Dave

Petty Officer 2nd Class
Joined
Apr 3, 2014
Messages
117
Well, it's been awhile since I posted, but I have made some progress. I've found that with my 1st boat renovation/restoration, I spend as much time thinking & figuring out things as I do working. You guys have all helped with the thinking/figuring out stuff. Anyway.........SHE'S FLIPPED! :rockon: I grabbed a couple of guys at work around lunch time and the 3 of us flipped her no problem.
IMG_20170507_125227%201_zps6j1vlnvk.jpg

My original intentions were to power wash the inside hull down to clean shiny aluminum. But the guy I'm renting the garage from hasn't turned on the outside spigots yet, and his well water doesn't have real good pressure to boot. I got some Simple Green type cleaner in a spray bottle, a scrub brush, and a 6 pack of paper towels from Walmart, climbed inside, and went to work. Got all the grime and what-not out of her bottom. Before & After:
IMG_20170507_125214_zpsgnolcamg.jpg

Then I wire brushed all the rivets, seams, and surrounding areas below waterline clean to shiny aluminum. I didn't worry about wire wheeling the areas not getting Gluvit - It is a fishing boat, and everything's getting covered with foam and decking. I did strip, clean, and wire wheel the entire bilge area between the transom and 1st bottom support rib. Then I coated all the rivets, seams, and the ENTIRE bilge area I cleaned with Gluvit. This thing should be water tight - it better be.
IMG_20170513_123629%201_zpsobdb1mrc.jpg IMG_20170513_123648_zpspgngmxdm.jpg

I got the gunnels re-installed. HEY - when you remove those, the hull loses it's shape a bit - it bows outward - who'da thunk?:noidea: I got those put back on, and installed a temporary transom so I could work on the rear deck structure. Then I removed the gunnels again, 'cause they would have hindered riveting in the lower portion of rear deck structure.
IMG_20170513_142036_zps4x8tnhxm.jpg


I got some 1 1/2" X 1 !/2" X 1/8" aluminum angle from a local wholesale supply house. About the same price as online, but no shipping costs. And it is the structural aluminum, not the architectural. I started the rear deck with the alum angle. I'm using 1/4" rivets - they're pretty stout. Since I'm not replacing the full width splash well, the aluminum framing of this deck will replace the structural strength lost by it's removal. I got the 2 full width "base" pieces installed over the 1st 2 bottom support ribs. Tomorrow, I should be able to finish rear deck structure and re-install the gunnels (those are the gunnels laying in the hull in pics below). I'm getting there - this is A LOT of work for one guy!
IMG_20170513_155036_zpsswdx087q.jpg IMG_20170513_162403_zpsgacynfsd.jpg
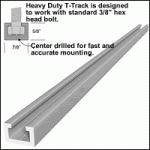
One last thing - I don't know if any one has used something similar or not. These new boats all seem to come with some sort of accessory track along the gunnels. The aftermarket ones for boats cost $$$$$$$$$$$$!!!!!!!!!. I'm a bit of a wood worker and found these T-Tracks at ttrackusa.com. They're 1/8" aluminum and accept any standard 3/8" hex bolt. $23 for a 4 ft section, and each section comes with 2 bolts and knobs. I bought 4 secrions and ordered 8 additional bolts and knobs. If the bolts rust too much, I'll cheaply replace them as needed. I can easily fab up or customize some rod holders, cup holders, tool holders, etc.
heavy_t_w_line.gif IMG_20170513_162704_zpsiudlm7lp.jpg
 

Attachments

  • IMG_20170507_125227%201_zps6j1vlnvk.jpg
    IMG_20170507_125227%201_zps6j1vlnvk.jpg
    231.2 KB · Views: 5

Watermann

Starmada Splash of the Year 2014
Joined
Jan 12, 2013
Messages
13,753
Looking good on the clean up, It's amazing how much muck ends up below deck.

Most of the older boats that have the narrow tracks on the gunnels were a slide for a bimini top so it could be pulled aft out of the way when not in use.
 

Coach Dave

Petty Officer 2nd Class
Joined
Apr 3, 2014
Messages
117
Put in about a half a day on the boat today - less than I wanted. The boy slept 'til after 10:00, had to feed him, then drop him off at his mom's at 11. Then hit Menard's for supplies - got my 3/4" ply for the transom and two 4' X 8' sheets of 1" EPS pink insulation to start with for my flotation. Grabbed some foam adhesive to secure foam, and some screws to clamp the transom pieces together.
IMG_20170514_190220_zpsjzyojqt1.jpg

I realized when measuring for the top horizontal structural pieces of aluminum angle that I'd have to install the gunnels to bring the hull back to shape for an accurate measurement. I measured down 3" from the top of the free boards for the top height of my rear deck. That'll leave me a 2" -2 1/2" lip around the perimeter of the rear deck after decking & flooring is installed. You'll see how I had to cut out the gunnels to accommodate the rear deck, and the horizontal aluminum angle ledgers riveted to the inside of the free boards to support the outer edges of the rear deck. That half circle is what's left of the hole the cable and pulley steering went through. The battery and gas tank will fit nicely underneath either side of the deck and leave a decent size center storage area. I'm thinking some built in Plano box storage, drawers, or something like in the picture (probably not that big or elaborate, but it's good inspiration). I built my own kitchen cabinets from scratch, I'm sure I can customize something to the space I'll have. The do make all stainless steel full extension drawer glides.
IMG_20170514_181927_zpspj5mcpkr.jpg IMG_20170514_182034%201_zpsrpu8tgfn.jpg 13770-52571_zpsw9edt0mt.png


Finally I did get the first top structural horizontal aluminum angle "joist" installed and riveted into the ledgers pictured above. A bit awkward laying on my back and contorted to get the rivets installed. My back and neck started to spasm, I was getting tired, and it was time to call it a day. I start making mistakes when I'm too tired. And the lawn needed mowed.
IMG_20170514_190214_zps2dvio3na.jpg

Meanwhile, I also got my over sized blanks of two 3/4" BCX plywood glued and screwed together. I went about an inch large on all sides - I'll trim it exactly after it cures.
IMG_20170514_154335_zpsigmmn5i4.jpg

Oh by the way......when your leaning over the top of the free board to drill rivet holes from the inside through the side of the boat, DON'T stand directly in line with the hole you're drilling. The bit will catch your shirt and do a real number on it.:facepalm:
IMG_20170514_200812_zpsvbzjar4w.jpg
I really am starting to see the light at the end of the tunnel.
 

Attachments

  • IMG_20170514_181943_zpsuvhnf4co.jpg
    IMG_20170514_181943_zpsuvhnf4co.jpg
    228.2 KB · Views: 2
  • IMG_20170514_181943_zpsuvhnf4co.jpg
    IMG_20170514_181943_zpsuvhnf4co.jpg
    228.2 KB · Views: 2
Last edited:

jbcurt00

Moderator
Staff member
Joined
Oct 25, 2011
Messages
24,869
Thats XPS foam, right? Not EPS, which is the stryo bead insulation an not what you want...

Havent finished reading tbe rest, yet....
 

Coach Dave

Petty Officer 2nd Class
Joined
Apr 3, 2014
Messages
117
Yeah, you're right. It was late and I was 2 beers in. It's the XPS closed cell foam - the right stuff.
 

ssdale

Starmada Splash of the Year 2016
Joined
Nov 4, 2011
Messages
285
Your really moving ahead Dave. I can't drink enough coffee to have your energy. Keep up the good work!
 

Coach Dave

Petty Officer 2nd Class
Joined
Apr 3, 2014
Messages
117
Thanks for the pat on the back. It's needed sometimes. And sometimes a kick in the arse helps also. This weather out here in NE OH has been crazy. I've probably lost at least 2 weeks to 30 and below temps and another week to being sick, and the past couple weeks haven't been ideal boating weather. That's made it a little more palatable to not being done yet. It's tempting sometimes, but I haven't taken any real shortcuts. I wanna do it right and have it safe for my boy. I thought I'd be on the water by now, but between losing that time and spending much more time on the trailer than I envisioned have me where I'm at. I don't regret the work I did on the trailer though.

BUT....I found a 1990 25 HP Suzuki DT25C with controls for $750. Plus, if you look at the pics, it has a stainless prop on it now and comes with the other two props you see on top of the motor. I figure I got at least $150 just in props. I did some research, and the Suzuki and Yamaha 25s are 3 cylinders, everyone else's 25s seem to be 2 cylinders. The horsepower rates the same, but the torque for hole shots and getting on plane is much better with 3 cylinders. These Suzuki's are supposed to be tanks also....... So I've read. My Dad worked for GM for 48 years, so I don't know what he'd think about a Japanese engine. He was cremated, so at least he aint rolling over in a grave.
FJjuUlWYAGyviHrmi_uR-eQFj7fLMM-uH7USy1QihlU9bzvEvJ_Kq7ONhpRRUH-pD8GwZdVC1ob133CYP20_WHzTb5eNvWmIveioFp1Ev-ilMcnYfN1AFtc31sMG5EbIE2GfJZ5k
Having said that, Tohatsu builds the Merc portables, and OMC sold to Bombadier. Guess you can't avoid it.

But wait - There's more! I list my 9.9 Johnson carbed up to 15HP converted to remote control on Craigslist yesterday afternoon. I don't know about where any of you live, but people ask BIG money for their outboards around here. And many of them sit on Craigslist for months. Imagine that. Anyway, I post mine as remote or tiller - electric start. $750. Guy calls me from WV this morning, hurt his shoulder and can't pull start his motor any more - wants an electric tiller. I run over grab my motor, tank, and controls, and have him meet me at work. Ended up selling it to him for $600 and I kept the controls. You know something is worth only what someone else is willing to pay for it. If I passed on the $600 (which was where I was originally willing to go to anyway), I might end up being one of those folks whose motor sits on Craigslist for months. Going to get the Suzuki 25 tomorrow. IMG_20170511_1509429741_zpsadmuem5e.jpg
IMG_20170511_1510079941_zpsfniqrmqq.jpg
 

Attachments

  • IMG_20170511_1510079941_zpsfniqrmqq.jpg
    IMG_20170511_1510079941_zpsfniqrmqq.jpg
    67.4 KB · Views: 1
Last edited:

Coach Dave

Petty Officer 2nd Class
Joined
Apr 3, 2014
Messages
117
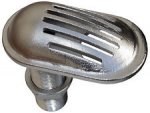
Question: I want a seacock or ball valve on my boat for the livewell pump input. Brass + Aluminum = BAD NEWS. Plastic? I've read bad things about Marlon. If I use a stainless steel through hull fitting then connect a brass ball valve to that inside the boat then connect my tubing to the ball valve, would that work? The brass would then be isolated from the aluminum hull. How to you guys handle seacocks/ball valves in your aluminum boats? I don't want a catastrophic failure obviously.
 

Coach Dave

Petty Officer 2nd Class
Joined
Apr 3, 2014
Messages
117
I tell you what, I've been shopping used motors forever it seems. That is the best deal I've come across, and the extra props are a huge plus. Don't have to buy a spare now.

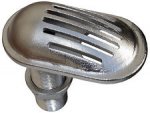
And.....I answered my own question. I just picked these up in stainless steel plus a dual port live well pump. I'm gonna hook up a wash down hose on the 2nd port to spray the fish blood and guts and catfish crap off the boat. I've had catfish poop on me enough times to know better. That's got me thinking......If I'm gonna hose down the boat, I better install a drain to the bilge area in the back of the boat in front of the rear casting deck.

prod_18129229907.jpg mdj5RJt3liYVs45BOLAEgKQ.jpg
 

Attachments

  • prod_18129229907.jpg
    prod_18129229907.jpg
    5 KB · Views: 0
  • mdj5RJt3liYVs45BOLAEgKQ.jpg
    mdj5RJt3liYVs45BOLAEgKQ.jpg
    10.5 KB · Views: 0

Watermann

Starmada Splash of the Year 2014
Joined
Jan 12, 2013
Messages
13,753
Oh I see where you're going with the set up.

Yeah check the props pitch, they could be ones that were the wrong pitch that the PO bought.Most AL props are over $100 and SS nearly 3 times that amount so most guys don;t go buying lots of extras ones all the same pitch.
 

Patfromny

Lieutenant Junior Grade
Joined
Dec 2, 2012
Messages
1,197
I'd stick with aluminum if you are lake using the boat. Stainless is less forgiving when you hit something and you'll be buying a lower unit instead of a new prop. I'm sure this is a huge argument somewhere but this is my opinion. Take it for what it's worth and what you paid for it. Lol. Stainless will not give you any noticeable performance increase on such a small engine. Not a whole lot of flex coming from a 25 hp. Good luck with the new engine. Sounds like you're on your way.
 

Coach Dave

Petty Officer 2nd Class
Joined
Apr 3, 2014
Messages
117
You know a guy from work told me the same thing about ripping up my lower unit if I hit something with a stainless prop. Gonna have to ponder on that. It is a Ballistic Stainless prop. That's probably a $2-$300 prop. The original aluminum prop plus what looks like a brand new aluminum prop he probably originally bought as a spare came with it. Maybe I'll do a test and see if the stainless does increase performance. If not, it'll be a fancy spare.

This deal just keeps getting better though. The dealer wasn't sure what year the motor was, they just took it in from a customer. Seemed strange, but these guys are pretty easy going, and honest too. I thought it was a 1990 model 'cause of the price and the 1st digit after the dash in the serial # was a zero. I jumped onto the internet to look for parts sources, and found out it is definitely a 2000 model. Same zero after the dash, but the serial # ranges make it 100% a 2000 model :whoo:Life is good sometimes.

My Model # DT25C, serial # 02507-032*** Below is the from the serial # chart from Brownspoint:

200002507-030001DT 25MCSY
DT 25MCLY
DT 25CESY
DT 25CELY
DT 25CRSY
DT 25CRLY
[FONT=&quot] [/FONT]
I did run out and pick it up this morning, it runs PERFECT! It could use a fresh coat of paint on the lower unit - it's a little spotty- looks like the PO had his boat docked. I'm really excited, it should push that boat mid-high 20s for sure, maybe 30 MPH. While browsing around their shop waiting for them to load it up, I saw what looked like a used Panther electric trim and tilt - Model 40 I believe. Asked them what was up with that, and they said they sold it to a guy that switched engines right after installing it, and they took it back on trade. Said I could have it for $350. It looks brand new. I believe those things run close to $600 brand new. I'm really tempted. This boat toys shopping is like Heroin - addictive and hard to resist.
 
Last edited:

Coach Dave

Petty Officer 2nd Class
Joined
Apr 3, 2014
Messages
117
So where'd I leave off? Been putting some hours in since last post. Anyway, in the spirit of not taking any shortcuts, I peeled back that aluminum strip that ran the length of the bottom at the center of the ribs.
IMG_20170516_190548_zpsdtbhw9c3.jpg
Sure enough, there were rivets under there that didn't get sealed. I cleaned the area under that strip & wire wheeled every rivet and seam to shiny aluminum. I've been mixing up my Gluvit as needed from the quart I bought, and had enough to put a HEAVY coat on those and a 2nd thinner coat on all the others previously coated. I should be good to go below the waterline.
IMG_20170516_203117_zpsnoa0kpou.jpg
Then I got the back structure of my back casting deck finished with the 1/8" aluminum angle.
IMG_20170520_183251_zpshm4mqfhx.jpg
BIG DECISION I have been contemplating all along. Finally just went for it. Cut my gunnel caps down to about 2" at their most narrow. Measured from the inside (towards the inside of the hull) of each gunnel cap, struck a chalk line, and ripped away with a circular saw. DEFINITELY wear eye protection when doing this! I was wearing the old school full goggles like we wore in Middle School woodshop, and I coulda/shoulda had a full face shield. Felt like getting hit with bird shot. You know, these frickin' Millenials 'round here didn't have wood or metal shop, or sewing class, or home economics in school - I know - I've raised one. They can't do anything for themselves. I told my boy he better make A LOT of money, 'cause he's gonna have to pay someone to do everything for him. But I digress, I calculated I picked up 5 to 6 sq. ft. of space just in the cockpit area. Definitely worth it on a boat this size where space is at a premium. Before & After:
IMG_20170514_181927_zpspj5mcpkr.jpg IMG_20170520_185835_zpsbvsdsi5m.jpg
On to the main cockpit flooring supports. I picked up some 1" aluminum square tubing, cut to length and I used stainless 1 1/2" self tappers to secure on each end into the top of the ribs. Then I cut, fit, and spot glued my 1" foam between each rib, leaving a channel for water to find it's way to the bilge. The brick is holding down an uncooperative piece of foam 'til the adhesive sets. Had to do that to a few pieces.
IMG_20170520_211539_zps8ht1fxtk.jpg IMG_20170520_192654_zpsgh3yyhsy.jpg
I knew I'd have to support the floor supports at least in the center. So I took the pieces of gunnel cap I had sawed off and cut 2" strips to make L brackets. I thought that would be enough, but when I tested it, you can see the result - bent supporting my body weight:
IMG_20170521_132716_zpsjr7odzdn.jpg
So I measured and cut a piece of the 1" square tube for each floor support, fit it snugly between the support and rib, then riveted it securely through the brackets I made. Strong like bull now. Once I get the plywood installed, it should make it even more solid and distribute the loads evenly across all the supports.
IMG_20170521_135320_zpscujkkc8s.jpg
Finally, I got the transom blank cut and fitted. It took a few adjustments, but she fits like a glove! The 25 HP Suzuki motor I got IS a short shaft like the one it replaced. I wanted to keep the transom as tall as possible for as far as possible, so I measured the engine mounting bracket and the swing area of the steering arm connector, then cut my transom notch to that dimension. then got my first coat of 2 part Epoxy on it. I shot 4 screws into the top of my saw horses to support the wet side of the transom so I could flip it and do both sides. For the edges of the plywood, I mixed in some Cabosil into the Epoxy 'til it was a Vaseline consistency. That filled in any small voids and kept it from simply dripping off. I'll get my 2nd coat on one night this week.
IMG_20170521_190805_zpspvybawgo.jpg IMG_20170521_193331_zpskfmmb0vr.jpg
I'm beat, my right hand is constantly numb, my feet hurt, and I groan every time I get up from my chair. But I keep going back. Promised the boy. One bright spot: the boating weather has sucked for the most part here in NE Ohio. Transom installed permanently, wiring, and plumbing next before floor boards go in. Oh....and I gotta get the front casting deck structure built.
 

Attachments

  • IMG_20170514_181927_zpspj5mcpkr.jpg
    IMG_20170514_181927_zpspj5mcpkr.jpg
    252.3 KB · Views: 2
  • IMG_20170520_192654_zpsgh3yyhsy.jpg
    IMG_20170520_192654_zpsgh3yyhsy.jpg
    166.5 KB · Views: 3
  • IMG_20170520_192654_zpsgh3yyhsy.jpg
    IMG_20170520_192654_zpsgh3yyhsy.jpg
    166.5 KB · Views: 1
  • IMG_20170520_192654_zpsgh3yyhsy.jpg
    IMG_20170520_192654_zpsgh3yyhsy.jpg
    166.5 KB · Views: 0
  • IMG_20170520_192654_zpsgh3yyhsy.jpg
    IMG_20170520_192654_zpsgh3yyhsy.jpg
    166.5 KB · Views: 1
  • IMG_20170520_211555_zpsofa5fogz.jpg
    IMG_20170520_211555_zpsofa5fogz.jpg
    205.2 KB · Views: 2
  • IMG_20170520_211555_zpsofa5fogz.jpg
    IMG_20170520_211555_zpsofa5fogz.jpg
    205.2 KB · Views: 2
  • IMG_20170520_211539_zps8ht1fxtk.jpg
    IMG_20170520_211539_zps8ht1fxtk.jpg
    230.7 KB · Views: 2
  • IMG_20170520_183251_zpshm4mqfhx.jpg
    IMG_20170520_183251_zpshm4mqfhx.jpg
    251.9 KB · Views: 2
  • IMG_20170520_183251_zpshm4mqfhx.jpg
    IMG_20170520_183251_zpshm4mqfhx.jpg
    251.9 KB · Views: 1
  • IMG_20170520_183251_zpshm4mqfhx.jpg
    IMG_20170520_183251_zpshm4mqfhx.jpg
    251.9 KB · Views: 0
  • IMG_20170516_190548_zpsdtbhw9c3.jpg
    IMG_20170516_190548_zpsdtbhw9c3.jpg
    252.6 KB · Views: 0
  • IMG_20170516_190548_zpsdtbhw9c3.jpg
    IMG_20170516_190548_zpsdtbhw9c3.jpg
    252.6 KB · Views: 1
  • IMG_20170516_190548_zpsdtbhw9c3.jpg
    IMG_20170516_190548_zpsdtbhw9c3.jpg
    252.6 KB · Views: 0
  • IMG_20170520_185835_zpsbvsdsi5m.jpg
    IMG_20170520_185835_zpsbvsdsi5m.jpg
    214.7 KB · Views: 3

Watermann

Starmada Splash of the Year 2014
Joined
Jan 12, 2013
Messages
13,753
You're really gaining some momentum in the rebuild. :encouragement:

So where did you hear that gluing the foam to the bottom of boat was the way to go? Just curious because if / when water gets trapped underneath the foam board it's an area that could start the corrosion process.

I agree with you on the millennial generation that's why I started my boy off working on his own vehicles, now he's a trade schooled European import car mechanic that works on Mercedes, BMW, Audi and the like.
 

Coach Dave

Petty Officer 2nd Class
Joined
Apr 3, 2014
Messages
117
You're really gaining some momentum in the rebuild. :encouragement:

So where did you hear that gluing the foam to the bottom of boat was the way to go? Just curious because if / when water gets trapped underneath the foam board it's an area that could start the corrosion process.

I agree with you on the millennial generation that's why I started my boy off working on his own vehicles, now he's a trade schooled European import car mechanic that works on Mercedes, BMW, Audi and the like.


I just "tacked" it with a glob of glue in each corner, I didn't want it moving around on me while I worked above it, and wanted to make sure the channel down the center was maintained after it was all covered up in case it shifted.

My boy was all about sports, especially baseball. I coached/trained him from a youngster. Kid was a REALLY good lefty center fielder lead off hitter - Ichiro like. Threw a no hitter his first Varsity start. At 5'9" and 120 lbs he didn't have many options after high school. Class President his Sr. year. He does coach his High School baseball team now and plays in adult leagues - He absolutely LOVES the game. He didn't have enough aptitude or interest in being a handy man of any sort. I tried :facepalm: You pick your battles.

This whole BS of the Gov't/Society/Student Loan lenders pushing college on our kids and racking up all that debt is exactly that - BS. A good tradesman around here makes more than most college grads - WITHOUT the debt. That's if your college grad stays in this area. We have a big brain-drain where I'm from.
 
Top