'76 Holiday i/o 18' Fishing Rebuild (pic heavy!)

italianstal27

Chief Petty Officer
Joined
Feb 18, 2017
Messages
403
Doing the shift adjustments last night.... I think we're close but shifting into reverse doesn't allow the prop to spin. SUPER rough.

Need to pull it apart, measure 6" exactly on the lower, then allign the upper, and see if that works. Since the boat is '76, I'm not 100% sure if this sterndrive uses the 5 7/8" or 6" lower shift adjustment. Actually may head over to the mercruiser forum again...

But the steering is attached! Way easier than I thought it would be...

-John
 

Pusher

Lieutenant
Joined
Sep 2, 2014
Messages
1,273
Phew, you guys are making some progress! I'm glad the theives haven't been back and hoping jack frost stays at bay until you can splash. I think we had our first frost on the 4th up here in Yakima.

Btw, I ran green LEDs (to match the boat) under the gunnels and really like it. I bet you're night vision will be happy with the red lights! If you have problems with the led strips staying adhered to the 5200 in the hull you can run it inside some clear vinyl tubing. It seems to be working well so far.
 

italianstal27

Chief Petty Officer
Joined
Feb 18, 2017
Messages
403
Wyatt reached out to the previous owner and got some pics from before!

OldBoat1.jpg
OldBoat4.jpg
OldBoat3.jpg
OldBoat2.jpg
 

Attachments

  • OldBoat1.jpg
    OldBoat1.jpg
    165.8 KB · Views: 1
  • OldBoat4.jpg
    OldBoat4.jpg
    147.3 KB · Views: 1
  • OldBoat3.jpg
    OldBoat3.jpg
    138.4 KB · Views: 1
  • OldBoat2.jpg
    OldBoat2.jpg
    208.9 KB · Views: 1

italianstal27

Chief Petty Officer
Joined
Feb 18, 2017
Messages
403
Cleaned gas tank by swishing gas 4 or 5 times. Put the now "bad" gas into the tractor lol.

Fuel sender is bad :'(

Wired it up last night and not working, but gauge pegs when grounded. Took the sender apart, and the rivet holding the wire in place had corroded away, so ordering a new one rather than trying to solder it back together :)

Added a 60A breaker between the alternator and the dash.

Main disconnect is now 5200'd and screwed to our "sacrificial" piece of wood hanging on the transom.

Piece of starborard (1/2") arrives today! So we get to mount the fish transducer & speedometer. We're definitely "questionable" on how gimicky these speedos are...

Steering wheel is attached and in! We realized that because of that notch, there really isn't a way to get the steering wheel "straight" when the sterndrive is straight. Minor concessions. Steering feels ok. Definitely a little on the stiffer side, but nothing to be unhappy about. You can really feel the parts moving ;)

Trim limit switch still not working. Switch works when pushing both buttons to trailer up, but just pushing the up button isn't working.

Tried shorting the blue and purple wire coming off the switch, and that didn't seem to work either... So more exploration is needed. The wires are heavily corroded.

-John
 

italianstal27

Chief Petty Officer
Joined
Feb 18, 2017
Messages
403
We didn't make it into the water :/

Now shooting for Saturday again...
IMG_20171015_175444.jpg

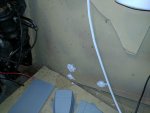
the fuel sender didn't match the holes on this tank... so we got 3 screws in as well as we could, and used 5200 around the edges to prevent water vapor intrusion. It's a 12 gallon tank, so we're looking to upgrade in the future anyway.

IMG_20171015_175454.jpg

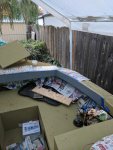
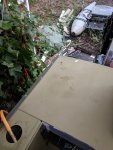
Wyatt got the epoxy painted in the bow (it's getting cold these nights so hopefully it'll be semi cured in 5 days). We're still trying to figure out color schema. You can see the holes in the bow raised deck where we attached it to the wood below. Those also need to be filled with 5200. IMG_20171016_183624.jpg

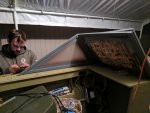
Got the windshield alligned. It may be off by 1[SUP]o[/SUP] towards port, but we can't be picky these days... It's a 1976 boat with 2 center consoles made by hand from plywood. It's probably impossible to get it to allign 100% perfect. But the windshield closes very very well, so we're calling that a win.

IMG_20171016_212957.jpg

And per watermann's suggestion we used the automotive / marine gasket from home depot. Snugged it down just a little and called it a day. Need to get more gasket for the starboard side. We're 1' short.

To attach the windshield, we used 1/4" bolts. The bolt head doesn't slide into the channel well. So, we ground down the bolt head with a bench grinder wheel (lots of sparks!!!) and then they slid right in! The windshield will get 1 rivet where Wyatt is, and then we'll e done with it minus support pieces.

IMG_20171015_191311.jpg

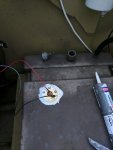
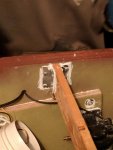
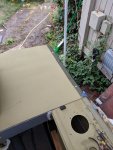
We ordered 1" starboard 12"x12" section online, and used 1/4" bolts to attach it to the hull with copious amounts of 5200. We also took a die angle grinder, and removed a rectangle of paint. Overkill yeah, but the 5200 bonds to aluminum better than paint ;)

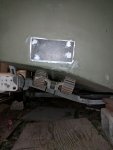
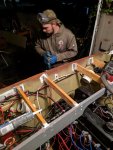
Our piece is 8"x4". I wouldn't go any smaller!!!! If anything we should have made ours a little bigger, but that's just how you learn. We're mounting a speedo and a fish finder to it.

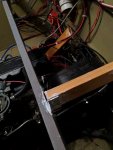
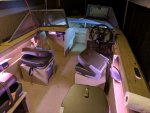
And here's the interior: If you look at the bottom you can see JUST a wee bit of 5200 under the Z channel for the transom. That's because our plate was a little low. Anyway, it's the same thing as before. Drill the hole. Have someone with a piece of wood on the backside of where you are drilling so it doesn't blow out the plywood! Take an old rivet, and spread 5200 around inside the hole, thoroughly. Put 5200 on the bolt head, and push firmly until the 5200 squeezes out. Attach on the backside with a washer and nut. Don't overtighten, or you'll crack the epoxy.

IMG_20171015_191321.jpg


IMG_20171016_183635.jpg

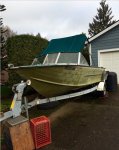
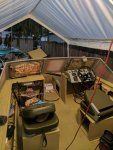
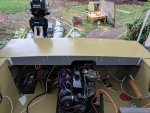
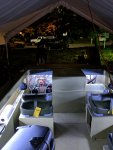
And here's a wider shot of the interior mock up (sorry this picture should be closer to the top). Coming along!!

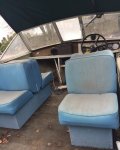
OH! And we got the Scotty low profile tracks riveted to the gunnel!! Check out the bottom port side of the picture. I should get another pic of that taken tonight.

-John
 

Attachments

  • IMG_20171015_175444.jpg
    IMG_20171015_175444.jpg
    102.3 KB · Views: 1
  • IMG_20171015_175454.jpg
    IMG_20171015_175454.jpg
    147.3 KB · Views: 1
  • IMG_20171016_183624.jpg
    IMG_20171016_183624.jpg
    141.1 KB · Views: 1
  • IMG_20171016_212957.jpg
    IMG_20171016_212957.jpg
    119.3 KB · Views: 1
  • IMG_20171015_191311.jpg
    IMG_20171015_191311.jpg
    104.5 KB · Views: 1
  • IMG_20171015_191321.jpg
    IMG_20171015_191321.jpg
    98 KB · Views: 1

Watermann

Starmada Splash of the Year 2014
Joined
Jan 12, 2013
Messages
13,753
Sounds like you had some work left to do and the splash plans were a bit premature. I hope the weather holds out for you this weekend, things are getting unpredictable this time of year here in the PNW.
 

Pusher

Lieutenant
Joined
Sep 2, 2014
Messages
1,273
If you need to do anymor starboard pieces you don't need to bolt them on. 5200 is plenty strong. Yours will never come off now though. Nut some accessories on and your off tot he races.

That low profile is looking good. I'm looking forward to a fuller pick 👍
 

italianstal27

Chief Petty Officer
Joined
Feb 18, 2017
Messages
403
Engine is now having trouble shifting into neutral. ugh. Will probably adjust the choke back a little and see if choking it helps. At idle, is the choke slightly closed or fully open? I've read running on muffs makes it difficult to control temp so it's possible that is contributing to the temp / choke balance?

Anyway here's pictures of the progress:
IMG_20171020_194258.jpg

Transom camp scaffolding going in. Tons of rivets and 5200...

IMG_20171020_190050.jpg

3/4" screws into the transom with 5200... Rivets through the epoxied wood and angled aluminum.

IMG_20171020_190056.jpg
Small gap between the supports... we didn't want the wood pushing on the grey support.

IMG_20171021_101759.jpg

Doing a mockup of the cap. The only problem we have with the install is the exposed aluminum by the gunnels on both sides. That'll have to get painted.

IMG_20171022_114249.jpg

Transom cap riveted down on both sides. The starboard side needed more rivets because the original holes didn't line up. We also had difficulty bending the gunnel back into position after removing the transom. So it sticks up a little...

IMG_20171022_114255.jpg

Port side....

IMG_20171022_120717.jpg

We put 5200 on the non-painted supports and used water jugs + metal to push the transom cap onto the supports. Let it dry for 24 hours. Hopefully it'll hold up!

Tonight, we'll cut the holes for gas fill, 2 blower exhausts, and white navigation light.

at this point we're ready to splash, so we're planning on Thursday.

Hopefully we can get the engine idling... Right now it's not doing below 1200 RPM.

-John
 

Attachments

  • IMG_20171020_194258.jpg
    IMG_20171020_194258.jpg
    143.1 KB · Views: 1
  • IMG_20171020_190050.jpg
    IMG_20171020_190050.jpg
    100.9 KB · Views: 1
  • IMG_20171020_190056.jpg
    IMG_20171020_190056.jpg
    106.4 KB · Views: 1
  • IMG_20171021_101759.jpg
    IMG_20171021_101759.jpg
    159.8 KB · Views: 0
  • IMG_20171022_114249.jpg
    IMG_20171022_114249.jpg
    150.5 KB · Views: 0
  • IMG_20171022_114255.jpg
    IMG_20171022_114255.jpg
    151.6 KB · Views: 1

italianstal27

Chief Petty Officer
Joined
Feb 18, 2017
Messages
403
So got a photo tach! Measured the strobes off our timing light for each cylinder, and then measured the harmonic balancer (the one with the notch in it), with a photo tach and they match almost perfectly...

750 RPM with no engine cover just seems REALLY fast....

Only odd thing is the tach, to get to 750RPM, needs to be set at the #4 position, which is supossedly a 10 cylinder engine... But putting it on the #4 slot gets us at 750 RPM exactly...

Anyone ever had weird tach problems like this before?

But you gotta trust the timing light + the photo tach right?

-John
 

italianstal27

Chief Petty Officer
Joined
Feb 18, 2017
Messages
403
Blowers done, stern light done, gas fill cap and gas line done, tach is now at the right speed (still a little uncertain but we'll see), and wiring is done!

Better pics to come, but here's the starboard side. Rivets were enough to suck down the blower vent caps...

SternLight.png
-John
 

italianstal27

Chief Petty Officer
Joined
Feb 18, 2017
Messages
403
Left to do tonight: screw plastic backing on dash, put winshield on starboard side, winch boat out, get it clean, and install the 1/2" vent for the gas tank.

That's it! Splashing tomorrow?!
 

italianstal27

Chief Petty Officer
Joined
Feb 18, 2017
Messages
403
More pics!

IMG_20171025_211858.jpg


IMG_20171025_212415.jpg

IMG_20171025_212311.jpg
IMG_20171025_212351.jpg
IMG_20171025_212338.jpg
 

Attachments

  • IMG_20171025_211858.jpg
    IMG_20171025_211858.jpg
    121.3 KB · Views: 2
  • IMG_20171025_212415.jpg
    IMG_20171025_212415.jpg
    127.6 KB · Views: 2

kcassells

Fleet Admiral
Joined
Oct 16, 2012
Messages
8,600
Man I feel like ordering a pizza. :) Keep it up you'll be on the water licketysplit.
 

Watermann

Starmada Splash of the Year 2014
Joined
Jan 12, 2013
Messages
13,753
If you can't get the idle down with the carb adjustment start looking at the timing.
 

italianstal27

Chief Petty Officer
Joined
Feb 18, 2017
Messages
403
Bad news.

Hydraulic line same loose from the trim cylinder and will not tighten. Feels like the threads are stripped... Going to try and use JB weld to seal it up. We really don't want to put more coin into this stupid pre alpha drive.

-John
 
Top