Complete Restoration of 1982 Galaxy 16' bowrider with Mercruiser and Pre-Alpha

devildogae

Petty Officer 2nd Class
Joined
Jan 14, 2017
Messages
147
No Title

I was able to take the gimble housing apart, clean up, prime and paint. The lower gimble ring swivel pin was rusted in, and was not coming out. I had to cut it three times, and I still broke the upper ear. I got it back with some JB Weld, and I know I might get some slack, but It will hold great. I built it up on the sides for extra strength also. Going to replace all hardware.
 

Attachments

  • photo266656.jpg
    photo266656.jpg
    88 KB · Views: 0
  • photo266657.jpg
    photo266657.jpg
    94.6 KB · Views: 0
  • photo266658.jpg
    photo266658.jpg
    91.3 KB · Views: 0
  • photo266659.jpg
    photo266659.jpg
    382.4 KB · Views: 0

devildogae

Petty Officer 2nd Class
Joined
Jan 14, 2017
Messages
147
No Title

Got the transom gelcoat applied and finished. It's snow white, much whiter than the gelcoat the boat currently has. So I'm going to look into getting matching gelcoat for the areas that will be seen. I'm not finished, need to gelcoat a lot more. No wax on stringers. I will put waxed gelcoat on the sides of the stringers, but not the top, so I can get good adhesion.
 

Attachments

  • photo266708.jpg
    photo266708.jpg
    101.7 KB · Views: 1

devildogae

Petty Officer 2nd Class
Joined
Jan 14, 2017
Messages
147
No Title

Just a few pics of the engine as it sits right now. will be getting more blue paint and more new parts soon. Not many old parts have been used on this build.
 

Attachments

  • photo266711.jpg
    photo266711.jpg
    92 KB · Views: 0
  • photo266712.jpg
    photo266712.jpg
    102.6 KB · Views: 0

devildogae

Petty Officer 2nd Class
Joined
Jan 14, 2017
Messages
147
No Title

Got the engine installed in the boat so I could figure out the front motor mount. Did an alignment while on the hoist and now I have the measurements. So installed the front motor mount, glassed it in. I then put down two coats of gelcoat to the middle of the boat, first unwaxed, and second waxed. Cut some water drainage holes and gelcoated.

I next proceded to mock up the floor with foam board from lowes. $11 each and I only needed two. I then took those templates and cut the 1/2" exterior grade ply. I got those fitted in the boat to where I am happy.

At lowes they had some thompsons water seal and stain on discount. $9 for a gallon, so I bought it. I went and put down a very thick coat of that on the bottoms of the deck. After that was dry, I coated the bottoms with poly resin. I think I'm going to shoot with hardened enamel paint as well. A few pics.
 

Attachments

  • photo268494.jpg
    photo268494.jpg
    95.7 KB · Views: 1
  • photo268495.jpg
    photo268495.jpg
    87.6 KB · Views: 1
  • photo268496.jpg
    photo268496.jpg
    127.3 KB · Views: 1

Baylinerchuck

Commander
Joined
Jul 29, 2016
Messages
2,726
I would be a little concerned about the poly over the Thompson's......actually mainly concerned about the Thompson's. Doesn't Thompson's contain silicon? Poly resin without glass has nothing to bind it together. Just curious as to why you didn't glass the bottom side instead of the sealer/poly/paint combination. Also I wonder if the Thompson's will allow whatever you're using to glue the deck to the stringers, to properly adhere.
 

devildogae

Petty Officer 2nd Class
Joined
Jan 14, 2017
Messages
147
I would be a little concerned about the poly over the Thompson's......actually mainly concerned about the Thompson's. Doesn't Thompson's contain silicon? Poly resin without glass has nothing to bind it together. Just curious as to why you didn't glass the bottom side instead of the sealer/poly/paint combination. Also I wonder if the Thompson's will allow whatever you're using to glue the deck to the stringers, to properly adhere.

I hope it's not a problem, I didn't even think about silicone and poly resin. I plan on putting a layer of CSM over the bottom now. It will be a few days before I can do anything else. I will see if it has adhesion issues thus far. I might end up sanding it down, we will see. I will be using PL Premium quick grab for the floor to stringers joint and was planning on PB for the hull to deck joints with 1708 tabbing.
 

devildogae

Petty Officer 2nd Class
Joined
Jan 14, 2017
Messages
147
I also have putting wood tabbing to the stringers in case I decide to use SS screws to attach the deck I have a few more to install.. You can see that here. Gelcoat done here also. ge1.jpg
 
Last edited:

devildogae

Petty Officer 2nd Class
Joined
Jan 14, 2017
Messages
147
No Title

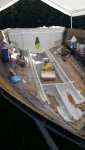
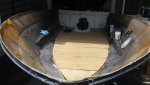
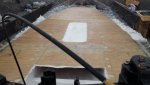
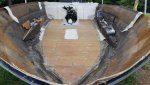
Ok, I have some progress to report. I HAVE A DECK!!!! Can't express how happy I am that I have a secured deck to the boat. I filled the compartments outside of the ski locker area with closed cell foam. I attached cleats to the stringers with quick grab PL glue that's 8X stronger. I liked it so much I decided to use the PL glue to attach the stringers to the deck. I also used 2.5 inch SS screws to attack deck to cleats. with some regular PL glue on top of the cleats. Hey, I have it laying around, so why not use it right!! I drew lines on the deck to know where the cleats were located for my screws. I put 1 more layer of foam right before I laid the deck down over the PL glue for more adhesion. Coated the SS screws with 5200 and secured the deck down. I had to screw into the stringers once of each stringer in the aft because the extra glass I put at the transom/stringer location, there was a gap. That went against my plan to not compromise the stringer fiberglass integrity, but had no choice. I put liberal amounts of 3M 5200 around that area.

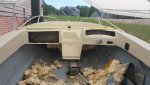
I then proceed to cut pieces of foam 1/4" and put around the deck perimeter so the deck didn't contact the hull. I made up some PB resin and went around the boat securing the deck to hull joint. At this point I needed to decide on the deck coverings. Either tab the deck with 1708 and CSM, or 1708 entire deck and CSM over that. I decided to use the glass I had, thus not wasting much. So I put down 1708 over the entire deck and into the hull for my tabbing. I have some hull sections I couldn't reach, and I have some more left over for more, stronger tabbing in some places I will put down next. The entire deck took about 1 gallon of resin. I will put down 1 layer of CSM next and it will be ready for paint.

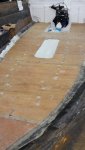
I have to report that I have excellent adhesion on the underside of my deck. I cut the ski locker out and inspected the glass. It's solid. I didn't wait for the thompsons waterseal to dry before I put down resin to coat. I'm thinking that was my saving grace.

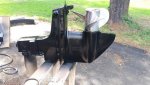
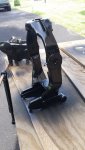
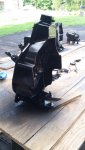
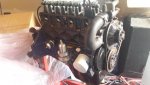
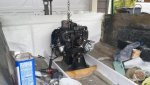
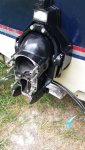
I also took some time to attach my bellows and install my bell housing onto the gimbal ring. I fought with those bellows for hours. That's a job I really disliked. I'm still not sure I did it correctly, but I got them all on and clamped down. After putting bellows adhesive on both sides and waiting 10 or more min, it was so difficult to move them over the flanges. It grabbed instantly. I did get them all clamped down well, but I'm not sure if the main drive bellows is 100% seated in the groves at the transom side. I put the bellows on the bell housing side first since I had better access (perceived) to the clamps. I did attach the new shift cable and shift cable bellows to the transom before. So the main bellows and exhaust bellows were the ones I struggled with. I think its secured down well, but I will have to float it to be 100% sure.

So here is my question:
- I have totalboat non-skid paint

Should I gelcoat the deck and up the sides, or just paint the deck and sides with the non-skid. Will they provide the same amount of protection? Should I use wax in the final CSM layer? Wondering if that would cause problems for the paint. Or use the wax and then wipe the deck down liberally with M.E.K or Acetone to remove the wax. I really need some advice on this.
 

Attachments

  • photo269960.jpg
    photo269960.jpg
    93.4 KB · Views: 1
  • photo269961.jpg
    photo269961.jpg
    86.9 KB · Views: 1
  • photo269962.jpg
    photo269962.jpg
    89.1 KB · Views: 1
  • photo269963.jpg
    photo269963.jpg
    100.6 KB · Views: 1
  • photo269964.jpg
    photo269964.jpg
    119 KB · Views: 1
Last edited:

devildogae

Petty Officer 2nd Class
Joined
Jan 14, 2017
Messages
147
Also guys, I want to put new back to back lounge chairs in, but I don't really want to screw them into the deck. Anyone have experience securing these down without putting screws into the deck. I'm open to ideas. Same will go for the aft jumper seats.
 

Baylinerchuck

Commander
Joined
Jul 29, 2016
Messages
2,726
So here is my question:
- I have totalboat non-skid paint

Should I gelcoat the deck and up the sides, or just paint the deck and sides with the non-skid. Will they provide the same amount of protection? Should I use wax in the final CSM layer? Wondering if that would cause problems for the paint. Or use the wax and then wipe the deck down liberally with M.E.K or Acetone to remove the wax. I really need some advice on this.

No wax necessary on the final CSM coat. Top coating with gelcoat or paint will be just fine. If you use wax, you will have to sand and acetone prior to top coating.
 

Baylinerchuck

Commander
Joined
Jul 29, 2016
Messages
2,726
Also guys, I want to put new back to back lounge chairs in, but I don't really want to screw them into the deck. Anyone have experience securing these down without putting screws into the deck. I'm open to ideas. Same will go for the aft jumper seats.

I was in the same boat....ok not literally. I minimized the penetrations into the floor using composite angles. You could epoxy the angles to the floor. I chose to attach mine with PL and stainless screws. Water is not getting in. Last or next to last page of my Chaparral thread.
 

devildogae

Petty Officer 2nd Class
Joined
Jan 14, 2017
Messages
147
No Title

OK Iboat community, I need some serious help. I got myself into a pickle. I'd like some advice on how to fix my hull!!

Story - I didn't support the front of the hull enough during my rebuild resulting in the keep sinking down, and the sides bowing out. I went to put the cap back on and it's short front to back, but also, would not fit once I was pushing the hull under the cap. The hull started to crack. I made the decision to cut into the hull, I made a relief cut straight down. Once I did that I was able to use straps to get the hull under the cap, but only once I cut some of the top of the hull off also. The hull is overlapping. What's the best way to go about fixing this.

Plan - Grind the overlapping edge flush inside. Use marine epoxy and 1708 to build back up and much more on the inside, use polyester resin PB for gap on the outside and getcoat over that.

Only thing that's I'm really worried about is will that hold up to the stress?
 

Attachments

  • photo273958.jpg
    photo273958.jpg
    390.5 KB · Views: 0
  • photo273959.jpg
    photo273959.jpg
    304.7 KB · Views: 0
  • photo273960.jpg
    photo273960.jpg
    132.8 KB · Views: 0
  • photo273961.jpg
    photo273961.jpg
    138.6 KB · Views: 0
  • photo273962.jpg
    photo273962.jpg
    128.5 KB · Views: 0

Baylinerchuck

Commander
Joined
Jul 29, 2016
Messages
2,726
You definitely do not want to use epoxy if you are going to use polyester resin as a filler. Polyester resin and 1708 will hold up. With this kind of repair, you'll need to fiberglass both sides. Grind down the overlap on both sides. Let's see if others will comment.
 

devildogae

Petty Officer 2nd Class
Joined
Jan 14, 2017
Messages
147
You definitely do not want to use epoxy if you are going to use polyester resin as a filler. Polyester resin and 1708 will hold up. With this kind of repair, you'll need to fiberglass both sides. Grind down the overlap on both sides. Let's see if others will comment.

I believe that Epoxy will stick to poly just fine, just not the opposite. That's why I would do the poly PB filler first, let that cure and sand it down inside and outside.. That way the epoxy will stick to everything inside properly. The epoxy inside would never reach past the current hull and poly PB filler, So I would be able to glass each side with it's respective resin.
 

devildogae

Petty Officer 2nd Class
Joined
Jan 14, 2017
Messages
147
I will get some more pics up soon, but right now I have a question. I just added a quart of oil to my sterndrive. It's a MC-1 pretty sure, but I added the whole quart and it didn't every reach and come out of the top hole. How much do these drives take? I then proceeded to attach the top screw with new gasket. I then unscrewed the fill pump and I lost at least a couple pumps worth of oil until I could get the bottom screw with new gasket on and tightened down. Is this normal to lose that much oil when the top is tightened?
 

devildogae

Petty Officer 2nd Class
Joined
Jan 14, 2017
Messages
147
Hello everyone, this thread is WAY past an update. I splashed the project probably late Oct. 2017. It was very cold out, but that's alright. It was worth it for sure. I discovered my new alternator was whining, so the company sent me a new one on warranty (still in box). I plan on getting a shorter V-belt also, because the alt fan was hitting the brackets. The Carb was rebuilt by a race shop close by, but it didn't run well, and I think it has a air leak, so I will be rebuilding it myself come spring. Bought an ultrasonic cleaner for the job. Here are some pics to follow.
 
Last edited:

devildogae

Petty Officer 2nd Class
Joined
Jan 14, 2017
Messages
147
Can't upload images at this time, will reserve this space for images soon.
 

devildogae

Petty Officer 2nd Class
Joined
Jan 14, 2017
Messages
147
Just wanting to update this thread with a few pics from last fall. I will be picking back up in spring to button up the trim pieces and some support foam for the bow area. I just rebuilt the carb myself and from what I can tell, it's functioning much better than before, but will know for sure when I attach it.
 

Attachments

  • photo284879.jpg
    photo284879.jpg
    169.4 KB · Views: 0
  • photo284880.jpg
    photo284880.jpg
    186.5 KB · Views: 0
  • photo284881.jpg
    photo284881.jpg
    1.4 MB · Views: 0
Top