1979 Starcraft Fishmaster 18 restoration

BWR1953

Vice Admiral
Joined
Jan 23, 2009
Messages
5,845
Hiya ybstuk! :wave:

I've been following along with your project and WM definitely has given you some excellent advice, as he usually does!

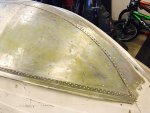
One other thing that I might add is that you should re-buck the rivets around that keel seam if they're not absolutely tight. Get 'em locked down after cleanup, then apply the Gluvit on the inside of the hull.

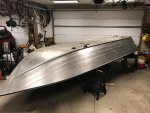
Many of us have used Gluvit, myself included and it works very well. On my Kingfisher I was able to tilt the hull nearly vertical on each side when applying the Gluvit, letting it seep deeply into the nooks and crannies. Did the same thing at the keel by raising the stern of the boat, then finally did the same with the bow. When it was all done, the boat ended up being bone dry in use. Been that way nearly 2 years now. :D

Keep up the good work! :encouragement:
 

ybstuk

Seaman
Joined
Sep 29, 2008
Messages
57
Thank you for everyone's input thus far. Over the weekend I picked up a really nice bunk trailer on the cheap to replace the old rusty roller one. We did a test fit and it fits the trailer perfectly. I don't think I could have ordered a better fit, especially from a used trailer. I need to do a little work to the it - re-carpet the bunks, check bearings, lights, etc, but It's going to be a great trailer.

IMG_0188.jpg IMG_0189.jpg IMG_0187.jpg

After fitting the boat to the trailer, we flipped the boat and put it back into the garage. My next task is sanding & painting. I have decided (after reading a lot) that I am not going to strip the hull down to bare aluminum. I am going to sand the paint, apply a primer, then paint over it. Now the spots on the bottom that are bare aluminum (due to wear), I'm going to sand, clean up, apply a self etching primer, then paint.

I'm 90% sure I'm going to go with Rust-o-leum self etching primer, followed up by Rust-o-leum paint. Not sure yet if I'm going to brush, roll, or spray yet. I know there's a lot of schools of thought on this. Any opinions are greatly appreciated, as I'm still doing research to determine the best route. I want it to look nice, but it is a fishing boat, and I don't need to invest a ton into it. I just want it to look good, and last a while.
 

Attachments

  • IMG_0189.jpg
    IMG_0189.jpg
    203.9 KB · Views: 6
  • IMG_0188.jpg
    IMG_0188.jpg
    203.5 KB · Views: 6
  • IMG_0187.jpg
    IMG_0187.jpg
    260.9 KB · Views: 6
  • IMG_0187.jpg
    IMG_0187.jpg
    260.9 KB · Views: 6

Watermann

Starmada Splash of the Year 2014
Joined
Jan 12, 2013
Messages
13,753
Super nice score on the new trailer, looks like a perfect fit to me. :thumb:

On the paint job, I know there's the "scuff it up good and paint" guys out there but I do not recommend sanding and painting over the old paint. First off it will take longer than striping the paint to bare. Every single rivet head will be bare from sanding with a power sander except the area right around rivet it will skip over so you'll have to hand sand around each of the 100's of rivet heads. Imagine how smooth your base coat of SE primer is going to be spot priming all the bare AL spots.

I'm not a pro painter by all means but after 3 boats I've learned what works best. My SN I sanded the bottom rather than strip bare and the paint is now coming off but the sides where it was bare is stuck tight.

My procedure is:

Strip hull bare
Wash hull until it's completely clean
Leak test
Make repairs to hull replacing any rivets that are leaking damaged or tipped
Leak test again
Clean inside of hull of all glue, gease, loose factory sealer
Fill un-needed holes, dents or pitting with marine tex or JB weld
Gluvit interior seams and keel plate
Sand entire hull with palm sander and 220g to break surface tension and remove oxidization.
Wash hull to remove the black dust, wash down with cleaning vinegar and rinse well.
Shoot smooth light coat of SE primer, 2 hours later shoot coat of regular primer
When primer is dry enough look for imperfections like bugs or nubbons and knock them down light sanding, tack cloth the dust
Shoot base coat of paint reduced with catalyst hardener
If base coat is all good then shoot top coat at about 2 hours after base coat... done and stay away until it's dried overnight.

After a day or so wheel it out to bask in the sun. Not buffed to a bright shine but I'm okay with that for a fishing boat, not a show boat.

IMAG2314.jpg


IMAG1414.jpg
 
Last edited:

ybstuk

Seaman
Joined
Sep 29, 2008
Messages
57
Wow - that SC is beautiful. Was the bottom bare aluminum to start with? I kind of like that look - mine's painted with chipping paint, etc. Not sure if I could get it to look that clean, then leave it bare. Did you clear it or anything? If I did this as well, I wouldn't have to paint the bottom, which of course is just going to get nicks & scratches in it anyway... Hmmm....

This whole "paint" stage has me spinning in circles. One minute I think I have my mind made up, and the next I'm second guessing myself. I'm no painter by any means. I wish I could snap my fingers and have it be finished, so I can get to work on the fun stuff - the interior. I'm trying my hardest to have this done for a spring fishing trip this May, which is only 3 short months away...

For stripping - did you use Aircraft Paint remover?

Still not sure what I'm going to do...
 

Watermann

Starmada Splash of the Year 2014
Joined
Jan 12, 2013
Messages
13,753

ybstuk

Seaman
Joined
Sep 29, 2008
Messages
57
Yeah and I'll never paint the bottom again, the SS is bare AL on the bottom. No clear coats, just the industrial/tractor paint that's oil base alkyd enamel.

I found the Jacso stripper to work best.


So the white & black color combination is an "industrial/tractor paint that's oil base alkyd enamel"? What brand (if you can say)? Sprayed on, I'm guessing?
 

Watermann

Starmada Splash of the Year 2014
Joined
Jan 12, 2013
Messages
13,753
The white is not really white it's a very light gray as you can see the white thru the hull fitting is actually white. Anyway I used VanSickle paint as it's what is carried at a local store, they have SE primer, regular primer, hardener and the paint all in one place.
 

ybstuk

Seaman
Joined
Sep 29, 2008
Messages
57
The white is not really white it's a very light gray as you can see the white thru the hull fitting is actually white. Anyway I used VanSickle paint as it's what is carried at a local store, they have SE primer, regular primer, hardener and the paint all in one place.


my apologies. It's a great looking color combo. Thank you for the info.
 

ybstuk

Seaman
Joined
Sep 29, 2008
Messages
57
No Title

Ok I tried stripping a spot to see how it would work. I bought the Jasco stuff too. It seems to strip all the paint off, yet it leaves a green residue behind. I tried a second time in the same area but to no avail. I did try some carb cleaner in a small spot and that removed it but there has to be something a little cheaper and safer than that. Any ideas? Thank you.
 

Attachments

  • photo259040.jpg
    photo259040.jpg
    117.3 KB · Views: 1

Watermann

Starmada Splash of the Year 2014
Joined
Jan 12, 2013
Messages
13,753
Yeah that alodine is tough stuff. I used the Jasco and a 3M scrub pad with handle. It came sight off.
 

ybstuk

Seaman
Joined
Sep 29, 2008
Messages
57
This alodine... I know I want to remove it on the middle where it will be bare aluminum, but on the sides that I'm going to repaint, do I have to strip it off there too? In going through a lot of stripper...
 

Watermann

Starmada Splash of the Year 2014
Joined
Jan 12, 2013
Messages
13,753
Run a sander over the whole boat with 220 is what I do, maybe that would smooth out the alodine staining and you could SE prime right over it.
 

ybstuk

Seaman
Joined
Sep 29, 2008
Messages
57
No Title

I ran out of stripper. Went to town and found some stuff at Oreillys that's much stronger and working very well. Just finished this side. One more side to go. Should finish tonight!
 

Attachments

  • photo259531.jpg
    photo259531.jpg
    130.7 KB · Views: 3

ybstuk

Seaman
Joined
Sep 29, 2008
Messages
57
No Title

Master Pro from Oreilly
 

Attachments

  • photo259532.jpg
    photo259532.jpg
    147.3 KB · Views: 1

Frey0357

Petty Officer 1st Class
Joined
Mar 13, 2014
Messages
313
Really looking good! Looks like a brand new hull again!

Frey
 

ybstuk

Seaman
Joined
Sep 29, 2008
Messages
57
No Title

Long overdue update: Boat is slowly progressing. Getting out there as time permits, and I'm sanding/polishing the bottom "center" as I'm calling it. I'm going to leave this raw, and paint the sides only. Attached is a progress pic. I'm using this process with a palm sander, and it seems to be going well: Sand 80 first (only on the bottom due to pitting & blemishes), then 220, 400, 800, then polish. Looks great, although it's been a week since I took the pic, and it's slowly oxidizing, and has a fog to it now. Still looks good. Hoping to finish sanding/polishing the center this weekend, and start prepping the sides for primer then paint. Slow going but still going strong...
 

Attachments

  • photo261035.jpg
    photo261035.jpg
    126.7 KB · Views: 8

Watermann

Starmada Splash of the Year 2014
Joined
Jan 12, 2013
Messages
13,753
Polishing the bottom? :faint2:

I do like that polished keel plate, it looks great!

fetch


You know that you won't ever see the bottom again when you flip it back.
 

ybstuk

Seaman
Joined
Sep 29, 2008
Messages
57
Polishing the bottom? :faint2:

I do like that polished keel plate, it looks great!


You know that you won't ever see the bottom again when you flip it back.


Thank you! I'm really pleased with how the Keel cleaned up.

I started polishing what you see here, as it will be seen slightly on the front. As for the bottom on the "flat" portion, I probably will forego the polishing step, as no one will see it...
 
Top