1989 Sratos 180CC Restoration

BayouWaters

Petty Officer 3rd Class
Joined
Jan 29, 2017
Messages
78
Thanks strat...that is what I was thinking as well. I am going to start with the 2 main stringers and then set the two outside stringers to be level with them. Removal of the old stringers starts today.
 

BayouWaters

Petty Officer 3rd Class
Joined
Jan 29, 2017
Messages
78
Been awhile since I posted so that I would take a few minutes to update on the progress.

Started removing the stringers and it has not been too bad. Initially tried a regular reciprocating saw but was having problems getting it into the proper angles to effectively cutout the stringers. Goal was to cut as close to the hull as possible to minimize grinding. Ended up purchasing a DeWalt compact sawzall and it did a great job. I also made a dust collection box for my shop vac. Got my inspiration from a post that "Wood on Glass" made. I made mine out out of an A/C register with a piece of plywood caulked and screwed into it and a PVC coupling. It helped keep the dust down quit a bit. Still a very dusty job...


Dewalt.jpg

Dust_Collector_1.jpg

Dust_Collector_2.jpg


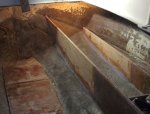
This is after the Sawzall and before grinding.
Before_grinding.jpg

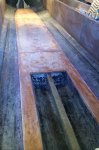
After grinding, lot of work and dust. Still needs to be vacuumed, but I am back down to clean glass.
After_Grinding.jpg
 

BayouWaters

Petty Officer 3rd Class
Joined
Jan 29, 2017
Messages
78
Does anyone have experience with replacing the lower strake stringers along the bottom of the hull? I guess I am going to have to rip some southern yellow pine 2x4's diagonally to get the shape of the original stringers. Anyone advice?

Lower_Strake_Stringer.PNG
 

kcassells

Fleet Admiral
Joined
Oct 16, 2012
Messages
8,600
Grind out that glass to the hull. Fill the strakes with pb. Then make new ply stringers to fit.
 

BayouWaters

Petty Officer 3rd Class
Joined
Jan 29, 2017
Messages
78
Thanks for the input Cassell... After examining the shape I think I am going to laminate 2 pieces of 3/4" marine plywood together and then rip the bottom angle on my table saw.
 

BayouWaters

Petty Officer 3rd Class
Joined
Jan 29, 2017
Messages
78
Between work and rain on my days off, the restoration has been going slow. Oh...and the biggest distraction...my other boat, but I am steady making progress. Been following along several other restores here in the forum and continue to learn a bunch. I have finally finished getting in all of the main stringers and only have a few bulkheads left to go.

Bow_Stringer_Before_After.jpg


Last two pieces of the long stringers PB'd in...if it does not rain today I should be able to get them glassed in. I will be adding a butt block over the joints to ensure the two stringer halves are properly joined together.

Front_Bow_Stringers.jpg
 

Attachments

  • Bow_Stringer_Before_After.jpg
    Bow_Stringer_Before_After.jpg
    74.4 KB · Views: 1
  • Bow_Stringer_Before_After.jpg
    Bow_Stringer_Before_After.jpg
    74.4 KB · Views: 0
  • Front_Bow_Stringers.jpg
    Front_Bow_Stringers.jpg
    209.3 KB · Views: 0

BayouWaters

Petty Officer 3rd Class
Joined
Jan 29, 2017
Messages
78
A little progress to post... I finished the main stringers last weekend and I am now focusing on the center keel stringer. I spent the better part of a day grinding out the old glass and working to get back to solid good glass. A lot of voids, pockets of water, and sections where the tabbing never adhered to the hull. Anyone doing these repairs needs to ensure they are removing all of the old glass before preceding with new installation.

Last 2 sections of the main outside stringers...ends cut and sealed before installation.
Last_2_Main_Stringers.jpg

Last_2_Main_Stringers_Installed.jpg
 

BayouWaters

Petty Officer 3rd Class
Joined
Jan 29, 2017
Messages
78
Here is a before and after of the keel stringer work. The original center stringers was 3/4" plywood, but I am going to go back with a southern yellow pine 2x6 cut to size.

keel_work.png
 

BayouWaters

Petty Officer 3rd Class
Joined
Jan 29, 2017
Messages
78
One more post... For those that are going to be working on their first restore I think it is important to mention how important it is to get through the old tabbing and back down to good glass. In the first picture you can see moisture seeping out from behind sections of old glass and voids. In the second picture you can see a section that was never bonded with hull creating a void. Reason I am posting is because as I am following other post I have seen questions about whether or not old tabbing needs to be removed. In my boat I would have never seen these defects if I had not ground all the way back down to the hull and that would have led to a weak structure. Anyway...hope this helps someone else.

keel_stringer_voids.PNG

keel_work_2.PNG
 

BayouWaters

Petty Officer 3rd Class
Joined
Jan 29, 2017
Messages
78
Real happy with the way my keel stringer came out. Looking forward to the weekend to get it glassed in.

keel-stringer.jpg
 

BayouWaters

Petty Officer 3rd Class
Joined
Jan 29, 2017
Messages
78
Glassed in the center stringer with 2 layers of 1708 and topped with 1 layer of CSM since this area could see standing water. Also added a layer of isophthalic gelcoat to top the area before installing the bottom floor panel. Temperatures dropped last night hence the heat lamps.

Center_Keel_Stringer_Gelcoated.jpg
 

BayouWaters

Petty Officer 3rd Class
Joined
Jan 29, 2017
Messages
78
Finished installing the bottom floor panels... They are 1/2" marine and the underside was covered with 1 layer of CSM before laying down. Panels were PB's to the center stringer and hull sides and screwed to the keel stringer for good measure. Once it warms up a little today I will be glassing over the top with 1 layer of 1708 before installing bulkheads.

bottom_floor.jpg
 

Attachments

  • bottom_floor.jpg
    bottom_floor.jpg
    365 KB · Views: 0

BayouWaters

Petty Officer 3rd Class
Joined
Jan 29, 2017
Messages
78
Had some time off over the Thanksgiving week and was able to make some good progress. Finished glassing in the lower floor and got the 4 main bulkheads cut and PB'd in. If weather cooperates I should be able to get them glassed in over the weekend.

main_bulkheads.jpg


main_bulkheads tabbed.jpg
 

kcassells

Fleet Admiral
Joined
Oct 16, 2012
Messages
8,600
You can make your life alot easier if you seal and glass the wood components on a work table, then install and tab.
Wood cuts looks great! Why aren't you sealing the ply first? The cut edges are the first to go.
 
Top