1989 Sratos 180CC Restoration

BayouWaters

Petty Officer 3rd Class
Joined
Jan 29, 2017
Messages
78
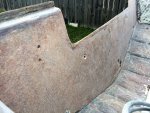
Thought I was back to clean glass on my transom and noticed some dark spots after returning from a work trip. As I ground a little deeper I am finding pockets of water between the remaining CSM and the boat hull where the wood core was added to the hull. I have also found little pockets of water in the fiberglass from the original transom tabbing along the bottom of the hull. The tabbing resin used has a bright reddish purple hue and has moisture trapped in it...UGH!!!! As I continue to grind it looks like I am going to have to grind all the way back to the original hull which is a dark grey in appearance. This layer appears to be dry with no voids.

Anyone ever encounter this before? I am also rethinking my grinding options as the 4 1/2" grinder is just too slow. Looking at a 7" grinder equipped with 16 grit ceramic grinding discs...any thoughts on quick fiberglass removal?

Transom_Ground_Down.jpg
 

BayouWaters

Petty Officer 3rd Class
Joined
Jan 29, 2017
Messages
78
My fear is less about mold than with bonding issues with fresh laminations over the top of fiberglass with pockets of water in it. I am going to grind down to bare hull this weekend before proceeding. Ordered a 7" grinder with ceramic grit grinding pads, hopefully it will speed the process up a bit.
 

kcassells

Fleet Admiral
Joined
Oct 16, 2012
Messages
8,600
Well what I'm saying is like what happened to me. The glass sits somewhat covered or exposed to mother nature and there is always moisture in the air. And there are always spots that will trap the moisture. The bleach kills the mold and even a little acetone will help evaporate moisture trapped in areas.
On another note,If after sanding and all looks great, wipe with acetone and clean just brush/roll on some poly. Not for strength but for sealing.
Just some thoughts.
 

BayouWaters

Petty Officer 3rd Class
Joined
Jan 29, 2017
Messages
78
Thanks kcassells, looks like the pockets of moisture are from poor bonding of the original core. I think I am going to be in good shape once I grind this layer of CSM off. Tough stuff to remove with a 4 1/2" grinder.
 

BayouWaters

Petty Officer 3rd Class
Joined
Jan 29, 2017
Messages
78
Received new 7" grinder in last night...hopefully this grinder will get the job done a little quicker than my 4 1/2" grinder. Just waiting for sunrise and I will be ready to make some dust.
grinder.jpg
 

Tnstratofam

Commander
Joined
Aug 18, 2013
Messages
2,679
That should help make a quick job of the grinding. New tools are always nice!:thumb:
 

BayouWaters

Petty Officer 3rd Class
Joined
Jan 29, 2017
Messages
78
Finished the removal of the CSM on the transom skin. I am glad I removed this layer as I found several pockets of water during the grinding process and pockets of bone dry cloth. It really looks like they slapped things together at the factory. The 7" grinder with the 16 grit discs worked very good at removing the material, but it was a butt kicker to hold 9 lbs up and out in front of you for several hours.

Before Grinding - this is the layer of CSM that was between the plywood core and the skin. At first glance it appeared to be in good shape and I was going to glass right on top of it. I am glad I did not as I found pockets of water hiding under this layer.
Transom_Before.jpg

After grinding down to original hull.
Transom_After.jpg

Found pockets of bone dry woven under the CSM, no resin was present on some of these sections.
Transom_Skin_no_Resin.jpg
 

Attachments

  • Transom_Before.jpg
    Transom_Before.jpg
    151.3 KB · Views: 0
  • Transom_Before.jpg
    Transom_Before.jpg
    151.3 KB · Views: 0
  • Transom_Before.jpg
    Transom_Before.jpg
    151.3 KB · Views: 0

BayouWaters

Petty Officer 3rd Class
Joined
Jan 29, 2017
Messages
78
It has been a few weeks since I have been able to post so I wanted catch everyone up. I just completed getting the new transom core glasses in and could not be happier. For the benefit of others that are attempting these repairs I thought I would admit a mistake that I made costing me an extra weekend of work.

When I first attempted to install the core I had the resin start to kick before I could get the clamps fully tightened down. It became painfully obvious that I was not going to be able to get the core fully clamped to the outer skin part way through the clamping process. In a panic I had to un-clamp and use a pry bar to get the core out before it was truly a nightmare. It was tough, but I was able to get it to pop out before it reached the point of no return. Unfortunately I got to experience the grinding and cleanup process twice (since once wasn?t enough). My fault, I tried to accomplish the task in the heat of the day under a tarp. Second round I ensured that I had absolutely everything laid out to include pots of un-catalyzed resin pre-measured and ready to go. I also waiting until early evening until the temp dropped and I had no issues at getting the transom in, clamped, with a good squeeze of resin flowing out from around the core.

For the lamination schedule it included: 1 layer of 1-3/4"oz CSM between the plywood core and the outside skin, 2 layers of 3/4" marine plywood with 1-3/4oz CSM in between, peanut butter fillet around perimiter covered with 8" 1708 bi-axial tape, 2 layers of 1708 bi-axial fabric progressively overlapping by 4", and one final 8" tape layer around all corners. Laminations came out 16" in total from the transom down the sides and bottom of the hull.

Clamping_transom_1.jpg

Clamping_transom_2.jpg

Finished-Transom.jpg
 

Slager

Petty Officer 2nd Class
Joined
Apr 30, 2014
Messages
189
Thanks for sharing. I'm going to be doing this in a couple weeks. Do know the temperature and what % MEKP you added? I see you used a couple bolts near the bottom, did you have any trouble getting those out after it hardened?
 

Teamster

Lieutenant Commander
Joined
Nov 8, 2010
Messages
1,923
I'm gonna guess the bolts in the bottom are the drain hole and the livewell intake,...??
 

BayouWaters

Petty Officer 3rd Class
Joined
Jan 29, 2017
Messages
78
The bolts and the wooden I-Beam used across the transom were all coated with just regular automotive turtle wax from Walmart and allowed to dry before using. I had no problems whatsoever with removing them or with the wood wanting to stick to the transom where I had resin squeeze out. I used 4 bolts across the bottom utilizing my drain, livewell discharge, and the 2 scupper drains. These will be drilled out later anyway. The big clamps have 12" throats and I picked them up at harbor freights. The knock down 2x4 clamps were a trick I saw on shipshape TV utilizing what was left of the stringer skins with a piece of plywood screwed in between. These provided a tremendous squueze along the bottom of the transom.
 

BayouWaters

Petty Officer 3rd Class
Joined
Jan 29, 2017
Messages
78
As far as the temp and % catalyst....it was approximately 87 degrees and I was catalzing at 2% (vinylester - per manufacture data sheet).
 

Slager

Petty Officer 2nd Class
Joined
Apr 30, 2014
Messages
189
Thanks. I'm using polyester resin and it will likely be a bit cooler than that. I'll be sure keep an eye on the working time. I'm thinking of clamping mine with 2x4s and bolts through the splash well drain holes and motor mount bolt holes.

The final product came out real nice! I don't remember if you already said, what are you going to power it with?
 

BayouWaters

Petty Officer 3rd Class
Joined
Jan 29, 2017
Messages
78
Just plan ahead, have everythig ready, and you will be fine. The 87 degrees is when I got into trouble, the next weekend when I was succesful I waited until after 6:00 and the temperature was in the mid 70's...I had no problems. Since you are using Poly you will be able to scale the catalyst back per the manufacturer's recommendation for the temperature that you are working at and should get a little longer working time than I did with the Vinylester. Vinylester is catalyst hungry and does not give you alot of margin to make adjustments, but it has very good secondary adhesion and water resistance similiar to epoxy. In areas that I wanted good adhesion strength and first layers againgst wood I am using vinylester, but where I am building up layers I will be using poly myself.

I am going to be putting a 150 ETEC on her when she is done.
 

BayouWaters

Petty Officer 3rd Class
Joined
Jan 29, 2017
Messages
78
Question...

Now that my transom is replaced the focus is on the stringers. The stringers on my boat are built with an arch from the middle of the boat to the outside hull for what appears to be water drainage. On the sides of the hull where the liner was bedded to the plywood floor there was almost 2" of bedding compound to make up for this arch and 1/2" in the middle where the liner attached to the plywood substrate. Tremendous amount of weight... I want to go back with a stringer system that allows for a flat floor and no need to use several 100# pounds of putty (not exaggerating). Any suggestions? Anyone run into this type of design?
Liner_Hull_Question.png
 

BayouWaters

Petty Officer 3rd Class
Joined
Jan 29, 2017
Messages
78
Started pulling the foam out this weekend...I think I enjoy grinding fiberglass better. This was a lot of work to say the least. As other in the forum before me I tried every tool in the shed to try and make it easier before settling for a sawzall and my trusty pry bar. Then late today I tried a wire cup wheel designed for angle grinders and found the go to tool for removing foam. If I would have known how effective this tool was going to be I would have used it yesterday and been done in one day. I hope I can at least help the next person undertaking this part of the project.

Before Foam_Before.jpg


During Foam_During.jpg


After Foam_After.jpg


Go buy one of these wire wheels for your 4 1/2" grinder. This wheel is specifically designed for grinders and it reduced the foam to dust in absolutely no time. Be warned...it creates a lot of foam dust. Would not try it on a windy day unless you want to shower the neighborhood with foam, but this was a tremendous time and back saver. Foam_Wire_Grinder.jpg
 

BayouWaters

Petty Officer 3rd Class
Joined
Jan 29, 2017
Messages
78
No one ever encounter the arched subfloor underneath the liner before?
 

Tnstratofam

Commander
Joined
Aug 18, 2013
Messages
2,679
I'm no expert but I would think building the outer stringers taller to allow for a flat floor would be fine. Keeping in mind that you still want proper deck drainage. It will certainly save some money on glass materials not to have to use that much peanut butter or filler between the deck and the outer stringers.
 
Top