More Time Than Money

Jeff-n-Gail

Petty Officer 3rd Class
Joined
Aug 10, 2016
Messages
99
No Title

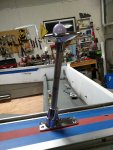
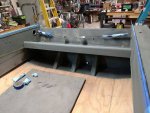
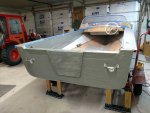
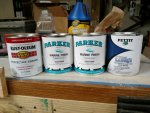
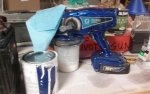
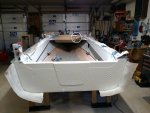
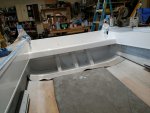
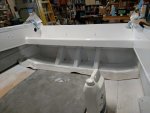
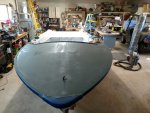
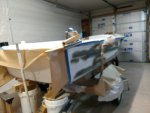
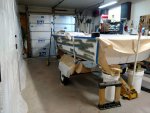
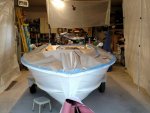
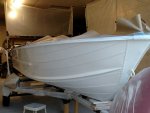
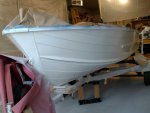
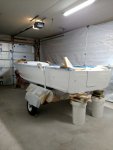
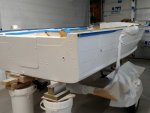
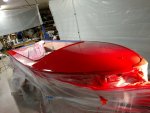
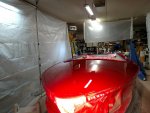
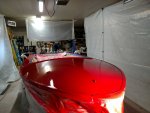
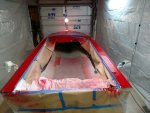
Since my last post, I didn't get the bilge area painted like I wanted, although that really didn't surprise me nor did it upset me. I managed to get an extra stern light that will double as a flag pole. Got that drilled and mounted in place and I believe I'm going to like it. I also got the wood backer boards in place and set up with straps to hang cables and wires up of sight. Got the wiring in place for both stern lights for when their time comes due. It's Friday today so since I managed to get the bilge area primed and also the tray above it and both sides of the transom all primed, I believe I will get those area's painted this weekend. I have already purchased the outside paint (white) and the red top color so I'm mostly curious as to how close the whites match. The plan is to paint the bilge area and tray and continue with the same paint to paint the side panels inside the boat. These area's won't be an issue but I plan to paint both sides of the transon, inside and out, with the bilge paint. Hopefully they match.
 

Attachments

  • photo260293.jpg
    photo260293.jpg
    247.8 KB · Views: 0
  • photo260294.jpg
    photo260294.jpg
    100.3 KB · Views: 0
  • photo260295.jpg
    photo260295.jpg
    99.6 KB · Views: 0
  • photo260296.jpg
    photo260296.jpg
    109.3 KB · Views: 0

Jeff-n-Gail

Petty Officer 3rd Class
Joined
Aug 10, 2016
Messages
99
No Title

Ok, I did get the opportunity to start up my Graco battery operated airless sprayer. It's not a new toy to me, but using it with oil based paints is a whole new item to me. I'm in the trades and latex paints are part of my life. I thinned the bilge paint according to instructions for airless spraying but I never gave a thought to the pressure settings. Well needless to say, day one handed me plenty of out of control paint runs. Hey, I gotta sander so no problem. Today I wised up and thinned the whole quart and turned the pressure down on the sprayer. Sanded the paint from yesterday and gave it all plus the actual bilge area a coat of paint. The bilge area ended up with a few runs but the sprayer is a bit clumsy in tight area's so I gave it an approval. I figure I got one more practice coaT of paint with this airless machine and all the rest of the painting will stamp me with the titles of either a good painter or I should'a hired it done. ......... It appears my photos have a mind of their own, so ill post them tomorrow when my tablet doesnt control me.
 

Attachments

  • photo260432.jpg
    photo260432.jpg
    41 KB · Views: 0
  • photo260433.jpg
    photo260433.jpg
    231.4 KB · Views: 0
  • photo260434.jpg
    photo260434.jpg
    220 KB · Views: 0
  • photo260435.jpg
    photo260435.jpg
    193.4 KB · Views: 0

ezmobee

Supreme Mariner
Joined
Mar 26, 2007
Messages
23,767
Looks good to me. Me and spray paint of any kind do NOT get along so I tend to brush/roll everything.
 

Watermann

Starmada Splash of the Year 2014
Joined
Jan 12, 2013
Messages
13,753
Hey a good solid paint job is the key, unless you have a parade showboat that never leaves the trailer. My goal is to have the paint stay on the hull and add color. :lol:
 

Jeff-n-Gail

Petty Officer 3rd Class
Joined
Aug 10, 2016
Messages
99
I planned to spray the white sides before I tackled the bright red top and decided I might need and benefit from a little practice with the airless sprayer. Like I said, I have used it with latex paints on wood projects but wasn't real comfortable with oil on aluminium. The tray and bilge area are not going to be pretty areas anyway so they got to be the practice spots. One more coat and I better be good or I'm going to back roll it all and say I wanted a slight texture to hide the imperfections, (I've been here before).
 

Jeff-n-Gail

Petty Officer 3rd Class
Joined
Aug 10, 2016
Messages
99
Got the bilge, transom, and inside side panels painted with the bilge paint. Not perfect, but pretty good for my experience level. Sides are sanded and ready for primer and paint but first I believe I'll strip the top and sand and prime it so it'll also be ready to paint. I'll be enclosing the boat area to do the balance of the paint work. Looking like a busy weekend of prep.
 
Last edited:

Jeff-n-Gail

Petty Officer 3rd Class
Joined
Aug 10, 2016
Messages
99
I've got a new tablet and I'm clueless to find things to attach. The double post was accidental.
 

Watermann

Starmada Splash of the Year 2014
Joined
Jan 12, 2013
Messages
13,753
Prep is key for paint work to come out looking good and holding up. Your pic did not come through on our end.
 

Jeff-n-Gail

Petty Officer 3rd Class
Joined
Aug 10, 2016
Messages
99
No Title

Ended up sucessfuly stripping the complete top and found no surprises, no dents no deep scratches. Primed it with self etching primer and now to spot prime the sanded sides and mask it all off. I got a good start on putting up the spray booth so I'm hoping to make good progress today also. At least one good coat of white today is on the wish list. I may try for 2 coats then let it dry a couple days before I coat it again. Fingers crossed for a "no run" day.
 

Attachments

  • photo260871.jpg
    photo260871.jpg
    271.8 KB · Views: 0
  • photo260872.jpg
    photo260872.jpg
    147.4 KB · Views: 0
  • photo260873.jpg
    photo260873.jpg
    224.8 KB · Views: 0

Patfromny

Lieutenant Junior Grade
Joined
Dec 2, 2012
Messages
1,197
Very nice. I like the room you have on each side of the boat. I have one Bay of a two car garage but there isn't that much room on the sides. If I had that much space I might have attempted painting mine. I gave up after priming due to the lack of room. Keep up the good work.
 

Jeff-n-Gail

Petty Officer 3rd Class
Joined
Aug 10, 2016
Messages
99
Thanks, I got 1 light coat on without any runs. Only bumped into one tight spot while spraying down low from end to end so I got plenty of room.
 

Jeff-n-Gail

Petty Officer 3rd Class
Joined
Aug 10, 2016
Messages
99
No Title

I made some good progress with the white painting at the exterior and ended up with only a couple of small runs. They are down low enough to basically not count. The sheen isn't quite as smooth and bright as I was hoping for but a believe that was from me adding a coat when the previous one was at a real tacky point. The paint didn't flow and self level as well as the previous coats. I am, despite those facts, very pleased with how bright and even it ended up. I damaged the masking I had on the aluminum trim for protection so i am removing all that, detail cleaning and sanding and remasking. The final paint challenge will be the bright red that goes on all of the top areas. I'll be worried about drips and spray lines from tip plug ups because the red is where all the chrome acessories will be installed. If I am going to really hope for a perfect area, this will be it. Tomorrow is the day to hopefully get the last of the paint sprayed. I'll let you know either way.
 

Attachments

  • photo261213.jpg
    photo261213.jpg
    121 KB · Views: 0
  • photo261214.jpg
    photo261214.jpg
    95.7 KB · Views: 0
  • photo261215.jpg
    photo261215.jpg
    92.7 KB · Views: 0
  • photo261216.jpg
    photo261216.jpg
    111.4 KB · Views: 0
  • photo261217.jpg
    photo261217.jpg
    110.7 KB · Views: 0
  • photo261218.jpg
    photo261218.jpg
    153.4 KB · Views: 0

Watermann

Starmada Splash of the Year 2014
Joined
Jan 12, 2013
Messages
13,753
Looks great from here :thumb:

White doesn't reflect shine very well especially inside, wait until she's out in the sun.
 

Jeff-n-Gail

Petty Officer 3rd Class
Joined
Aug 10, 2016
Messages
99
No Title

I gotta say, it's nice to finally get some of the red sprayed. I ended up with the Frog Tape lifting as soon as it sat wet for a couple minutes.l was able to get it to restick after it was dry but it popped loose again as soon as it got wet. Going to let everything dry for 2 or 3 days then I'll remove the tape and re-mask when I lightly sand everything with 600 grit paper. I feel like one more nice even coat on the heavy and uniform side will give me the results I'm looking for.I find myself once again wondering about a final top coat of clear. Is there any input or advise available on this idea? I'm thinkin a coat of clear will protect the finish from water spots.
 

Attachments

  • photo261351.jpg
    photo261351.jpg
    237.8 KB · Views: 0
  • photo261352.jpg
    photo261352.jpg
    238 KB · Views: 0
  • photo261353.jpg
    photo261353.jpg
    201.3 KB · Views: 0
  • photo261354.jpg
    photo261354.jpg
    232 KB · Views: 0

jbcurt00

Moderator
Staff member
Joined
Oct 25, 2011
Messages
24,871
Its a boat, its going to get scuffed or scratched, when it does, having clear over it is going to make touchups harder......


Did you add enamel hardener? Makes the oil based cure quicker (not just dry to the touch), higher gloss AND improves scratch resistance.
 

Jeff-n-Gail

Petty Officer 3rd Class
Joined
Aug 10, 2016
Messages
99
We live a shallow lake so I can easily agree with the scratches and even a couple of dents. I actually had'nt given any consideration to a hardener. How available is that stuff and can I just pick up any kind or does it have to be from the same paint company?
 
Top