More Time Than Money

Jeff-n-Gail

Petty Officer 3rd Class
Joined
Aug 10, 2016
Messages
99
I would use what ever polyurethane adhesive you have around the shop. PL has poly adhesive but for me doing boat work I always have a construction tube of 5200 around so I would just use it, 5200 is a powerful adhesive and water won't get in either.

I have to comment on the silly cone, so the SS I'm working on was full of silly cone on the stringers and fuel tank bed. The aluminum under the silicone was pristine like the day the stuff was applied. Looks at all this on the fuel tank bed and you can see where it was removed the AL is beautiful.

IMAG2103.jpg
I have 5200 so that is what I'll use. Thanks for reminding me about the obvious. I decided to do some initial set up and measuring for the windshield challenge and next thing I know I'm testing how to use the heat gun and how much heat is too little or too much. I got carried away and just like that, I had a new windshield that I was able to put the original aluminum trim on. The hardest part was figuring out the easiest way to put that trim on. I originally thought I had to start at one end and work slowly toward the other end. "DEFINITELY NOT". Because of the curves, I was able to slip the trim on the middle, clamp in place with a 24" clamp, then working toward each end was easy. I put a strip of masking tape on the sheet before I started any bending then marked it at each inch from each end to the middle. The rest was a lesson in patience. NOTE- Its a whole lot easier to bend this stuff than it is to unbend.
 

Jeff-n-Gail

Petty Officer 3rd Class
Joined
Aug 10, 2016
Messages
99
image_258698.jpg image_258699.jpg image_258700.jpg ? Instant windshield. Still got some final trimming and fitting but got we done with one 3'x6' sheet. About $95.00 for the acrylic, $10.00 for the cardboard tube. Now, back to polishing aluminum trim.
 

Attachments

  • IMG_20170210_191332865.jpg
    IMG_20170210_191332865.jpg
    116.1 KB · Views: 0
Last edited:

Watermann

Starmada Splash of the Year 2014
Joined
Jan 12, 2013
Messages
13,753
Hey that windshield looks great, I'm thinking it takes some stones to start that process of heating and bending. :lol:
 

Jeff-n-Gail

Petty Officer 3rd Class
Joined
Aug 10, 2016
Messages
99
Thanks Guys. Its great being able to share the journey with people who understand and can relate. Have a Great rest of your weekends.
 

Jeff-n-Gail

Petty Officer 3rd Class
Joined
Aug 10, 2016
Messages
99
After I finally got the windshield fitted close and polished some of the remaining more difficult pieces of aluminum trim I decided to jump into coating it while it was still clean and bright. I'm actually quite impressed with the wet look shine and it does seem to be pretty durable, although that part will be tested when the summer use begins. We are having a rare but welcome look at the upcoming spring season here in Wisconsin. (55 to 60degrees and sunny) I have been able to turn off the furnace in my workshop and open up the overhead doors. The reality of spring is making me anxious to get this project done before spring yard work starts calling me. I've started to completely re-assemble the boat now that I believe all of the parts have been either fixed, painted, polished, or replaced. I was pretty good about replacing all the damaged or worn hardware as I disassembled each part, but wasn't real good at marking all the new stuff as to where it belonged. Its Here Somewhere, I Think!? This seems like a waste of time to put it completely together then completely disassemble it to paint but I just started and am glad I'm doing it. I have to admit, I'm nervously anxious about masking all that polished aluminum and hoping the removal of the masking tape doesnt also remove the finish. Carpet and seats should be here mid week so I can carpet the seat boxes and fit and test mount them, then remove them until after the floor carpet is down. Actually don't need the seats yet but iboat teased me with that 10% sale so I took it. Commercial Time: I have been pleased at how easy and quick it is to shop here and also to learn from others experiences.
 

Jeff-n-Gail

Petty Officer 3rd Class
Joined
Aug 10, 2016
Messages
99
No Title

I had originally planned on using a newer smaller steering wheel but after realizing the desire others had for the original wheels I took a second Look at what I had. My wheel was appearantly white when new, but was black and extremely stained when I started. I decided to give it a try to restore it. I tried everything I had in the garage to clean it but ultimately ended up just sanding it until it was as close to pure white as I could get it. Of course the sanding took all of the protective finish off, so I am using the Wet look floor polish and its doing a good job bring it back to life. The center horn area has a clear acrylic window with a half moon shinny insert under it for visual effect. That whole area was in the same shape as the steering wheel so I made a new acrylic window then got a tiny wire brush from my Dremmel tool and stuck a 3/4" round piece of sanding sponge on it. I was then able to duplicate the dash design on a small piece of aluminum, cut it to fit and the steering wheel now matches the dash. Its a small detail that may go mostly un-noticed, but it's there non the less. The pic is before the new insert was installed but you can see it laying there waiting to be cut and installed.
 

Attachments

  • photo259078.jpg
    photo259078.jpg
    65 KB · Views: 0

jbcurt00

Moderator
Staff member
Joined
Oct 25, 2011
Messages
24,871
Excellent work on the steering wheel. Nice touch w adding the 'machine turned' aluminum insert.
 

Patfromny

Lieutenant Junior Grade
Joined
Dec 2, 2012
Messages
1,197
Looking good, I love the wheel. Use soft release tape on any pretreaed parts. Either frog tape or the orange core 3m blue masking tape. I am able to tape over latex Paint that was painted the previous day to make a clean line on accent walls. Chances are that your stuff will be cured before Paint anyway so I wouldn't worry too much. Just put the tape on just before Paint and pull off as soon as possible when finished. Good luck
 

Jeff-n-Gail

Petty Officer 3rd Class
Joined
Aug 10, 2016
Messages
99
No Title

Ok, I decided to mask a couple of foot of polished aluminum and let it set for a week or so then just peel it off and see what happens. I'm using some Frog Tape so I feel safe. There's a lot of pieces/parts to put back on but it's starting to feel like I'm over dead center and heading for the waters edge. I got my quart of bilge area paint today from iboat so I decided it was time to go back to sanding and preping the transom area. I believe the transom install will be in it's final place so I cut the aluminum transom cover I bent and I got it fitted tightly in place without any damage. Now I am going to break open the 5200 and start filling holes and tightening bolts. I put a temporary wood block on top of the middle transom brace under the tray so the tray will have a slight slope toward each drain. I'll remove it when the rest of the screws are in place. I set the back corner caps in place to see if they covered the wood that the aluminum didn't hide. If you look real hard, there are 2 really small pie wedges that are exposed but I think I can hide them with caulk or paint.
 

Attachments

  • photo259287.jpg
    photo259287.jpg
    230.1 KB · Views: 0
  • photo259288.jpg
    photo259288.jpg
    210.4 KB · Views: 0
  • photo259289.jpg
    photo259289.jpg
    177.4 KB · Views: 0
  • photo259290.jpg
    photo259290.jpg
    235.8 KB · Views: 0

Jeff-n-Gail

Petty Officer 3rd Class
Joined
Aug 10, 2016
Messages
99
While I'm thinking about it, I'm looking for some input on a ladder or similar way to get in and out of the boat when we are up river or anchored on one of the sandbars where we drink tea and eat cookies in the hot sun. Not sure of my options and I don't have a problem modifying anything that's existing but just won't fit proper. There's not a lot of room in the back, although that would be the preferable way to re-enter.
 

Jeff-n-Gail

Petty Officer 3rd Class
Joined
Aug 10, 2016
Messages
99
There are a number of outboard swim platform/ladder options available http://www.iboats.com/Boat-Parts-Ac...hed.1--filter.prod_name?q=outboard swim&s=sol I have the Garelick one on my Starcraft and like it a lot. You will definitely have to shorten the lower support pole (I did and your boat is even shorter). We're quite pleased with it.
Hey thanks for the input. I'm looking at what is available on iboat and two options seem to be offered although I only see one style in the pics. Im kinda curious on how it will look and if I would have the space to mount the unit and also utilize it. You wouldn't happen to have any pics on yours or any other so I can get an idea on what it will look like. Even a link would be helpful.
 

Jeff-n-Gail

Petty Officer 3rd Class
Joined
Aug 10, 2016
Messages
99
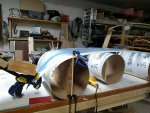
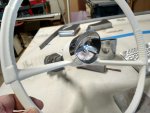
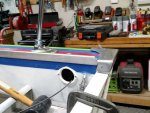
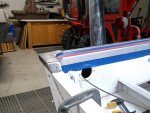
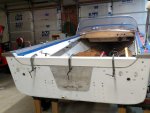
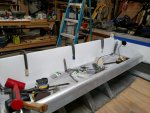
Wow, things are starting to happen kinda faster than I was prepared for. Just had to pay down for my soon to be new (to me ) used 40 hp merc, oil injected motor (1998 model). Planning for the spring rush, when the previous owner trades in (deals already done) I need to be ready to take my boat in for the transplant. There is so much that I think I need to do before all this happens, but what do I know, this is my first field trip. Then I get side tracked by a light/ flag pole brought to me by a buddy. A good companion for my original stern light to balance the boat. Done, now back to the list. Got the Transom totally installed including using the 5200 (still got that stuff stuck to my arms and hands). Decided to reinstall the steering wheel, etc, so I'll be ready when called. Now I can get back to sanding and priming everything. Seats and carpet came in, new distraction. Any thoughts on using Bilge area Paint for all of the exterior body sides. Its durable, glossy, and I already got it. I can't find any negatives that change my mind. The top will be red, thats not negotiable.
 

Watermann

Starmada Splash of the Year 2014
Joined
Jan 12, 2013
Messages
13,753
You paying someone to rig a motor?

Bilge paint, what's the type of paint and what;s that cost?
 

Jeff-n-Gail

Petty Officer 3rd Class
Joined
Aug 10, 2016
Messages
99
You paying someone to rig a motor?

Bilge paint, what's the type of paint and what;s that cost?
I got the bilge paint here at iboat for 26.00 a quart. The can says durable, high gloss. I'm thinking that's what a person should want for a good maintenance free surface. I still got to check if the 500 s/f is for a quart or gallon. I have the place I got the motor from to also do the install as part of the purchase price. Since my boat had only the steering assembly with cables and no motor controls at all, I opted for complete turn key start and drive. I been cruising all the for sale sites and just the motor should run me about 2500 to 3500 in the 1995 to 2000 age. I'm getting the whole package with warranty for 1900 so I'm pretty excited to see what I bought.
 

Watermann

Starmada Splash of the Year 2014
Joined
Jan 12, 2013
Messages
13,753
I figured that paint would be expensive. I don't know if you've checked out my SC paint jobs but the paint I use is an oil based gloss industrial enamel the same type formula as Rustoleum Pro. It costs 28 bucks a gallon. I do add catalyst hardener too which ups the price as it's around $2 an ounce ;)

Hey that's a pretty good deal for motor, steering and all the work done, shop rates are killer!
 

Jeff-n-Gail

Petty Officer 3rd Class
Joined
Aug 10, 2016
Messages
99
Anyway, back to the list. I know I need to focus on making sure all of the items I am going to mount on the finished product, as accessories, will be properly fitted and approved as to fit and look. Not knowing exactly what will ultimately be ran thru the concealed spaces, I think I should try to accommodate any unforseen installation issues. I've decided to put cedar wood 1x boards where I'll be mounting many of these options.
Research shows me that I can pretty much install the optional pieces where ever I want. That decision has been made now so back to drilling and mounting each accessory as I work from the back to the front.
Just like that, another weekend has shown up and added to the pressure and the reality that time is running out.
I had to mount a seat just to be sure that the mounting of each chrome tie down wouldnt effect normal boating comfort. I'm going with 1 step pad on each side of the boat so a front seat will need to be mounted to be sure these are placed properly.
I'm hoping to get the bilge areas and tray painted this weekend so I can make a decision on exterior side panel paint hoping to make enough noticeable progress so I ca post pictures you haven't seen.
 
Top