1969 Sea Ray Rebuild (and mods) [SPLASHED Sept 2017]

archbuilder

Vice Admiral
Joined
Sep 12, 2009
Messages
5,697
Finn, your pics aren't showing up by the way. Photobucket screwed everyone and now wants 400$ a year to get the pics to show up. I haven't moved yet, but I know others have. What a crappy deal.
 

CrazyFinn

Petty Officer 1st Class
Joined
Dec 12, 2016
Messages
357
Finn, your pics aren't showing up by the way. Photobucket screwed everyone and now wants 400$ a year to get the pics to show up. I haven't moved yet, but I know others have. What a crappy deal.


Thanks! I guess I'll have to post my pics elsewhere and then fix the links. They do show up (for me) if I'm logged into my Photobucket account, which is why I didn't notice earlier.
 

CrazyFinn

Petty Officer 1st Class
Joined
Dec 12, 2016
Messages
357
Got the lid sealed up with a layer of 6 oz cloth and some resin. Some sanding, filling in low spots, and then paint...

lid_glass.JPG
 

CrazyFinn

Petty Officer 1st Class
Joined
Dec 12, 2016
Messages
357
This project is going a bit slower than I hoped recently. Entirely my fault though... In addition to my full time job, I went and agreed to do a full demo and renovation of a bathroom for my sister-in-law in my "spare time". So... my boat renovation has to be done in the non-existent spare time I have outside of that. They are paying me well for the reno, so it gives me more money to spend on the boats (eventually) - so there is a good reason for me doing it!
 

CrazyFinn

Petty Officer 1st Class
Joined
Dec 12, 2016
Messages
357
A little more progress yesterday...

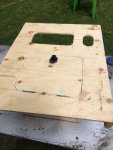
Fabricated a centre console (complete with locking glove compartment) out of plywood yesterday. The cutouts will house an acrylic panel for switches, as well as the trim buttons. The whole thing will get glassed, painted white.

console.JPG

Also got the first coat of paint on the engine cover and the side supports.
paint_1.JPG

As I was working on this, my dad decided to clean up the yard... There was an old bench in the back corner (it was there when we bought the place). It was one of those old benches with cast metal frames (with one broken leg), and wooden slats for the seat and backrest. The paint was peeling, but he noticed that the wood wasn't rotting, and felt rather heavy. A bit of sanding revealed that it was actually teak! So... I'm thinking of ripping one of the slats (as an experiment) to make some 1" wide teak strips to place on top of the engine lid supports (in the above photo), maybe 4 per side, to create something to stand on when getting in the boat. With the teak trim in the rest of the boat, it should make it look like it belongs there... Free teak is always good.
 

CrazyFinn

Petty Officer 1st Class
Joined
Dec 12, 2016
Messages
357
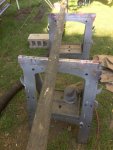
This is one of the boards from the old bench that has been sitting in the back corner of our yard since we moved in 7 years ago - and who knows how long it was there before we bought the place.

old_board.JPG

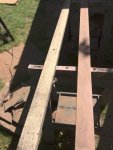
Went to throw out the bench, and the weight of the boards caught my dad's attention. Some sanding of one of the boards, and this is what we had:

sanded_teak.JPG

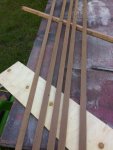
Ran it through the table saw to make some 1" wide, 3/8" thick strips, and it looked like this:

teak_strips.JPG

Planning to use them to create "treads" on top of the engine lid/compartment. Should make it look like it belongs, along with the teak already in the rest of the boat.
 

archbuilder

Vice Admiral
Joined
Sep 12, 2009
Messages
5,697
Cool that you were able to recycle it. It cost a fortune if you go out and buy it.
 

CrazyFinn

Petty Officer 1st Class
Joined
Dec 12, 2016
Messages
357
love re purposing:)
So do I, and my father is the master of re-purposing anything.

The problem is, he rarely throws anything away - thinking he might somehow re-use it. I helped him move out of his property a couple hours north of here back in 2010 (he was moving into an apartment upstairs in our house). At the time, we hauled away 6 tons of metal to the recyclers when he moved - the money we got paid for the moving truck rental and more! He had only lived there 15 years, not sure how he accumulated that much metal...

As I was helping him pack, on the shelf in the garage I found a box with a used oil pump from a '79 Rabbit he had gotten rid of in '84. The oil pump was originally removed from the car because the relief valve got stuck in my high school parking lot and the oil filter exploded (what a mess - it was a diesel). He had brought that used oil pump (with the defective valve) with him when he moved 500 km back in '95 (11 years after he got rid of the car it came out of). :confused: He was going to move it again in 2010 until I threw it in the metal recycling load...

It's a constant battle with him - getting him to throw out things he really needs to get rid of, while still allowing him to keep "raw materials" for his projects.

Fortunately, this bench works out - I get some good wood out of it, and the metal frames are going to the recyclers.
 

CrazyFinn

Petty Officer 1st Class
Joined
Dec 12, 2016
Messages
357
A bit more progress over the past few days (worked on a bathroom reno Friday night and Saturday). Thursday night, installed the doors on the various storage cabinets. Saturday night, got the "console" installed. Nothing fancy, just a piece of plywood with a box on the back and a door...
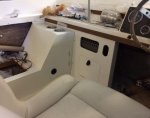
console install.JPG

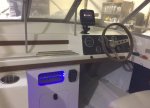
Yesterday, installed/wired the transducer and got my Raymarine Dragonfly installed, got the switches into the console switch panel, and ran the wiring for the trim (and installed the buttons).
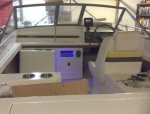
console1.jpg

console2.JPG

The switch panel itself is a piece of clear acrylic. Drilled all of the attachment holes, switch holes, then primed. Painted it black, once that dried I applied switch labels (round plastic, white text on black background - bought for cheap on eBay). Sprayed it with clear to seal in the decals. Next day, a strip of masking tape to cover decals, sprayed the rest with the same graphite metallic as the other dash panel. Switches are just SPST toggles with waterproof rubber covers.

A spacer (3/8" plywood) between the console and the acrylic panel gave me a place to put a short LED strip for some "bling". I'll probably never actually use the LED's, but they look cool... or something like that.

Also installed the new alternator.
 

Baylinerchuck

Commander
Joined
Jul 29, 2016
Messages
2,726
I like that switch panel!! Nice work. I want to redo my dash and switch panel this winter. Nice work!!
 

CrazyFinn

Petty Officer 1st Class
Joined
Dec 12, 2016
Messages
357
I like that switch panel!! Nice work. I want to redo my dash and switch panel this winter. Nice work!!


Thanks... Every time I do something on this boat now, I look at it as a learning experience and an experiment for how to do things better on the bigger boat.

I got the hinges and latches attached for the engine lid last night, installed a new alternator belt, secured the rear bilge pump, and connected the wiring to the trim pump. Relays all work, and the motor spins. No idea if it actually pumps or not - will need to wait until I get the outdrive and trim rams on to test it.

That's the next step - new seals in the upper half of the drive, and then install it. If all goes well, I should have a functional boat at that point! Really hoping the internals on the lower unit are good - it feels ok, doesn't leak, but until I get it in the water I won't know for sure...

Still have a pile of trim work to do in the boat as well, and waiting for my wife to finish up the new cushions.
 

Broaters

Petty Officer 2nd Class
Joined
Jul 31, 2017
Messages
139
Hello,

good work and making good progress.
I'm about to start a reconstruction as well, all the posts are very inspiring !

keep pushing
 

CrazyFinn

Petty Officer 1st Class
Joined
Dec 12, 2016
Messages
357
Hello,

good work and making good progress.
I'm about to start a reconstruction as well, all the posts are very inspiring !

keep pushing


Thanks. And welcome aboard!

Make sure you start a new thread with lots of pics of your new project...
 
Top