1969 Sea Ray Rebuild (and mods) [SPLASHED Sept 2017]

CrazyFinn

Petty Officer 1st Class
Joined
Dec 12, 2016
Messages
357
Yes congrats. And it is your fault I am going though all this now to I hope you know. You made me look. Before that ignorance was bliss LOL.

Happy to help. Looks like you're making good progress on your project... In the middle of it, it feels like it's never going to get finished (even though it's been less than a year since I started on mine), but it sure feels good when you launch it the first time, and it floats, and runs! It was in the water for roughly 24 hours, and the bilge was still dry when I pulled it out.

It's worth doing everything properly. At the end, you won't be wondering or second guessing what you did.
 

CrazyFinn

Petty Officer 1st Class
Joined
Dec 12, 2016
Messages
357
great looking boat !


Thanks!

Crazy thing is that I've had a carburetor re-build kit sitting on my dining room table for three weeks now - but I've been so busy with work that I haven't even had time to pull the carb out of the boat.

This working for a living sure gets in the way of the more important stuff!

Still hoping to get the carb done and get it back in the water at least one time before winter - just so I can put it to bed for the winter knowing it's ready to use in the spring!
 

Corjen1

Lieutenant Junior Grade
Joined
Aug 24, 2013
Messages
1,237
Congrats on your splash!!! Awesome work!!! Thanks for taking the time to update your thread!! Im still working on the GT thread....
 

CrazyFinn

Petty Officer 1st Class
Joined
Dec 12, 2016
Messages
357
Finally found a bit of time yesterday evening to pull out the carb and re-build it (took the day off work to help my dad swap the head gasket in his car - got it done faster than I expected).

First step, pulled the carb out, then disassembled the whole thing. One thing I've learned, is whenever you start a project like this, take some pictures from every angle with your phone - even if it's fairly simple like a Rochester 2-Jet carb, it's good to have confirmation that you're putting it back together correctly.

I set up a table in the middle of the garage floor, with good lighting so I could find little bits if they decided to wander. BTW, my garage feels a lot bigger when it doesn't have the boat occupying it (that has been there for the past year).

Pulled apart the carb, here is what I ended up with: disassembled.JPG
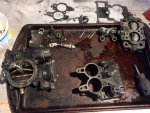

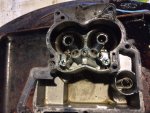
A closer shot inside the float bowl - lots of little bits of residue - certainly needing a cleaning. I have no idea how long this carb sat unused before I got it. I should have just cleaned/rebuilt it before I tried running the boat, but no harm done as it is! float_bowl.JPG

Pulled out the fuel inlet/strainer, and this is what I found in the housing: fuel_inlet.JPG
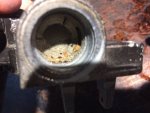

Not sure what all of those little bits are, but they sure wouldn't help it run any better!

Pulled out the main jets. I think I figured out at least one reason why it didn't have much power! The one jet was clogged solid - I used a welding torch tip cleaner to get the hard crusty stuff out of it. The engine was running on one half of a dirty carburetor...
jets.JPG


Got it all cleaned out, new float and valve, new accelerator pump parts, all new gaskets.

Looking much cleaner: clean_1.JPG
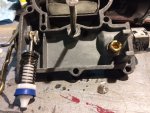

It's all back together. Now I just have to get it back in the boat, set the idle, and get it back in the water. Too bad I have to go get some work done...
 
Last edited:

CrazyFinn

Petty Officer 1st Class
Joined
Dec 12, 2016
Messages
357
I little bit more progress... spent most of the day rebuilding the exhaust system in my wife?s car, swapped the alternator in my dad?s car, but still found enough time to bolt the carburetor back in the boat.

Theoretically at least, the boat is ready to go once I get the idle adjustments set. Now I just need to find some time to get it back in the water before the weather gets too cold.
 

chevymaher

Commander
Joined
Mar 29, 2017
Messages
2,915
I hear you. I been fooling with the boat so much I let other things that are normal maintenance build up. Grass to high gardens growing wild. Pandamonium I say.

Hope you get it running right with this.
 

Skipper Sean

Petty Officer 2nd Class
Joined
Sep 19, 2017
Messages
124
Nice restoration work on project Splashed! I looked through this whole thread and have gotten some nice informative tips and tricks as I begin my project on my boat ?Keeping It Reel?
Your Project came out awesome and I think you should be proud..
 

CrazyFinn

Petty Officer 1st Class
Joined
Dec 12, 2016
Messages
357
Winterized it today, hauled it up to the in-laws cottage and put it in the garage for winter storage. Was hoping to get it in the water one more time, but not happening before winter. Originally bought the boat beginning of last November. One year later, and I have a solid boat, ready to go next spring.

For anybody else thinking of taking on a project like this - just do it! Be careful though, it seems to be addictive...
 

CrazyFinn

Petty Officer 1st Class
Joined
Dec 12, 2016
Messages
357
Although the boat is in storage for the winter, I do have a few things I am researching/planning/figuring out over the winter, so I can get it ready to use as quickly as possible once the snow melts (although it’s ready to run as-is).

Still need to get vinyl flooring installed - now thinking of one of the synthetic teak options. Also need to get a Bimini top for it, and probably some type of fishing rod storage/holders so my dad doesn’t trip over the rods when we get out fishing.

Like I said, this boat thing is addictive. Can’?t actually work on either boat. One is in storage, the other outside in the snow... but I’m still thinking about it.
 

CrazyFinn

Petty Officer 1st Class
Joined
Dec 12, 2016
Messages
357
Still waiting for this winter to end so I can pull the boat out of storage and hopefully actually use it this summer! I do have a few things I need to finish up on it though... picked up some of that fake teak non slip flooring over the winter, as well as a Bimini top.

My wife had originally offered to sew the new seat cushions for the boat - and she did manage to get one of them done before I splashed it last fall. Problem is, her fancy expensive sewing machines don’t like the thread I got to sew the vinyl. The Husqvarna kept jamming, and the other one (whatever it is) kept having other issues.

So... a few days ago I found a good deal on a 1951 vintage Singer 15-91. Tried it out yesterday - my first time sewing. A few small issues due to my inexperience, but the sewing machine worked flawlessly! Just need to go buy some Velcro so I can finish the job.
 

CrazyFinn

Petty Officer 1st Class
Joined
Dec 12, 2016
Messages
357
Noticed that a few of my own posts on my own threads are showing up blank - at least for me - since the forum software update. What’s up with that? Can’t fix them, because I don’t remember what I said... ah well probably wasn’t anything world changing anyway...
 

CrazyFinn

Petty Officer 1st Class
Joined
Dec 12, 2016
Messages
357
So many folks doing their own vinyl work, I’m tempted to give it a try.....

I figured why not? If you look around you can pick up a good solid old Singer sewing machine for well under $100. They don't do much other than straight stitching, but they can do that well, and aren't as picky about materials as the newer home sewing machines. If I can sew seat vinyl, anybody can!

I'm thinking of trying my hand at some canvas work later - for my other boat. Once I get everything else done...
 

CrazyFinn

Petty Officer 1st Class
Joined
Dec 12, 2016
Messages
357
Drove up to the in-laws cottage on Sunday, pulled the boat out of the garage up there and hauled it home. Looks like it survived the winter just fine!

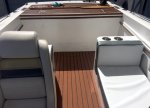
Took the day off work yesterday, installed the new bimini top I bought online over the winter, and also installed the new flooring.

Hooked up the hose, fired up the engine and got the idle mixture screws and idle speed adjusted to the best of my ability. Just hitting the throttle while it's running on the trailer it sounds SO much better than last fall with the clogged carb!

This is what it's looking like from the back:
interior_front.JPG

It's not perfect - but sure a whole lot nicer than when I picked it up a year and a half ago!
 

Attachments

  • interior_from_stern.JPG
    interior_from_stern.JPG
    165.7 KB · Views: 0
  • interior_helm.JPG
    interior_helm.JPG
    125.1 KB · Views: 0
Top