1987 Astroglass 166V Bass Boat Restoration - with Youtube Videos!!!

DFord143

Seaman
Joined
Oct 26, 2016
Messages
61
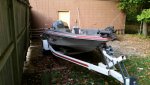
I picked up my latest winter project, a 1987 Astroglass166V to restore... should be an adventure!

Here's the link to the first video in the series:
https://youtu.be/1bKq0pomDXI

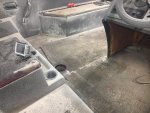
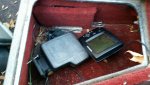
This thing overall is in pretty good shape with a good trailer under it. No motor included in the sale, but I have a motor on my pontoon I'm going to upgrade and them move the motor from the pontoon to the bass boat. here's some pictures:

00r0r_cmb6XTLLJHe_1200x900.jpg


00y0y_hUkYDOinMfH_1200x900.jpg


00303_6VsEP67nbhA_1200x900.jpg


File_001.jpeg


00j0j_66dCRzW7eXY_1200x900.jpg


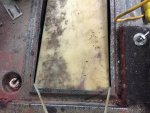
Obviously a lot of work to do here and a ways to go but it should be fun. The floor has a soft spot and the carpet is disgusting and nasty. The goal is to get it ready to go fishing next season!

I'll be updating this thread with pictures as I have them but I'll also be making videos as well, something new for me on a restoration.

Stick around... should be fun!

https://youtu.be/1bKq0pomDXI

-Dave
 

Attachments

  • 00r0r_cmb6XTLLJHe_1200x900.jpg
    00r0r_cmb6XTLLJHe_1200x900.jpg
    124.6 KB · Views: 2
  • 00r0r_cmb6XTLLJHe_1200x900.jpg
    00r0r_cmb6XTLLJHe_1200x900.jpg
    124.6 KB · Views: 2
  • 00r0r_cmb6XTLLJHe_1200x900.jpg
    00r0r_cmb6XTLLJHe_1200x900.jpg
    124.6 KB · Views: 1
  • 00r0r_cmb6XTLLJHe_1200x900.jpg
    00r0r_cmb6XTLLJHe_1200x900.jpg
    124.6 KB · Views: 1
  • File_005.jpeg
    File_005.jpeg
    170.1 KB · Views: 1
Last edited by a moderator:

Woodonglass

Supreme Mariner
Joined
Dec 29, 2009
Messages
25,924
Welcome to iBoats!!!
Bass Boat restorations can be challenging.
Make sure and core sample the transom. If the floor has soft spots you'll probably be in for a total resotration.
 

DFord143

Seaman
Joined
Oct 26, 2016
Messages
61
Welcome to iBoats!!!
Bass Boat restorations can be challenging.
Make sure and core sample the transom. If the floor has soft spots you'll probably be in for a total resotration.


Transom seems solid from the outside but we both know that means nothing until I get in there and see what's REALLY going on...
 

gm280

Supreme Mariner
Joined
Jun 26, 2011
Messages
14,592
I too welcome you aboard. And I have to say, any time a boat has a soft floor, there is a lot more going on under the floor that is rotted as well. And with the floor rotted and more then likely the stringers as well, you can bet the transom is as well. Now I didn't say that to be a nay sayer, but to let you know you have a lot to refurbish. But you also have come to the best place for the help and assistance for such a refurbishing effort. Tons of folks have come here for the exact same things. A soft floor was their only symptoms as well.

I do like the lines and layout. And with your labor and our knowledge, you will end up with a nice bass type boat when it is all said and done. I look forward to your project.

:welcome: to iboats...
 

DFord143

Seaman
Joined
Oct 26, 2016
Messages
61
I too welcome you aboard. And I have to say, any time a boat has a soft floor, there is a lot more going on under the floor that is rotted as well. And with the floor rotted and more then likely the stringers as well, you can bet the transom is as well. Now I didn't say that to be a nay sayer, but to let you know you have a lot to refurbish. But you also have come to the best place for the help and assistance for such a refurbishing effort. Tons of folks have come here for the exact same things. A soft floor was their only symptoms as well.

I do like the lines and layout. And with your labor and our knowledge, you will end up with a nice bass type boat when it is all said and done. I look forward to your project.

:welcome: to iboats...


I'm definitely not afraid of some work as it seems all I ever buy is projects anymore. This isn't the first boat I've rebuilt either, most recently a pontoon so this is a completely different direction. This should be a fun one and the added bonus of sharing the experience with iboats.com and Youtube should make it even better.
 

gm280

Supreme Mariner
Joined
Jun 26, 2011
Messages
14,592
I'm definitely not afraid of some work as it seems all I ever buy is projects anymore. This isn't the first boat I've rebuilt either, most recently a pontoon so this is a completely different direction. This should be a fun one and the added bonus of sharing the experience with iboats.com and Youtube should make it even better.

With that type attitude, I think you will turn out a very nice Bass boat. Post on sir...
 

DFord143

Seaman
Joined
Oct 26, 2016
Messages
61
Hey all, new video is posted! Check it out...

https://www.youtube.com/watch?v=rmrNXwmE8Bk

So as I originally suspected and I'm sure several others were thinking, the cap needs to come off the boat. Does anyone have any tips or tricks for doing so? This thing is going to fight me. I've got the rub rail removed (upcoming video) to begin work splitting the hull, but it is feeling like it is pretty well stuck all the way around. I can lift up in several places on the top cap but it feels like it is stuck in the center. Perhaps the underside of the storage compartments/livewells/etc. are glassed or glued to the plywood flooring???
 

ondarvr

Supreme Mariner
Joined
Apr 6, 2005
Messages
11,527
Bass boats can be a little trickier, the one piece topside/liner design is frequently bonded in a few places when assembled.
 

DFord143

Seaman
Joined
Oct 26, 2016
Messages
61
Bass boats can be a little trickier, the one piece topside/liner design is frequently bonded in a few places when assembled.


I highly suspected it. The issue is that it looks as though the majority of the places that it's bonded are the few good places left on the boat where the wood hasn't completely turned to wet toothpicks.
 

DFord143

Seaman
Joined
Oct 26, 2016
Messages
61
So after deciding to part the red hull I got to work. Took a couple reference photos before removing the rub rail rope, the rail removing dozens and dozens of screws and then removing the screws holding the hull and cap together.

File_001(1).jpeg

File_000(1).jpeg


File_002(1).jpeg


Don't know what exactly I'll do with the rub rail come assembly time, but just in case...

File_003(1).jpeg


Here's the floor in the lower deck section as I began cutting and separating.

File_001(2).jpeg

File_002(2).jpeg

And the fun begins...

File_008.jpeg

File_009.jpeg

File_004(1).jpeg

File_003(2).jpeg


And a giant garbage can full of foam, fiberglass and toothpicks.

File_007.jpeg


So I'm working towards separating the two halves and having a lot of problems. As my earlier posts and others suggest it seems to be bonded at several points through the boat under storage compartments and such. What appears to be a major hurdle looks like the transom area. Looks like there might be some solid bonding there. Anyone got any ideas on what to cut and where?

This picture is facing aft from the port side looking towards the starboard aft corner.

File_003.jpeg


Same setup, just less zoomed.

File_004.jpeg


More of the center under the splash well.

File_000.jpeg


And a more close up picture of the splash well area.

File_001.jpeg


Thoughts anyone??
 

DFord143

Seaman
Joined
Oct 26, 2016
Messages
61
No Title

I had a thought that I wanted to run past you folks. Removing the two seats in the lower deck was quite simple since they weren't even screwed down. Underneath them however is nothing... just painted fiberglass. I can't really feel anything under them or see anything since the wood floor is in the way. Would it make sense to cut a couple decent but not obnoxious holes there to gain access to the flooring underneath that section to work on separating the floor from cap? During the build then I would simply make them storage compartments of sorts.

photo256467.jpeg
 

Attachments

  • image_256467.jpeg
    image_256467.jpeg
    238.1 KB · Views: 1
Joined
Jun 7, 2016
Messages
19
Found your thread... 😂
My 1989 152 is very similar to yours, rotted floor and all..!
My seats was mounted on two homemade wooden pedestals, in turn made two nice cubby holes under each seat. Only problem was the force of the persons weight being forced back by the motor during acceleration kept ripping the screws from the floor. When I do mine I'll be mounting the seats back factory... plus being set up on pedestals it puts your knees right in the steering wheel.
As for rub rail instead of rope I'm going to try to use led rope lights / or put the rope back and run leds right under the rub rail for night fishing...
your doing a great job, I'm going now to find your YouTube videos... I wish I had your motivation, but at least as mine sets it's fishable... lol maybe next time something big goes bad I'll just rip into the whole thing... besides its crappie season at the moment...😂😂😂
 

DFord143

Seaman
Joined
Oct 26, 2016
Messages
61
Mounting those lower deck seats really seems like a terrible idea but I'm sure the previous owner of your boat had a reason for it. My seats (aftermarket) weren't mounted and I can't find any evidence of seats mounted there ever. I plan on running LED's up front in my rub rail for my navi lights, but I'll do the rest of the rail insert with either a rope or a rubber insert.

As much as I want to go fishing with it, I knew that even if I put a motor on the back it wouldn't be safe. Here in Iowa we've got snow on the ground with a high temperature tomorrow in the single digits... before the wind chill.
 
Joined
Jun 7, 2016
Messages
19
Yeah it was a terrible idea but the old guy was a troll fisherman and I'm assuming it was easier for him to get up and down, idk...
 

DFord143

Seaman
Joined
Oct 26, 2016
Messages
61
No Title

Been out of town and had temps below zero here so I haven't been able to make any progress on the boat. I was able to sneak in a few minutes in the garage today. I got the gas tank free and attempted to remove it however the tank wasn't having it. It looks as though it's just a fraction too small to be removed from the bilge.

File_000.jpeg

File_001.jpeg

Maybe I'll give it another try with some smaller line, like fishing wire or something, but as I was pulling it up it looked as though the corners were hitting the radius corners of the opening.
 

Attachments

  • photo256843.jpeg
    photo256843.jpeg
    193 KB · Views: 0
  • photo256844.jpeg
    photo256844.jpeg
    225.1 KB · Views: 0

DFord143

Seaman
Joined
Oct 26, 2016
Messages
61
Had a bit of time so I decided to spend a few minutes on the boat. Started in on the transom hoping to get it freed up a bit. The chainsaw made quick work of it! :D
File_001.jpeg
File_000.jpeg


This is the port side stringer nearest the keel of the boat. Missing a good sized piece of material there...
File_002.jpeg


The section cut out is where the captain would sit.
File_003.jpeg

After cutting out the top fiberglass there was wet wood underneath it. I suspect thats how most of the wood will end up being on this boat through the cap. Is that going to be an issue???

For the overall cap removal, am I better off to cut the cap into to pieces where the opening is for the bilge area? So making everything from that section forward one piece and the smaller section around the transom a different one then glassing them back together later?
 
Last edited:

Woodonglass

Supreme Mariner
Joined
Dec 29, 2009
Messages
25,924
You can do it that way but...If you take the rubber insert out of the rubrail you can drill out the rivets and more than likely remove the entire top cap in one piece.
 

DFord143

Seaman
Joined
Oct 26, 2016
Messages
61
You can do it that way but...If you take the rubber insert out of the rubrail you can drill out the rivets and more than likely remove the entire top cap in one piece.


I've already taken the entire rub rail off along with the roughly million stainless steel screws both through the rubber and the few just securing the cap to the hull.
 

gm280

Supreme Mariner
Joined
Jun 26, 2011
Messages
14,592
I've already taken the entire rub rail off along with the roughly million stainless steel screws both through the rubber and the few just securing the cap to the hull.

DF, some times the cap is secured to the hull with polyester in some places. So you may have to use a sawsall type tool to separate the two parts. But it depends on how your boat was assembled initially. Others had to do such things to separate their boats sections. So go slowly and carefully and cut the attachment areas free. JMHO
 

rcwannab

Seaman Apprentice
Joined
Apr 3, 2016
Messages
40
Looks like a very solid project with great potential. Keep posting. I've been researching both here and bass boat central restoration forum for information in the hopes I can utilize it to rehab a 1979 skeeter project.
 
Top